background image


PR-3 POWER RACK


STEP 3 


1.  Plug the Dip Frame (#6) into the 

Vertical Tube, locked with Pin (#10). 

2.  Plug the 4xPlate Rest (#7) into the 

Vertical Frame. 


Summary of Contents for PR-3

Page 1: ... POWER RACK Product may vary slightly from the item pictured due to model upgrades Read all instructions carefully before using this product Retain this owner s manual for future PR 3 HALF RACK OWNER S MANUAL ...

Page 2: ...2 PR 3 POWER RACK reference TABLE OF CONTENTS 1 IMPORTANT SAFETY INSTRUCTIONS 3 2 PARTS LIST 4 3 ASSEMBLY INSTRUCTIONS 5 4 WARRANTY 9 ...

Page 3: ...a time should use the machine If the user experiences dizziness nausea chest pain or any other abnormal symptoms STOP the workout at once CONSULT A PHYSICIAN IMMEDIATELY Do not use the machine near water or outdoors Keep hands away from all moving parts Always wear appropriate workout clothing when exercising DO NOT wear robes or other clothing that could become caught in the machine Running or ae...

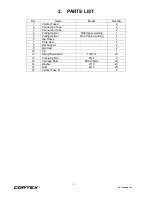
Page 4: ... Connection Tube 2 4 Pulling Up Bar Φ32 Upper welding 1 5 Pulling Up Bar Φ32 Center welding 1 6 Dip Frame 1 7 Plate Rest 4 8 Bar Support 2 9 Bar Rest 2 10 Pin 1 11 Strengthen Board 110mm 16 12 Pulling Up Bar Φ42 2 13 Carriage Bolts M10x70mm 20 14 Washer Φ10 20 15 Nuts M10 20 16 Vertical Tube B 2 ...

Page 5: ...RUCTIONS STEP 1 1 Attach the Vertical Tube A 1 and Vertical Tube B 16 to the Connection Tube 2 and 3 Secure it with 8 Carriage Bolts M10x70mm 13 8 Washers Φ10 14 8 Nuts M10 15 4 Strengthen Board 11 2 Install the other side the same way ...

Page 6: ... the chart Attach the two sides with Pulling Up BarΦ32 Upper welding 4 Pulling Up BarΦ32 Center welding and 5 and Pulling Up Bar Φ42 12 Secure it with 12 Carriage Bolts M10x70mm 13 12 Washers Φ10 14 12 Nuts M10 15 6 Strengthen Board 11 ...

Page 7: ...7 PR 3 POWER RACK STEP 3 1 Plug the Dip Frame 6 into the Vertical Tube locked with Pin 10 2 Plug the 4xPlate Rest 7 into the Vertical Frame ...

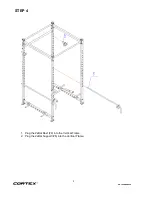
Page 8: ...8 PR 3 POWER RACK STEP 4 1 Plug the 2xBar Rest 9 into the Vertical Frame 2 Plug the 2xBar Support 8 into the Vertical Frame ...

Page 9: ...ds fail to be of acceptable quality and the failure does not amount to a major failure Full details of your consumer rights may be found at www consumerlaw gov au Please visit our website to view our full warranty terms and conditions http www lifespanfitness com au warranty repairs Warranty and Support Please email us at support lifespanfitness com au for all warranty or support issues For all wa...

Reviews: