


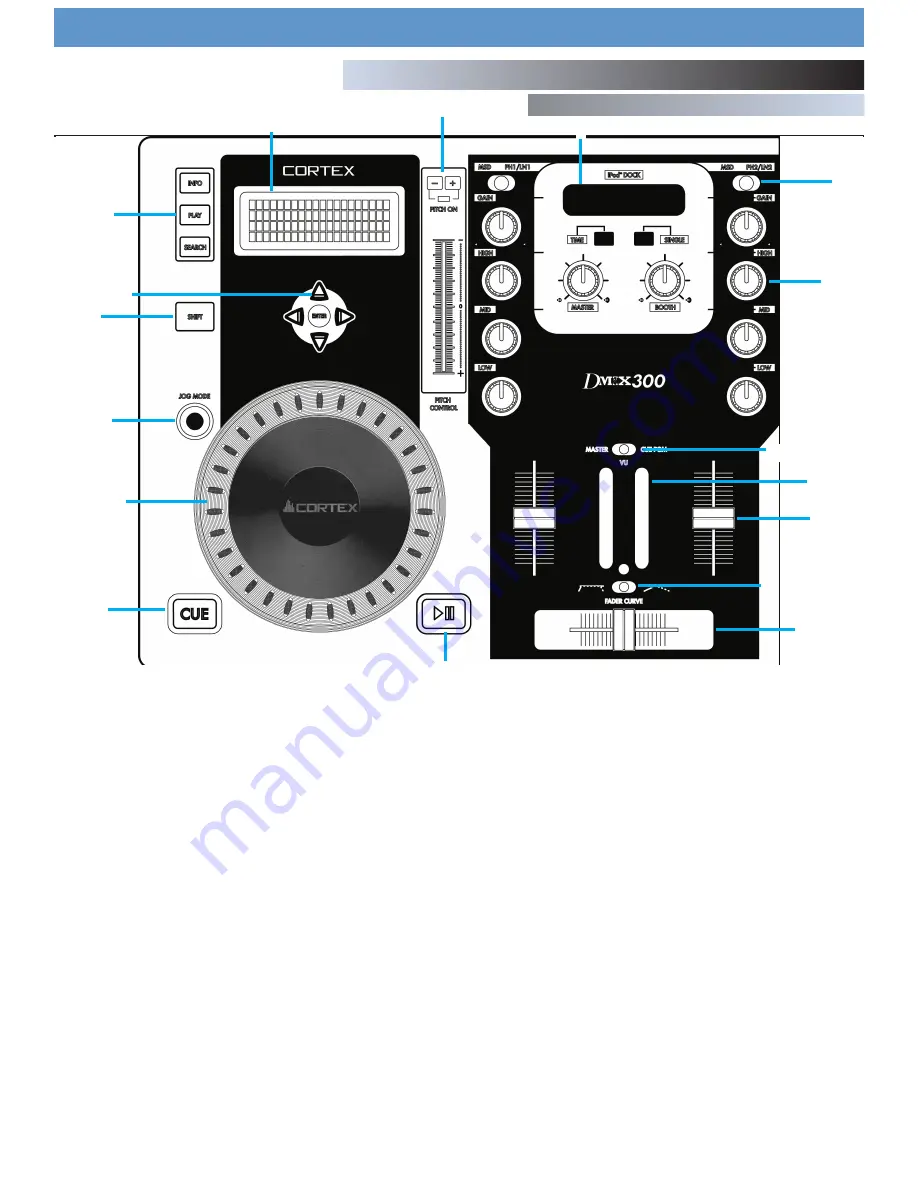
Parts Diagram and Functions
Top Panel-Player Section
1.
LCD DISPLAY panel
This blue-backlit display is a 20 Character LCD that displays informa-
tion such as track/waveform, folders, parameter adjustments and
search information. Contrast is available in the Edit menu.
2. JOG WHEEL
The JOG WHEEL controls many aspects of the unit, and can be used for
navigating through menus, searching through music and manipulation of
pitch. The behavior of the JOG WHEEL is dependent on the mode of
operation, as well as the status of the PITCH ON/OFF indicator and
JOG MODE. When Scratch Mode is enabled by pressing and holding
the Jog Mode button, you can use the Jog Wheel to manipulate the
audio just like a Vinyl Turntable!
3. NAVIGATOR keypad
These buttons allow the user to navigate through menus and features of
the Dmix-300. Depending on the mode of the unit, the buttons may
serve different purposes.
4. JOG MODE button/indicator
Each time this button is pressed, this button controls alternately whether
the JOG WHEEL will function as PITCH BEND or FF/REW. When the
LED indicator is lit, it indicates that the JOG WHEEL will function as
FF/REW. To enable Scratch Mode, press and hold the Jog Mode but-
ton for one second. You will see the Jog mode button blinking.
5.
Ipod Dock
This can be used to dock any Ipod (Gen 3 and above) to the unit. As
well, when used together with the USB type B connector on the rear of
the unit the Ipod can be connected to a PC through the Dmix 300 for
file transfers.
6.
Pitch Fader, PITCH ON/OFF indicator and PITCH BEND buttons
This slide, when pushed towards the bottom of the unit (+), increases the
tempo of playback. When the slide is pushed towards the top of the
unit (-), the tempo of playback is decreased. The Pitch Bend buttons can
be used to make temporary increases and decreases in pitch for
matching tempo, and when both buttons are pressed together the pitch
is turned on and off (as indicated by the Pitch On/Off indicator LED).
7.
CUE button/indicator
When the LED indicator which illuminates this button is lit, it indicates
that there is a CUE POINT memorized.
8.
PLAY/PAUSE button/indicator
When the LED indicator which illuminates this button is lit solidly, it indi-
cates that the unit is in PLAY mode. When the LED indicator is flashing,
it indicates that the unit is in PAUSE mode.
9.
Info/Play/Search Buttons
Use the INFO button to view the information of a playing file. Use the
SEARCH button to enter the search menu. Use the PLAY button to re-
enter the Play screen.
10.
Time and Single buttons
Press the TIME button to toggle between Time Remaining and Time
Elapsed on the Play screen when playing an audio file. Use the Single
button to toggle between Single and Continuous play modes.
11.
SHIFT button
Holding down the SHIFT button extends the use of certain buttons on the
unit, by providing alternate functions.
8
1
2
3
4
5
6
7
8
9
10
20
12
13
14
15
16
17
18
19
11
Dmix 300 Manual


