Corsair Obsidian 250d Installation Manual Download Page 11

3

1

2

4

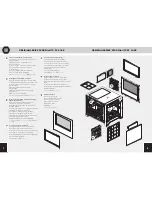
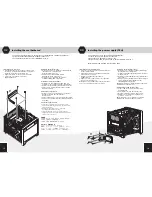
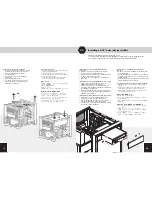
Installing a 5.25" drive/devices (ODD)

05

20

>

  Remove the front panel 5.25" drive bay cover.

>

  Insert the ODD into the drive bay until the tool-free latch clicks, securing the drive.

>

  To remove, push the tool-free tab to release the ODD drive and remove.

Installation d'un lecteur/périphérique optique  

5,25 pouces

Retirez le couvercle du logement de l'unité de  

  lecture 5,25 pouces du panneau avant.

Insérez le lecteur optique dans le logement jusqu'à  

  ce que le loquet soit enclenché. 

Pour retirer le lecteur, appuyez sur la languette,   

  sans outil.

Installation eines 5,25-Zoll-Laufwerks/Gerätes (ODD)

Nehmen Sie die Abdeckung des 5,25-Zoll- 

  Laufwerkfachs auf der Frontplatte ab.

Schieben Sie das ODD in das Laufwerkfach,  bis  

  die Zunge einrastet und das Laufwerk in  Platz hält  

  (werkzeuglose Installation). 

Um das ODD-Laufwerk zu entfernen, drücken  Sie  

  die Zunge herunter, um das Laufwerk  freizugeben,  

  und ziehen Sie es heraus.


Installazione di dispositivi/unità da 5,25 pollici (ODD)

Rimuovere il coperchio dell'alloggiamento per  

  unità da 5,25 pollici nel pannello anteriore.

Inserire l'unità ODD nel vano fino a far scattare i  

  fermi di fissaggio dell'unità senza attrezzi. 

Per rimuovere, premere la linguetta di rilascio senza  

  attrezzi ed estrarre l'unità ODD.

Instalación de una unidad/dispositivos (ODD) 

de 5,25"

Retire la cubierta de la bahía de la unidad de 5,25"  

  del panel frontal.

Inserte la unidad ODD en la bahía correspondiente  

  hasta que el pestillo haga clic, lo que indica que la  

  unidad está fija. 

Para extraerla, presione la pestaña sin tornillos para  

  liberar la unidad ODD y extraerla.


Установка 5,25" диска или устройств (оптические диски)

Снимите крышку отсека для 5,25" диска  на передней  

 панели.

Вставьте оптический диск в отсек для диска, чтобы он  

  зафиксировался защелками, отвертка не требуется. 

Для извлечения нажмите на язычок, чтобы освободить  

  оптический диск, и извлеките его. 

安装 5.25" 驱动器/设备 (ODD)

拆下前面板 5.25" 驱动器槽盖。

将 ODD 插入驱动器槽, 直至免工具卡锁发出“咔嗒”声,  

  表示驱动器已固定。 

要拆下驱动器, 则推动免工具舌片以释放 ODD 驱动器然后 

  将其拆除。

5.25インチドライブ (光学ドライブ) を取り付ける

フロントパネルの5.25インチドライブベイカバーを取 

  り外します。

光学ドライブをドライブベイに差し込み、ツールフリ 

  ー機構のレバーがカチッと音がしてドライブが固定さ 
  れるまで押し込みます。 

取り外す場合は、ツールフリー機構のレバーを押して 

  光学ドライブの固定を解除し、取り外します。

19

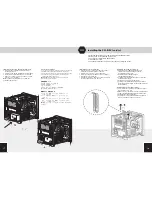
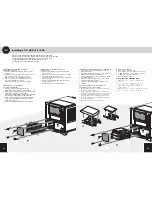
Instalación de las tarjetas PCI-E/PCI

>

  Deslice hacia arriba la cubierta del soporte  

  de las PCI-E/PCI retirando los tornillos. 

>

  Retire las cubiertas de las ranuras  


 correspondientes.

>

  Desatornille el soporte de la bahía de  

  disco óptico. 

>

  Instale la tarjeta PCI-E/PCI. 

>

  Coloque la cubierta del soporte de los  

  puertos PCI-E/PCI y asegure la tarjeta  

  PCI-E/PCI con tornillos.

Установка плат PCI-E/PCI

>


Сдвиньте крышку держателя плат PCI-E/PCI вверх,  

  отвернув барашковые винты. 

>


Удалите заглушки соответствующих разъемов.

>


Отверните держатель отсека оптического привода. 

>


Установите плату PCI-E/PCI. 

>


Установите крышку держателя плат PCI-E/PCI на  

  место и закрепите плату PCI-E/PCI винтами.

安装 PCI-E/PCI 卡

>


通过拧下指旋螺钉,使 PCI-E/PCI 托架盖向上滑动。 

>


拆下对应的插槽盖。

>


拧下光驱槽托架的螺钉。 

>


安装 PCI-E/PCI 卡。 

>


通过螺钉使 PCI-E/PCI 托架盖复位并固定 PCI-E/PCI 卡。

PCI Express/PCIカードを取り付ける 

>


ハンドスクリューを取り外して、PCI Express/ 

  PCIブラケットカバーを上にスライドさせます。 

>


スロットカバーを取り外します。

>


光学ドライブベイのブラケットのネジを外します。 

>


PCI Express/PCIカードを取り付けます。 

>


PCI Express/PCIブラケットのカバーを据え、PCI  

  Express/PCIカードをネジで固定します。

Summary of Contents for Obsidian 250d

Page 1: ...RIES 250D Mini ITX PC CASE 46221 Landing Parkway Fremont California 94538 USA corsair com 2013 Corsair Components Inc All rights reserved Corsair the sails logo and Obsidian Series are registered trademarks of Corsair in the United States and or other countries All other trademarks are the property of their respective owners Product may vary slightly from those pictured PN 49 001214 rev AA 250D ...

Page 2: ...a Mini ITX system without compromising expansion flexibility or performance the Obsidian Series 250D is your answer Though it s small on the outside the 250D has room for standard components like a full size 5 25 optical drive a full length GPU a 240mm radiator and even a full size ATX power supply The sleek aluminum front fascia provides the striking yet subtle design that Obsidian Series cases a...

Page 3: ...dente aunque sutil por el que son conocidos los chasis de la serie Obsidian y su ventana superior le proporciona un primer plano de sus componentes de elevado rendimiento El chasis 250D es una excelente opción si desea un rendimiento completo en un pequeño espacio Если хотите создать систему Mini ITX без дальнейших проблем с расширением гибкостью или производительностью корпус Obsidian Series 250D...

Page 4: ...uftventilator auf der Rückseite und einem AF140L Ansauglüfter auf der Vorderseite Installationsanleitung Zubehörkit Obsidian Series 250D Mini ITX OC 机箱 带一 个 AF120L 背部排气扇和 一个 AF140L 前部进气扇 安装指南 附件套件 Case Obsidian Series 250D Mini ITX OC con una ventola di scarico posteriore AF120L e una ventola di aspirazione anteriore AF140L Guida all installazione Kit di accessori Obsidian シリーズ 250D ミニ ITX OC ケース ...

Page 5: ...t fan screws Vis de ventilateur courtes Kurze Lüfterschrauben Viti corte per ventola Tornillos para ventilador cortos Винты для твердотельных накопителей или оптических дисков 风扇短螺丝 冷却ファン用ネジ 短 SSD ODD screws Vis SSD Lecteur optique SSD ODD Schrauben Viti per unità SSD ODD Tornillos para montar la unidad SSD ODD Винты для материнской платы или жестких дисков SSD ODD 螺丝 SSD 光学ドライブ用ネジ Cable ties Atta...

Page 6: ...s de 120mm compatibles con un radiador de 120 240mm Стойки для двойного вентилятора 120мм на боковой панели совместимые с радиаторами 120 240мм 侧面双120mm风扇托架 与120 240mm散热器兼容 サイドデュアル 120mm ファンマウント 120 240mmラジ エータ互換 x1 Corsair AF120L rear exhaust fan 1 ventilateur d évacuation arrière Corsair AF120L 1 rückseitiger Corsair AF120L Abluftventilator 1 ventola di scarico posteriore da 120mm Corsair AF120L...

Page 7: ...tale e inferiore rimovibili Filtros antipolvo de baja restricción extraíbles inferior y frontal Съемные пылевые фильтры с низким ограничением скорости потока воздуха передний и нижний 可移除式前部和底部低限制滤尘器 フルサイズ ATX GPU互換性 Dual 3 5 and 2 5 tool free drive bays Double baie pour lecteurs 3 5 et 2 5 pouces à montage sans outil Zwei 3 5 Zoll und 2 5 Zoll Laufwerksschächte Alloggiamenti doppi senza viti per ...

Page 8: ...re le sei viti dal pannello superiore e da quelli laterali Per rimuovere il pannello superiore tirare il pannello indietro e sollevarlo Per rimuovere il pannello laterale farlo scivolare indietro Nota Corsair consiglia di rimuovere e mettere da parte tutti i pannelli per evitare danni accidentali durante l assemblaggio del sistema 拆下顶部开窗面板和两个侧面板 从顶部面板和侧面板拆下六颗指旋螺钉 要拆下顶部面板 向后拉面板并提起 要拆下侧面板 向后滑动侧面板 注 ...

Page 9: ... your motherboard s I O shield see your motherboard s manual for guidance Align the motherboard with the standoffs in the case Secure with the included screws MBD HDD screws Installation de la carte mère Installez la plaque de protection des E S de votre carte mère pour plus d informations consultez le manuel d instructions de la carte mère Alignez la carte mère sur les picots du boîtier Fixez la ...

Page 10: ... scivolare la copertura della staffa PCI E PCI fino a rimuovere le viti Rimuovere le coperture degli slot corrispondenti Svitare la staffa dell alloggiamento unita ottica Installare la scheda PCI E PCI Posizionare la copertura dell staffa PCI E PCI e fissare la scheda PCI E PCI con le viti 17 Instalación de la fuente de alimentación PSU Desatornille y extraiga la placa trasera de montaje de la PSU...

Page 11: ...que la unidad está fija Para extraerla presione la pestaña sin tornillos para liberar la unidad ODD y extraerla Установка 5 25 диска или устройств оптические диски Снимите крышку отсека для 5 25 диска на передней панели Вставьте оптический диск в отсек для диска чтобы он зафиксировался защелками отвертка не требуется Для извлечения нажмите на язычок чтобы освободить оптический диск и извлеките его...

Page 12: ...l vassoio HDD 3 5 pollici o 2 5 pollici senza attrezzi dal vano per dischi Inserire l unità HDD nel vassoio HDD o l unità SSD nel vassoio SSD Allineare i fori dell unità HDD SSD ai perni del vassoio per fissare Reinserire il vassoio dell unità nel vano Instalación de una unidad HDD de 3 5 o SSD de 2 5 Retire la placa trasera de HDD SSD de la parte trasera del chasis Retire la bandeja de HDD de 3 5...

Page 13: ...olido premendo gli angoli superiori del coperchio in alluminio Il pannello frontale solido fuoriesce consentendo di accedere al filtro antipolvere frontale Rimuovere il filtro antipolvere anteriore premendo la linguetta con la freccia posizionata nella parte centrale superiore Per rimuovere il filtro antipolvere inferiore individuare la linguetta di rilascio sotto il PSU ed estrarre il filtro Extr...

Page 14: ...водстве по материнской плате 安装前部 I O 连接器 请参阅母板手册确定前面板端板和引脚的位置 フロントI Oコネクタを接続する フロントパネルの接続端子の配置やピン配列につ い てはマザーボードのマニュアルを参照してください Attach case fan cables to motherboard headers 08 25 See your motherboard s manual for fan header locations Branchement des câbles du ventilateur sur les fiches de la carte mère Consultez le manuel d instructions de la carte mère pour plus d informations sur l emplacement...

Reviews: