Corsair AX1500i Manual Download Page 5

5

6

AXi SERIES

AXi SERIES

WARNING:

 The detachable four-pin from the 24-pin main connector is not a “P4” 

or “+12V” connector. Serious damage can be caused if you use it in place of a “P4” 

or “+12V” connector.

Using the self test feature

In order to use the self-test feature, please follow the steps below.

1.  Connect the PSU to an AC power source, and flip the power indicator on the


back of the PSU to the On position (I).

2.  Press the self-test button on the modular connector side of the PSU. 
3.  If the button lights up green and the fan spins for a moment, you’re good to go!
4.  If the button lights up red or does not light up at all, please contact Corsair


customer service for further technical support.

Installing your NEW AX1500i

Step A: Removing your existing power supply 

If you are building a new system, skip to Step B.
1.  Disconnect the AC power cord from your wall outlet or UPS and from the existing


power supply.

2.  Disconnect all the power cables from your video card, motherboard and all other

 peripherals. 
3.  Follow the directions in your chassis manual and uninstall your existing power supply.
4.  Proceed to Step B.

Step B: Installing the Corsair AX1500i power supply 

1.   Make sure the power supply’s AC power cable is not connected.
2.  Follow the directions in your chassis manual and install the power supply with


the screws provided.

3.  The main 24-pin power cable has a detachable 4-pin mechanism in order to support


either a 24-pin or a 20-pin socket on the motherboard.


  A.  If your motherboard has a 24-pin socket, you may connect the 24-pin main


      power cable from the power supply directly to your motherboard.


  B.   If your motherboard has a 20-pin socket, you must detach the four-pin


      cable from the 24-pin connector, and then plug the 20-pin cable onto your


      motherboard without connecting the four-pin connector.

4.  Connect the eight-pin +12V (EPS12V) cable to the motherboard.
 

  A.  If your motherboard has an eight-pin +12V socket, connect the eight-pin


      cable directly to your motherboard.


  B.   If your motherboard has a four-pin socket, detach the four-pin from the


      eight-pin cable, and then plug this four-pin cable directly to your motherboard.

5.  Connect the peripheral cables, PCI-Express cables, and SATA cables.
 

  A.  Connect the peripherals cables to your hard drive and CD-ROM/DVD-ROM 


      power sockets.


  B.   Connect the SATA cables to your SATA SSD or hard drive’s power sockets.


  C.   Connect the PCI-Express cables to the power sockets of your PCI-Express


      video cards if required.


  D.   Connect the peripheral cables to any peripherals requiring a small 4-pin connector.


  E.   Make sure all the cables are tightly connected. Be sure to save any unused modular


      cables for future component additions.

6.  Connect the AC power cord to the power supply and turn it on by pushing the switch


to the ON position (marked with “I”).

Using Corsair Link

 with your new AX1500i

Before you are able to monitor your new PSU with Corsair Link

 you must 

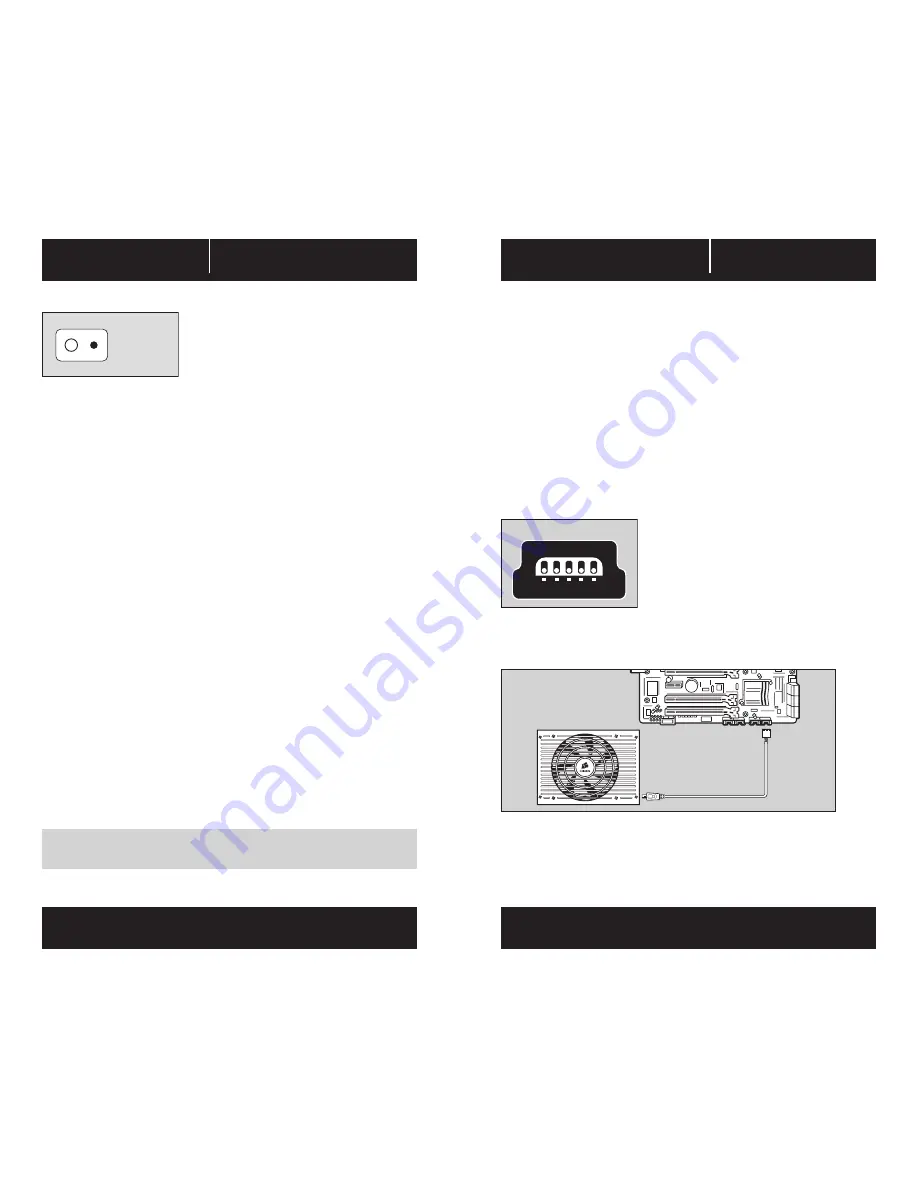
connect the power supply to an internal USB header using the included  

USB cable.

1.  Plug one end of the included USB cable into the USB PORT of the AX1500i,


seen here:

2.  Plug the other end of the USB cable into a standard USB header on your


motherboard. (Check your motherboard manual for locations and compatibility).

3.  Download the Corsair Link Dashboard software from 

www.corsair.com/linksw

 and  


follow the instructions.

SELF TEST 

USB COMM PORT

Summary of Contents for AX1500i

Page 1: ...tates and or other countries All other trademarks are the property of their respective owners Product may vary slightly from those pictured Document Number 49 001216 rev AA 46221 Landing Parkway Fremo...

Page 2: ...English 1 Fran ais 9 Deutsch 17 Italiano 25 Espa ol 33 41 Portugu s 49...

Page 3: ...ow DC output voltage ripple and noise The AX1500i features individual DC DC regulation for 3 3V 5V and 12V rails and secondary side synchronous rectification utilizing MOSFETs that have lower losses t...

Page 4: ...mm 10mm 1 PCI E cable 8PIN 6 2 2 800mm 10mm 1 PCI E cable 8PIN 6 2 2 800mm 10mm 2 PCI E cable 8PIN 6 2 3 800mm 10mm 4 SATA cable 4 SATA 2 850mm 10mm 4 SATA cable 4 SATA 3 750mm 10mm 4 Peripheral cable...

Page 5: ...supply directly to your motherboard B If your motherboard has a 20 pin socket you must detach the four pin cable from the 24 pin connector and then plug the 20 pin cable onto your motherboard without...

Page 6: ...9 The 24 pin main power connector has a detachable 4 pin connector This 4 pin connector is not a P4 or ATX 12V connector Do not force this cable in the P4 or ATX 12V socket on the motherboard 10 Failu...

Page 7: ...ails 3 3 5 4 et 12 V la terre ou sur un autre rail Il prot ge galement l unit ou les composants de votre PC de tout d g t en cas de court circuit F licitations pour l achat de votre nouveau bloc d ali...

Page 8: ...limentation INPUT 230Vac INPUT 115Vac 94 96 Charge du syst me 86 88 90 92 10 50 100 20 Efficacit Bruit du ventilateur db 40 Charge du syst me 0 10 20 30 0 50 75 100 25 Corsair AX1500i courbe sonore du...

Page 9: ...dessous 1 Branchez le bloc d alimentation une prise secteur et faites passer le bouton d alimentation au dos du bloc d alimentation en position On I 2 Appuyez sur le bouton d autotest c t connecteur...

Page 10: ...ect de celles ci peut endommager votre syst me ou votre bloc d alimentation et causer des blessures graves voire la mort 2 Le bloc d alimentation contient des tensions lev es N ouvrez pas le bo tier d...

Page 11: ...tur automatisch abgeschaltet wird Normalerweise ist ein solches Problem auf eine berlastung des Ger ts oder einen defekten L fter zur ckzuf hren Wir gratulieren zum Kauf Ihres neuen Corsair Netzteil A...

Page 12: ...92 10 50 100 20 Zertifizierung Ger uschentwicklung des l fters db 40 Systemlast 0 10 20 30 0 50 75 100 25 Kurzschlussschutz Short Circuit Protection SCP Ein Kurzschluss liegt bei einer Ausgangsimpeda...

Page 13: ...te rot oder gar nicht aufleuchten wenden sie sich bitte f r technische unterst tzung an den kundendienst von corsair Installieren des AX1500i Schritt A Entfernen des vorhandenen netzteils Wenn sie ein...

Page 14: ...itswarnungen vor Eine Nichtbeachtung kann Sch den am Netzteil oder Computer verursachen und zu schweren Verletzungen bzw Sogar zum Tod f hren 2 Im Innern des Netzteils ist eine hohe Spannung vorhanden...

Page 15: ...e ancora pi piacevole realizzare il PC perfetto L AX1500i introduce nuove e rivoluzionarie tecnologie vedere pi sotto per maggiori informazioni Caratteristiche del prodotto Potenza controllata digital...

Page 16: ...96 SISTEMA DI CARICO 86 88 90 92 10 50 100 20 EFFICIENZA RUMORE DELLA VENTOLA DB 40 SISTEMA DI CARICO 0 10 20 30 0 50 75 100 25 Corsair AX1500i grafico del rumore della ventola dell alimentatore INGR...

Page 17: ...ante di test automatico sul lato del connettore modulare della PSU 3 Se il pulsante si illumina di verde e la ventola si attiva per un istante il test superato 4 Se il pulsante si illumina di rosso o...

Page 18: ...si di sicurezza Eventuali inosservanze potrebbero provocare danni all alimentatore o al sistema ed essere causa di gravi lesioni o morte 2 All interno dell alimentatore presente un voltaggio elevato N...

Page 19: ...e dise o tradicional Bajo nivel de ruido y fluctuaci n el ctrica de la salida CC La fuente de alimentaci n AX1500i incluye una regulaci n individual CC CC para ra les de 3 3V 5V y 12V as como una rect...

Page 20: ...4 1 800mm 10mm 1 Cable EPS ATX12v 8 patillas 4 4 4 650mm 10mm 1 Cable PCI E 8 patillas 6 2 2 800mm 10mm 1 Cable PCI E 8 patillas 6 2 2 800mm 10mm 2 Cable PCI E 8 patillas 6 2 3 800mm 10mm 4 Cable SAT...

Page 21: ...de 4 patillas del conector de 24 patillas y a continuaci n conectar el cable de 20 patillas a la placa base sin utilizar el conector de 4 patillas 4 Conecte el cable 12V EPS12V de ocho patillas a la...

Page 22: ...taci n 9 El conector de alimentaci n principal de 24 patillas cuenta con un conector extra ble de 4 patillas Este conector de 4 patillas no es un conector P4 ni ATX 12V No fuerce este cable en el z ca...

Page 23: ...00i Corsair AX1500i AX1500i 80 PLUS Titanium AX1500i 140 Corsair Link Corsair Link AX1500i AX1500i ATX AX1500i 80 PLUS Titanium 94 AX1500i AX1500i 3 3 5 12 4 AX1500i OVP 12 5 3 3 ATX OVP 13 4 12 5 74...

Page 24: ...0mm 1 PCI E 8 6 2 2 800mm 10mm 1 PCI E 8 6 2 2 800mm 10mm 2 PCI E 8 6 2 3 800mm 10mm 4 SATA 4 SATA 2 850mm 10mm 4 SATA 4 SATA 3 750mm 10mm 4 4 2 101mm 5mm 1 4 1 800mm 10mm 1 PMBUS 4 1 800mm 50mm 1 USB...

Page 25: ...3 24 4 24 20 A 24 24 B 20 4 24 20 4 4 8 12 EPS12V A 8 12 8 B 4 4 8 4 5 PCI Express SATA A CD ROM DVD ROM B SATA SSD SATA C PCI Express PCI Express D 4 E 6 ON I Corsair Link AX1500i Corsair Link USB U...

Page 26: ...A2 2003 IEC61000 4 2 IEC61000 4 3 IEC61000 4 4 IEC61000 4 5 IEC61000 4 6 IEC61000 4 11 UL CUL UL 60950 1 CSA C22 2 NO 60950 1 C Tick RCM AS NZS CISPR 22 2009 AS NZS 4417 TUV EN 60950 1 CB IEC 60950 1...

Page 27: ...CD A AX1500i apresenta regulamenta o CD CD individual para trilhos de 3 3V 5V e 12V e retifica o s ncrona lateral secund ria utilizando MOSFETs que t m perdas mais baixas que os esquemas de retifica...

Page 28: ...4 4 4 650mm 10mm 1 Cabo PCI E de 8 pinos 6 2 2 800mm 10mm 1 Cabo PCI E de 8 pinos 6 2 2 800mm 10mm 2 Cabo PCI E de 8 pinos 6 2 3 800mm 10mm 4 Cabo SATA 4 SATA 2 850mm 10mm 4 Cabo SATA 4 SATA 3 750mm 1...

Page 29: ...a o diretamente sua placa m e B Se a sua placa m e tiver um soquete de 20 pinos voc dever remover o cabo de 4 pinos do conector de 24 pinos e depois ligar o cabo de 20 pinos sua placa m e sem conectar...

Page 30: ...ema e fonte de alimenta o 9 O conector de alimenta o principal de 24 pinos tem um conector remov vel de 4 pinos Este conector de 4 pinos n o um conector P4 ou ATX 12V N o force este cabo no soquete P4...

Reviews: