background image

Page  12

SRP-003-545 • Issue 4 • July 2004
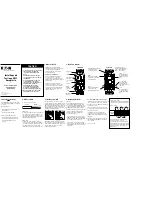
13.3

When central member strain-relief is

necessary, remove the drop cable strain-relief
bracket and secure the cable to the bracket
using a cable tie as shown (Figure 26).

a) Install the 8-32x

5

/

8

 screw from the front side

of the strain-relief bracket through the flat
washer and U-shaped washer. Loosely
install the hex nut.

b) From the front side of the strain-relief

bracket, wrap the strength member yarn in a
clockwise direction around the screw and
under the U-shaped washer (Figure 27).

c) Insert the central member of the cable

between the flat washer and the U-shaped
washer (Figure 27).

d) Tighten the hex nut.

e) If the central member is metallic, place the

eye of a ground wire (#6 AWG, purchased
separately in appropriate length from any
electrical supply store) under the U-shaped
washer or under the flat washer.

f) Trim off the excess yarn and central

member.

g) Reinstall the strain-relief bracket.

NOTE: 

The exposed length of the central member

(after strain-relief) is to be less than or equal to 6.5
cm (2 

1

/

2

 inches) between the U-shaped washer and

the end of the cable sheath.

Figure 26

Figure 27

Figure 28

13.4

Route cable around the guides as shown in

Figure 28 and plug in connectors. Refer to the
connector installation instructions in Section 10
and the fiber precautions in Section 3 to avoid
damaging the cable during installation.

Central Member

Strength-Member Yarn

U-Shaped Washer

Summary of Contents for EDC-06P-NH

Page 1: ...mounted and how the distribution cable and drop cable will be routed to the unit 2 Description 2 1 The EDC that stores and protects fiber optic connections and splices in an outdoor environment The ca...

Page 2: ...pieces of fiber stick to your clothing or drop in the work area where they can cause injury later Use tweezers to pick up cut or broken pieces of the glass fibers and place them on a loop of tape kept...

Page 3: ...igure 2 5 2 An installation kit is provided that includes cable ties central member strain relief hardware a sheath retention kit and a quick release latch kit 6 Unpacking Stubbed Units Follow the dir...

Page 4: ...Figure 4 Figure 5 b Drive 1 4 inch screws or wall anchors through the stabilizer bracket and into the mounting surface Do not install a screw in the bottom hole of the stabilizer bracket at this time...

Page 5: ...tside of the armor and sheath Tap the sheath above the ground clamp base to set the teeth Stop Base Plate Position the top plate and lock nut on the outer sheath over the base plate Tighten with a 10...

Page 6: ...ed washer f Arrange the buffer tubes to ensure clearance around the central member clamp assembly and hardware g Tighten the hex nut h Install the two flat washers i Loosely install the other hex nut...

Page 7: ...irect connectorization per manufacturer s instructions If installing BTF kits proceed to section 12 Figure 12 Figure 13 Figure 14 Splice Tray Holder Splice Tray Holder Bracket NOTE Pigtails are fiber...

Page 8: ...els into the connector support bracket Figure 16 10 6 Repeat for all required panels Figure 15 11 Splicing 11 1 The unterminated ends of pigtails are spliced to buffered fibers in a splice tray Figure...

Page 9: ...he cable tie too tightly 11 4 Splice fibers as described in instructions for the splicing method you are using 11 5 As you complete a splice label the connector end of the pigtail with its port identi...

Page 10: ...es and each successive loop should be in the section above the previous loop d At the third loop reinstall the splice tray holder and trays Figure 21 NOTE Cable ties can be loosely attached to organiz...

Page 11: ...o avoid damaging the connectors during installation 12 7 Label the connector end of the pigtail with its port identifier Record information appropriately on the record label inside the front door Figu...

Page 12: ...r Figure 27 d Tighten the hex nut e If the central member is metallic place the eye of a ground wire 6 AWG purchased separately in appropriate length from any electrical supply store under the U shape...

Page 13: ...fications The unit weighs 6 9 kg 15 2 lb 21 cm 8 3 in 37 cm 14 5 in 42 cm 16 5 in Corning Cable Systems reserves the right to improve enhance and modify the features and specifications of Corning Cabl...

Reviews: