CorLiving BMG-370-B Manual Download Page 2

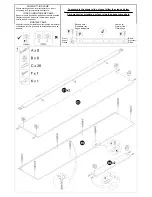
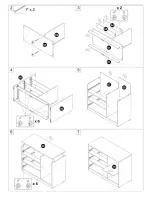
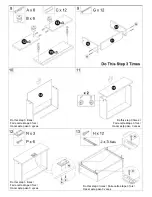
Thank you for purchasing this product. Before starting assembly we suggest you spend a short time reading through this assembly instruction manual, 
then follow the simple step by step guide. 

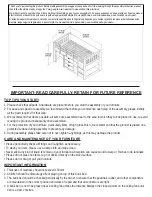
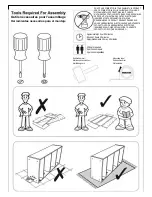
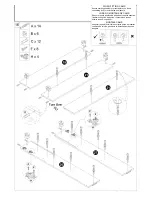
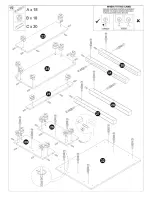
Two people are needed to assemble this product.

Merci d'avoir acheté ce produit. Avant de commencer l'assemblage, que nous vous suggérons de que vous passez un peu de temps en lisant ce manuel 
d'instructions de l'Assemblée, puis suivre le guide étape-par-étape simple. 

Deux personnes sont nécessaires pour monter ce produit.

Gracias por adquirir este producto. Antes de comenzar la Asamblea que le sugerimos que pasas poco tiempo leyendo este manual de instrucciones de 
montaje, luego seguir a la guía paso a paso simple. 

Se necesitan dos personas para montar este producto.

IMPORTANT- READ CAREFULLY- RETAIN FOR FUTURE REFERENCE

TOP TIPS YOU START!

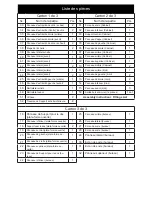
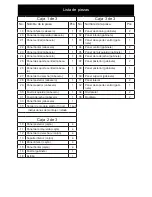
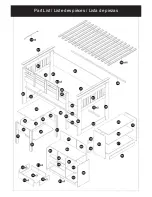
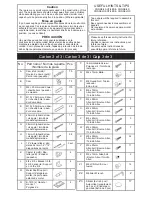
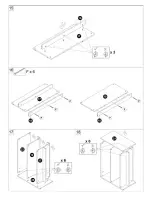
1. Please check that all parts & hardware are present before you start the assembly of your furniture.
2. For ease and speed of assembly, we recommend that before you commence each step of the assembly, please identify
    all the parts required for that step.
3. We recommend that where possible, all items are assembled near to the area in which they will be placed in use, to avoid             
    moving the product unnecessarily once assembled.
4. For the protection of your furniture, particularly items of high gloss fi nish  ,  we  recommend  that  the  product  is  placed  on  a                   
    protected surface during assembly to prevent any damage.
6. During assembly please take care not to over-tighten any fi ttings, as this may damage the product.

CARE AND MAINTENANCE OF YOUR FURNITURE

• Please periodically check all fi ttings and re-tighten as necessary.
• To clean your item, please use a damp cloth and wipe clean.
• Never allow any kind of liquid to remain on your furniture. Absorption can cause wood to warp or fi nishes to de-laminate.
• Please do not place hot items (e.g hot drinks) directly on the wood surface.
• Please do not drag or pull your furniture.

IMPORTANT INFORMATION

1. Thickness of mattress should not exceed 150mm.
2. Children should be discouraged from playing on top of this bunk bed.
3. The bunk bed should be checked periodically by the owner to ensure that the guardrail, ladder, and other components
    are maintained in the correct position and state of repair and that all connectors are tight.
4. A bunk bed is not to be placed near a ceiling fan unless the distance between the closest points on the ceiling fan bunk
    bed is at lest 2 metres.

Summary of Contents for BMG-370-B

Page 1: ...a tienda Ll menos primero Despu s de horas deje un mensaje o correo electr nico parts corliving com y casa en nuetro equipo de atanci n sl cliente que responder el d a siguiente de su Piezas de repues...

Page 2: ...ll items are assembled near to the area in which they will be placed in use to avoid moving the product unnecessarily once assembled 4 For the protection of your furniture particularly items of high g...

Page 3: ...es enfants devraient tre d courag es de jouer sur le dessus de ce lit superpos 3 le lit superpos doit tre v rifi p riodiquement par le propri taire pour s assurer que la glissi re de s curit l chelle...

Page 4: ...ci n o acabados de laminado de madera Por favor no coloque objetos calientes e g bebidas calientes directamente sobre la superficie de madera Por favor no arrastre o tire de sus muebles INFORMACI N IM...

Page 5: ...RIQUES INVALIDERATOUTE R CLAMATION ET RISQUE D ENDOMMAGER CE PRODUIT RENDANT DANGEREUX NO USE HERRAMIENTAS EL CTRICAS PARAMONTAR ESTE PRODUCTO USO DE HERRAMIENTAS EL CTRICAS INVALIDAR CUALQUIER RECLAM...

Page 6: ...ack Panel Drawer 1 44 Side Panel Front 2 12 Left Panel Drawer 2 45 Left Side End Panel Back 1 13 Right Panel Drawer 2 46 Left Side End Panel Front 1 14 Bottom Panel Drawer 3 48 Back Side Rail 1 15 Fro...

Page 7: ...12 Panneau de gauche tiroir 2 45 Panneau d extr mit gauche arri re 1 13 Panneau de droite tiroir 2 46 Panneau d extr mit gauche avant 1 14 Panneau inf rieur tiroir 3 48 Rail lat ral arri re 1 15 Panne...

Page 8: ...ro 1 07 Panel posterior gabinete 2 26 Panel de soporte central cabece ro 1 08 Panel posterior gabinete 1 27 Panel de la derecha cabecero 1 09 Panel superior gabinete 1 28 Panel posterior cabecero 1 1...

Page 9: ...Part List Liste des pi ces Lista de piezas...

Page 10: ...les caches vis devraient tre fix s demeure en position Le cas ch ant PRECAUCI N Hay muchos peque os componentes utilizados en la construcci n de esta unidad Estos elementos sueltos deben mantenerse a...

Page 11: ...ce que s r MONTAJE CAMS Asegurar la posici n inicial es correcta antes de Insertar conexi n de tornillo gire hacia la derecha hasta que se asegure To assemble the drawer slide please follow the step...

Page 12: ......

Page 13: ...3 fois Hacer este paso 3 veces Do this step 3 times Faire cette tape 3 fois Hacer este paso 3 veces Do this step 3 times Faire cette tape 3 fois Hacer este paso 3 veces Do this step 3 times Faire cett...

Page 14: ...til secure LORS DU MONTAGE DE CAMS S assurer que la position de d part est correcte avant de l ins rer connexion de boulon tourner dans le sens horaire jusqu ce que s r MONTAJE CAMS Asegurar la posici...

Page 15: ......

Page 16: ......

Page 17: ......

Page 18: ......

Page 19: ......

Page 20: ......

Page 21: ......

Page 22: ......

Page 23: ......

Page 24: ...uts de fabrication mat riaux et la fabrication Cette garantie ne se applique pas l usure normale Si le produit a fait l objet d abus un mauvais entretien ou l utilisation du produit la garantie sera a...

Reviews: