Corega CG-WLBARGO User Manual Download Page 6

WLBARGO Manual

4

5

4

5

4

5

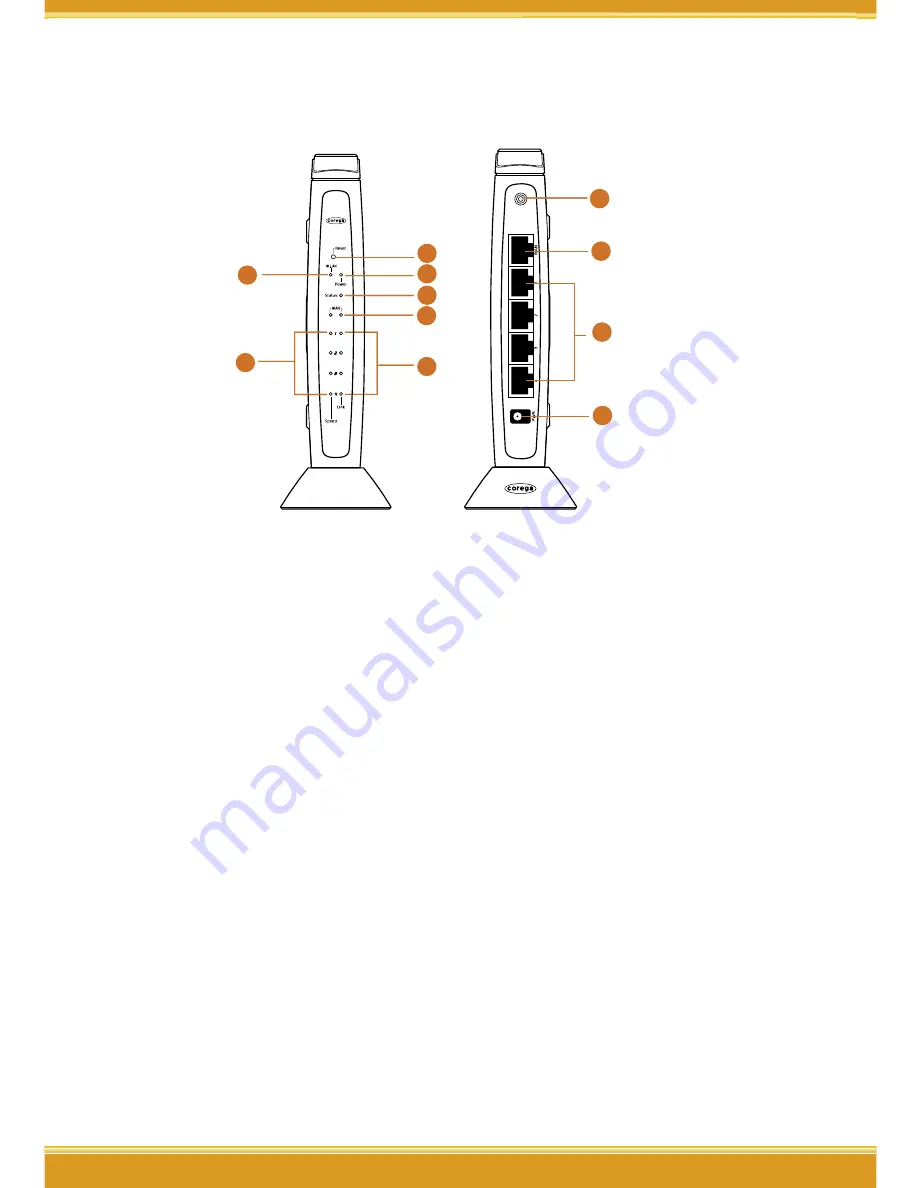
1.3 Hardware Introduction


1
3
4

5

7

6

2


8

9

11

10


1. Reset Button 
Press this button it will reset to 
default setting

2. WLAN LED (Green)
ON:Connected

3. Power LED (Green)
Indicate power status

4.Status LED (Orange)
Steady on:  Abnormal
Blink:Connected
Flash:Firmware upgrade/Reboot

5. WAN LED (Green)
ON:Connected
Blink:Transmitting or receiving data

6. Speed LED (Green)
ON:100Mbps
Off:10Mbps


7. Link LED (Green)
ON:Connected
Blink:Transmitting or receiving 
data

8. Detachable Antenna 
Connector

9. WAN port
Connected with modem  

10. LAN ports(1-4)
Connected with PC

11. AC IN Socket
Connect with power adapter


Summary of Contents for CG-WLBARGO

Page 1: ...User Manual 54MWirelessbroadbandRouter CG WLBARGO...

Page 2: ......

Page 3: ...indows 98 95 ME O S 13 3 1 5 Mac OS 8 x 9 x O S 14 3 1 6 Mac OS X O S 14 3 2 Browser Con guration 15 3 2 1 Windows Vista O S 15 3 2 2 Windows XP O S 16 3 2 3 Mac O S 18 4 Network Con guration 19 4 1 Q...

Page 4: ...tting 41 Security setting Connection control 41 Security setting lter list 42 Advanced setting virtual server 42 Advanced setting Special Applications 42 Advanced setting DMZ 43 Advancedsetting Routin...

Page 5: ...er Detachable Antenna Flat UTP Cable Product Stand with Mounting Screws Wall Mount Kit Quick Installation Guide User Manual 1 2 Features IEEE802 11b g standard Contains 5 dBi detachable antenna which...

Page 6: ...tus 4 Status LED Orange Steady on Abnormal Blink Connected Flash Firmware upgrade Reboot 5 WAN LED Green ON Connected Blink Transmitting or receiving data 6 Speed LED Green ON 100Mbps Off 10Mbps 7 Lin...

Page 7: ...apter and plug in the AC power WAN LAN corega WLBARGO Modem PC 2 2 Installation Procedure To ensure successful installation following the below steps after confirming all installation data and or equi...

Page 8: ...ssimilar in different operat ing systems This manual takes Windows XP 2000 95 98 ME and Mac O S as examples 3 1 1 Windows Vista O S 1 Click Start select Control Panel 2 Double click Network and Sharin...

Page 9: ...v4 click Properties 5 Select the General tab click both Obtain an IP address automatically and Obtain DNS Server address automatically click Advanced 6 Select the DNS tab uncheck the Register this con...

Page 10: ...Windows XP O S 1 Enter Control Panel click Network Connection right click and select Open 2 Click Local Area Connection and right click and select Properties 3 Click General click Internet Protocol TC...

Page 11: ...9 WLBARGO Manual 9 4 Click General select Obtain an IP Address Automatically and Obtain DNS Server address automatically and press Advance...

Page 12: ...is connection s address in DNS and press OK 6 Go back to Internet Protocol TCP IP and press OK 7 Press OK to close Local Area Connection Properties 3 1 3 Windows 2000 O S 1 Go to My Computer and enter...

Page 13: ...LBARGO Manual 11 2 Right click Local Area Connection and select Properties Note Please check if TCP IP had been installed in the Local Area Connection 3 Click Internet protocol TCP IP and click Proper...

Page 14: ...tain an IP address automatically and Obtain DNS server address automatically And click Advance 5 Click DNS tab in Advance TCP IP setting page and unselect Register this connection s DNS address and pr...

Page 15: ...s in all Windows 98 95 ME are the same and this manual takes Windows 98 as an example 1 Enter Control Panel and double click Network 2 Click Con guration tab and select TCP IP click Properties 3 Selec...

Page 16: ...ually 3 1 5 Mac OS 8 x 9 x O S 1 Open the TCP IP con guration from Control Panel 2 Select Ethernet Network in the connection methods select DHCP server in Con guration and close this page 3 1 6 Mac OS...

Page 17: ...is chapter if you are using Windows 2000 98 ME 3 2 1 Windows Vista O S 1 Open Internet Explorer click Tools select Internet Options Note When the dial up connection page appears please close it do not...

Page 18: ...XP O S The following examples are for Windows XP O S skip this chapter if you are using Windows 2000 98 ME 1 Open Internet Explorer IE 6 0 select Tools menu and click Internet Options If a Dial up Co...

Page 19: ...17 WLBARGO Manual 17 3 Unselect all three options in the Local Area Network LAN Setting 4 Press OK in the Internet Options...

Page 20: ...18 3 2 3 Mac O S 1 Open Internet Explorer IE 5 0 Go to Edit in the menu bar select Internet Explorer Preferences 2 Select Proxies options in Network on the left side con guration items 3 Do not selec...

Page 21: ...e Web browser Internet Explorer 6 0 If you use dial up network such as PPPoE and are using Windows 2000 98 ME O S The Dial up Network window will pop up do not connect to the Internet right now and cl...

Page 22: ...seeing this screen shot click on Next 7 Select your connection type Please make sure that your ADSL connection type is correct as you enter the correct information can be obtained from the documents...

Page 23: ...ribing to auto obtain IP service or DHCP Dynamic IP from your ISP such as Cable Modem that obtain an IP automatically for connection please select Auto obtain IP DHCP Click on Next 2 Press MAC address...

Page 24: ...the connection status When Connection ok appears click on Close 5 Open the web browser IE 6 0 and test with any website for testing the connection Note if the connection to the website fails Restart...

Page 25: ...3 WLBARGO Manual 23 4 1 2 Fixed IP 1 If you are subscribing Fixed IP connection from your ISP then select Fixed IP and click on Next 2 Enter the network setting provided by your ISP Then click on Next...

Page 26: ...24 24 3 Click on Save to perform connection tests 4 Within seconds the result of the connection test will be appeared in the dialogue box to indicate the connection status When Connection OK appears...

Page 27: ...s of the installation such as the LAN WAN connections After verifying that repeat these setps in the section 4 1 3 Float IP PPPoE 1 If you are subscribing Float IP connection or known as PPPoE from yo...

Page 28: ...26 26 3 Click on Save to perform connection tests 4 Within seconds the result of the connection test will be appeared in the dialogue box to indicate the connection status When Connection OK appears...

Page 29: ...ternet wirelessly However please be reminded that your network is not safe and the connection is open to anyone Please consult Chapter 5 Wireless Security Configuration for security setting Wireless c...

Page 30: ...one available network e g corega and click Connect 3 Connection status will appear in the bottom right of the screen Windows XP SP2 O S 1 Go Control Panel double click on Network connection right cli...

Page 31: ...ection select Available wireless network connection e g corega and click Connect 3 Connection status will appear in the bottom right of the screen Note The wireless connection has been established now...

Page 32: ...tication menu 2 Select WEP from Cipher menu 3 Select 64 bit or 128 bit from the Encryption menu 4 Type encryption code in Key1 64 bit hex 0 9 a f 10 digits in total 128 bit hex 0 9 a f 26 digits in to...

Page 33: ...please check the function avail ability of your network adapter or select b b WPA WPA2 PSK If selected encryption type will be defined automati cally according to the corresponding wireless network a...

Page 34: ...ter or select b b WPA WPA2 EAP If selected encryption type will be defined automati cally according to the corresponding wireless network adapter 2 Select Cipher Type Recommended to keep the default N...

Page 35: ...itch to Router wireless broadband router or AP Acess point mode Note When switch to AP mode the product will stop sending IP the WAN port will not be function The LAN port will also turn to general Hu...

Page 36: ...given by your ISP Password con rm Please type your password again Service name Please enter your ISP name optional Connection type Auto Reconnect always on line recommended On Demand connect when acce...

Page 37: ...s Computer name Please refer to your ISP internet service information add edit Computer name MTU value Maximum Transmission Unit Please accept the deafault setting 1500 Byte DNS Server Select Auto Set...

Page 38: ...etting 1500 Byte DNS server When Manual Setup is enable two DNS server addresses can be inserted DNS1 and DNS2 Multi NAT Setup corresponding sets of internal IP and public IP WAN setting Dynamic DNS D...

Page 39: ...before you setup this function WAN setting Other setting VPN PPTP pass through VPN pass through function enable disable VPN IPSec pass through VPN pass through function enable disable LAN setting LAN...

Page 40: ...hen click on save button to save the setting LAN setting PC database The following table display the current connected users information you can add edit delete users data Add a pc data click on add t...

Page 41: ...smit throughput will be improved Only work with corega WLCBGMO or WLUSB2GO Hidden AP when it s enabled ESSID will not be seen in the network WMM Select Disable Enable to manage function of wireless ba...

Page 42: ...ction Con gure wireless communication between clients Enable Disable enable or disable wireless communication between clients Wireless to wire connection Con gure wireless and wired communication betw...

Page 43: ...1 Enter the range of limited IP address 2 Select one of limit stop networking services 3 Select one of protocol 4 Enter the range of limited port number 5 Select one of the time schedule limitations A...

Page 44: ...a WAN Open servers or special online games can take advantage of this function Setting processes are as follows 1 Select a PC to be the virtual server 2 Select Service 3 Enter Port Range of internet c...

Page 45: ...e only use it in need 2 The PC with DMZ function needs a xed IP address 3 DMZ function can only be used in one PC Avanced setting Routing Table Static Routing Add Edit Delete static routing can be set...

Page 46: ...nd so forth Set its status usable The default value is Enable Advanced setting SNMP There are two ways of SNMP Syslog UDP and SMTP TCP 1 Start SNMP User can select two ways to start SNMP function If s...

Page 47: ...t setting Click Proceed to restore all default values Reboot New changes only effect after the system reboots Save Setting Click Save to save your setting values as a le Load Setting Click Load to loa...

Page 48: ...folder Follow the route that the firmware saves to select the file 2 After selection click Firmware update 3 When the countdown starts do not click any button The update will complete soon afterward N...

Page 49: ...settings e g Assume the port value is 8080 enter IP address as the type http xxx xxx xxx xxx 8080 to access the management program by remote control PING testing Enter the IP address into the Target I...

Page 50: ...System log is displayed in the table Status Log Display E mail function An E mail address can be set below Special incidents will be recorded and sent to the appointed E mail address After entering a...

Page 51: ...f the below processes are complete or not 1 Is your subscription to ISP expired 2 Have the powers of all relevant devices been switched on or have cables or plugs been connected correctly 3 Has the ca...

Page 52: ...user exits the program 4 Reset to default settings Refer to Q9 for more details and re login the program Q4 Forget the password A If you ever changed the password of the management program please ent...

Page 53: ...get new setting values applied The steps are as follows open the management program Click on Management Click on Proceed in the Reboot column Note The de nitions of Reboot Firmware update and Reset t...

Page 54: ...ay adversely affect wireless signal range Transmission method DS SS OFDM BPSK QPSK CCK Protocol CSMA CD Security ESSID WEP 64 128bit WPA PSK WPA2 PSK WPA WPA2 PSK WPA EAP WPA2 EAP WPA WPA2 EAP Antenna...

Page 55: ...he equipment into an outlet on a circuit different from that to which the receiver is connected Consult the dealer or an experienced radio TV technician for help This device complies with Part 15 of t...

Page 56: ......

Page 57: ...www corega com tw PN T30 UM8410 00 Rev D www corega asia com 7F No 10 Lane 345 YangGuang St Nei Hu Chiu Taipei City 114 Taiwan TEL 886 2 8751 9164 FAX 886 2 8751 9174 corega Taiwan Inc...

Reviews: