background image


Car Dash Cam 

    10651


Instructions for Use 

Please read and retain these instructions for future reference


v001: 03/11/16 


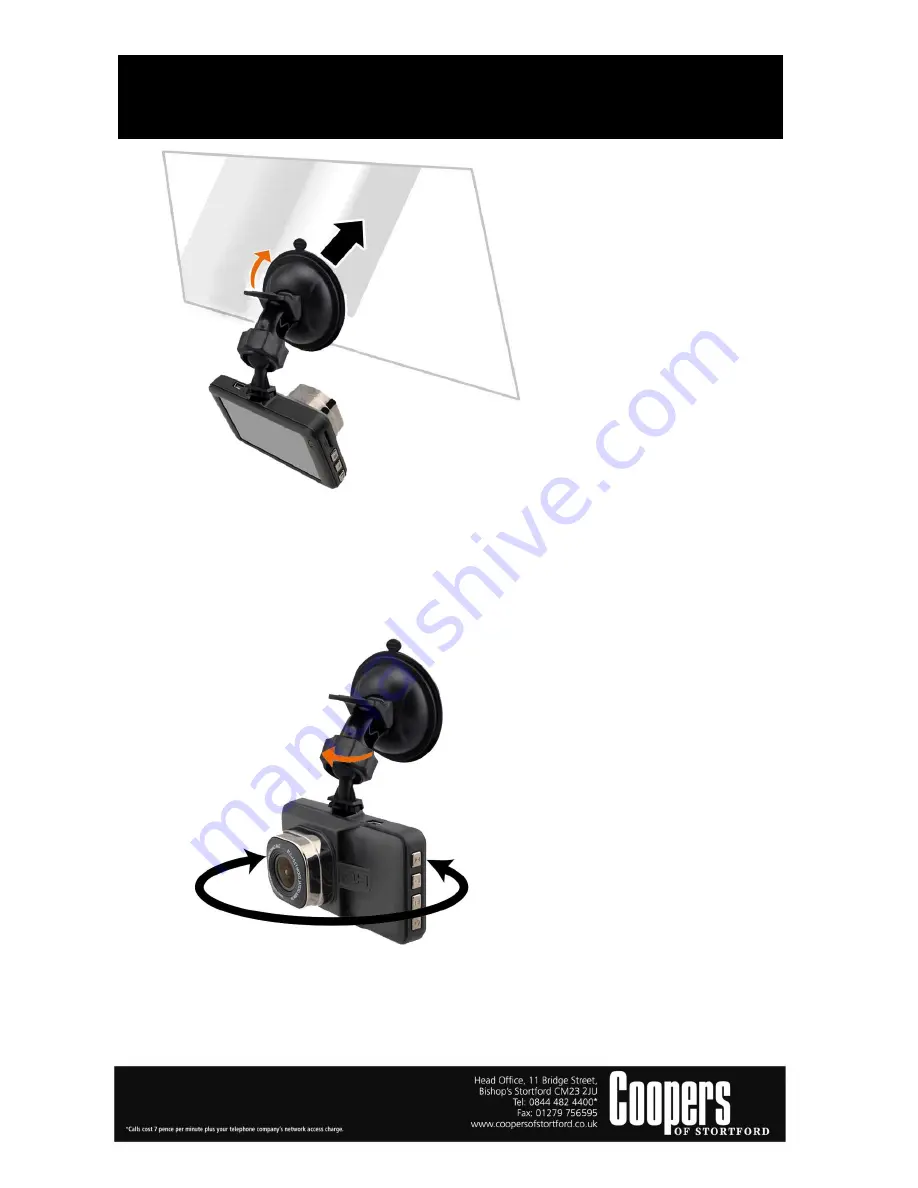
3) Hold the base firmly on the windscreen and press down the clamp to mount the car holder to the 
windscreen. Please ensure the base is securely locked in place. 
 

6.2 Adjust the device position 

1)


Loosen the knob to swivel the device vertically or horizontally. 

2)


 Tighten the knob to ensure the car dash cam is securely locked in place. 


Clamp 

Summary of Contents for 10651

Page 1: ...w CAR DASH CAM SAFETY INSTRUCTIONS WHEN USING ELECTRICAL APPLIANCES BASIC SAFETY PRECAUTIONS SHOULD ALWAYS BE FOLLOWED READ ALL INSTRUCTIONS BEFORE USE UNPLUG FROM OUTLET WHEN NOT IN USE AND BEFORE CLEANING THE USE OF ANY ACCESSORY ATTACHMENTS NOT RECOMMENDED BY COOPERS OF STORTFORD MAY CAUSE INJURIES AND INVALIDATE ANY WARRANTY YOU MAY HAVE DO NOT USE OUTDOORS DO NOT PLACE ON OR NEAR HEAT SOURCES...

Page 2: ...4 Menu 15 Down 2 Description of Function Keys 1 OK button In Video Mode press the OK button to start recording press it again to stop In Photo Mode press the OK button to take a photo In Menu interface press the OK button to confirm your selection 2 Mode button Press the Mode button to change camera mode between Record video Take photo Play back 3 SOS button When recording press the SOS button to l...

Page 3: ...In menu interface press the Down button to select an option In Standby or Photo mode press the Down button to zoom out 3 Special Function Description 3 1 G sensor Measures acceleration and tilt In video recording mode when sudden changes occur in tilt or acceleration the current video file will be locked automatically it will not be deleted by Loop recording function 3 2 SOS In video recording mode...

Page 4: ...back Press the Mode button switch to Playback mode the top left corner of the screen will show you a Playback icon Press the Up Down button to select the file you want to display and press OK to play back the selected video 4 5 Menu Setting Press the Menu button to access the menu interface Every mode has a different menu For instance if you want to change the selection to Video you should press t...

Page 5: ... charged Method 1 Using a power adapter for charging DC Adapter is not included in the standard package Method 2 USB charging Method 3 Using Car charger for charging Note Press the Reset button on the camera when the system is not responding 6 Installing in Vehicles 6 1 Mount to Windshield 1 Attach the bracket to the device slide it into the bracket holder until you hear a click 2 Before installin...

Page 6: ...he base firmly on the windscreen and press down the clamp to mount the car holder to the windscreen Please ensure the base is securely locked in place 6 2 Adjust the device position 1 Loosen the knob to swivel the device vertically or horizontally 2 Tighten the knob to ensure the car dash cam is securely locked in place Clamp ...

Page 7: ...nese Japanese Korean etc 8 Trouble Shooting For problems in normal operating situations please try the methods below 8 1 Cannot take photo and record Check if the TF card has enough space or is locked 8 2 Automatically stops when recording Use a compatible high speed TF card with SDHC 8 3 Unclear video Check if there is any dust or fingerprints and use lens wipes to clean the camera lens 8 4 Black...

Page 8: ...cloth Allow to dry thoroughly before further use Store the unit in a cool dry place BATTERIES Keep batteries away from children and pets Do not mix used and new batteries Remove the batteries if left for long periods Never dispose of batteries in a fire Battery disposal spent or expired batteries must be properly disposed of and recycled in compliance with local regulations For detailed informatio...

Reviews: