IF 748
Cooper Crouse-Hinds, LLC
Revision 1
PO Box 4999, Syracuse, New York 13221 • U.S.A.
Revised 09/04
Copyright© 2004, Cooper Industries, Inc.
Supercedes 03/80
FSQ SERIES RECEPTACLE
SWITCH REPLACEMENT
Installation & Maintenance Information
SAVE THESE INSTRUCTIONS FOR FUTURE REFERENCE
IF 748
All statements, technical information and recommendations contained herein are based on information and tests we believe to be reliable. The accuracy or
completeness thereof are not guaranteed. In accordance with Cooper Crouse-Hinds "Terms and Conditions of Sale", and since conditions of use are outside our
control, the purchaser should determine the suitability of the product for his intended use and assumes all risk and liability whatsoever in connection therewith.
WARNING
Power to receptacle MUST be OFF.
Switch lever on receptacle MUST be in OFF position.
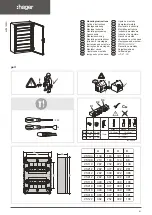
SWITCH COVER REMOVAL
Loosen cover set screw (turn in clockwise direction). Remove and set
cover aside so threads will not be damaged.
SWITCH OPERATING FORK REMOVAL
(FSQ3430 Series uses only one screw and lock washer).
•
Turn cover set screw in counterclockwise direction until receptacle
insulating body can be rotated.
•
Fully insert plug into receptacle and turn it clockwise until switch fork
is about in middle of opening.
•
Remove screw(s) plus lock washer(s) from fork and set screw(s) and
lock washer(s) aside for use later.
•
Remove operating fork.
•
Attach wires to switch exactly the same as they were to old switch.
•
Install switch using screws and lock washers that were set aside.
Switch lever MUST be in OFF position and MUST be to left as
shown in sketch.
•
Check OFF position by inspection for open contacts on switch.
•
Replace switch operating fork using screw(s) and lock washer(s)
that were set aside.
NOTE
: Start screws, then turn body using plug to put lever over
switch before securely tightening screw(s).
Check position of switch by turning plug to ON and back to OFF.
SWITCH REMOVAL
•
Remove screws plus lockwashers from switch, setting them aside
for later use.
•
Make note of exact wiring pattern used for switch connections.
•
Disconnect all wires from switch and discard switch.
SWITCH REPLACEMENT
For FSQ models M2 and M3 use only:
Switch #D-118 (3 wire, 4 pole), or Switch #D-119 (2 wire, 3 pole)
See sketch below.
For FSQ models M4 and M5 use only:
Switch #25757A (3 wire, 4 pole), or Switch #25744A (2 wire, 3 pole)
See sketch below.
WARNING
:
DO NOT INTERCHANGE SWITCHES.
SWITCH COVER REPLACEMENT
•
With switch in OFF position turn cover set screw clockwise until
screw is below housing surface.
•
Tighten cover into body as far as possible.
•
Loosen enough so hole in cover lines up with set screw.
•
Turn set screw counterclockwise as far as possible, witch locks
cover in place.
Plug will now operate receptacle normally.
TURN POWER TO RECEPTACLE ON.
25757A or 25744A
Switch (Shown in
OFF position)
Model M4 or M5
D-119 or D-118
Switch (Shown in
OFF position)
Model M2 or M3