


SELECT AN AUDIO RESOURCE
The StageHand can play audio from CDs,
USB flash drives or from its internal memory.
Up to 3 hours of material can be recorded (or copied) to
the internal memory - ideal for performance use.
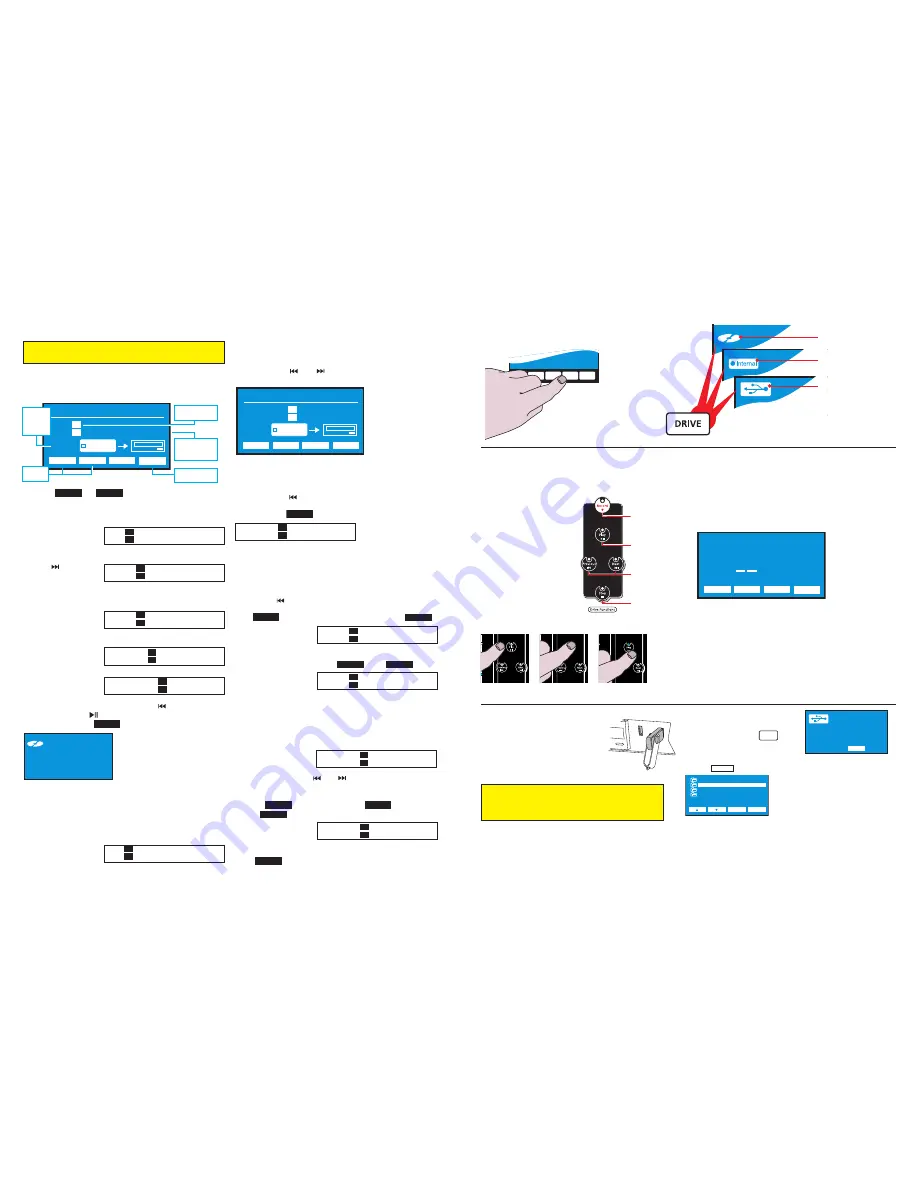
The DRIVE button
Pressed repeatedly, the
drive button toggles
between internal memory, the
CD drive and USB flash drives.
An icon in the top left corner of
the menu screen displays which drive
has been selected for listening.
3
3
TONE
SPEED
CUE
DRIVE
MENU
RW
31
45:53
Recordable & Erasable
Remaining 34:04
Drive A
03
02:2
Recordable & Erasable
Remaining 34:04
Drive B
in
Pen 1
files
CD-R or CD-RW
Option only appears if a CD
has been inserted
2GB Internal drive
USB flash drive
(max. 4GB)
Option appears only if a USB
flash drive has been connected.
PLAYING AUDIO
The StageHand range can play audio
from CDs, USB flash drives and internal memory.
Once you have selected the
drive - CD, USB or memory
- you can play audio.
The transport keys on the
touch panel allow you to
play tracks, pause them,
stop, go forward or
backward through tracks
and even record onto the
selected drive.
Simply touch the graphic
required to play or pause
music etc.
Playback options are available via the menu (see overleaf)
for a CD or internal memory.
Repeat options
No repeat: play a CD/memory contents once only (default).
Repeat track: select and continually play one track.
Repeat disc: play entire CD/memory contents continuously.
Programme
Choose the order of tracks playing from CD or internal memory.
On selection the
programme screen appears.
Use the “tens” or “units”
keys to select the number
of your first track.
Press NEXT to add the next track and so on.
When ready, press DONE.
Press PLAY to hear the selected programme.
Random mode
Plays all tracks on CD or in the memory in a random fashion.
Intro mode
Plays five seconds of each CD or memory track.
Note: All options can be cancelled via the menu.
Default settings are resumed on startup.
4
4
Record
Play/Pause
Track Back /
Track Forward
Stop
programme mode
track plays
at
number position
tens units next done
01
6
3
PLAYING MP3 FILES
Play, select tracks,
stop and eject
MP3 CDs
like an ordinary CD.
Play MP3 or audio from a
USB flash drive
by
locating and selecting the file to be played.
Insert the flash drive into the slot.
The drive should appear in the LCD
window. If not, press until
the display shows “Pen 1” and the
USB logo.
Select to show the contents of the flash drive.
Use the soft keys below the screen to navigate
through the folders and individual tracks.
Press folder to display the contents of the
highlighted item.
Press PLAY to listen to your selection.
Audio/MP3 files and folders play in order of placement on
a flash drive. A selected track (file) will play, followed by
the next in the list. When all files have been played the
next folder is opened and any tracks within it are played.
Pen 1
files
files
COOMBER
DANCE CLUB
HISTORY FOLK SONGS
WAKE AND SHAKE
back
folder
5
5
DRIVE
CHOOSE SOME TRACKS
Copying to an empty internal memory or blank CD
Use the menu to select
Erase & copy functions
>
Copy
audio
>
Part of the internal memory
>
Choose some
tracks
. A box appears...
Press the or menu soft keys as required
to select a track for copying.
Imagine you want to copy tracks 3, 14, 9 and 11.
To select the first track
keep pressing the “
+1
”
key until track 3 appears.
Use the key to
move the cursor to
the next position...
...and select the second track by pressing the
“
+10
” and “
+1
”
keys until track 14
is selected.
Repeat the process to
select the third track...
...and again to select
the final track.
To hear and confirm your selections, press to return to the
first track, then press . The first six seconds of each track will
play. If satisfied, press . Copying begins immediately.
The finished CD is “unfixed” to allow further
copying if required.
Adding tracks at a later date or time
Copying to a partially completed “unfixed” CD? The only
difference is that when you select
Choose tracks
the
dialogue box looks slightly different.
In the example shown here an
unfixed CD-R has been inserted.
It already has seven tracks on it -
so the first available track for recording will be track eight!
Editing Selections
Once you have selected tracks for copying, you can
delete
,
insert
or
change
selections before copying takes place.
You can use the and keys to move backwards and
forwards through the selected tracks.
In the example shown here
track 03 is to be deleted
and track 12 is to be inserted
between tracks 04 and 05.
Deleting Tracks
By pressing the key, the cursor moves back to track 03.
As this happens, the menu soft keys change. To remove
track 03, press . The track instantly disappears.
Inserting Tracks
Pressing the key again moves the cursor back to track 05.
Press to show new key options and select .
This will open a gap...
... to select track 12 using the and keys.
Changing Tracks
You can also change existing track selections.
In the example shown here track
05 is to be replaced by track 07.
Again, you can use the and keys to move backwards
and forwards through the selected tracks.
Press the key, followed by the key. Then
use the key to select track 07.
Select when editing is complete. Copying will begin
immediately.
13
13
+10 +1
help!
go
Copy tracks from memory to CD
From
01
To
01
02 03 04 05 06 07 08 09
76:34
free
Internal
track 01
track 01
Track No. of
original CD
Press only when
ready to copy
Time
remaining
for
copying
Track
selection
Copy spaces
available on
CD/R or CD/RW
+10
+1
From
03
To
01
02 03 04 05 06 07 08 09
From 03
04
To 01
02
03 04 05 06 07 08 09
From 03
14
To 01
02
03 04 05 06 07 08 09
From 03
14
09
11
To
01 02 03
04
05 06 07 08 09
go
From 03
14
09
To 01
02
03
04 05 06 07 08 09
R
Drive A
04
18:30
Recordable
Remaining 61:27
From
01
To
08
09 10 11 12 13 14 15 16
In the examples shown here, we are copying tracks from the
internal memory to CD, but you can copy in either direction.
del edit
help! go
Copy tracks from memory to CD
From 04 05
03
13
To 07
08
09
10 11 12 13 14 15
76:34
free
Internal
track 03
track 09
del
From 04 05
13
To 07
08
09
10 11 12 13 14 15
edit
ins
+10
+1
From 04 05 13
To 07
08
09 10 11 12 13 14 15
From 04
12
05 13
To 07
08
09 10 11 12 13 14 15
From 04 12
05
13
To 07
08
09
10 11 12 13 14 15
edit
change
+1
From 04 12
07
13
To 07
08
09
10 11 12 13 14 15
go


