background image

C

ooling

T

ech


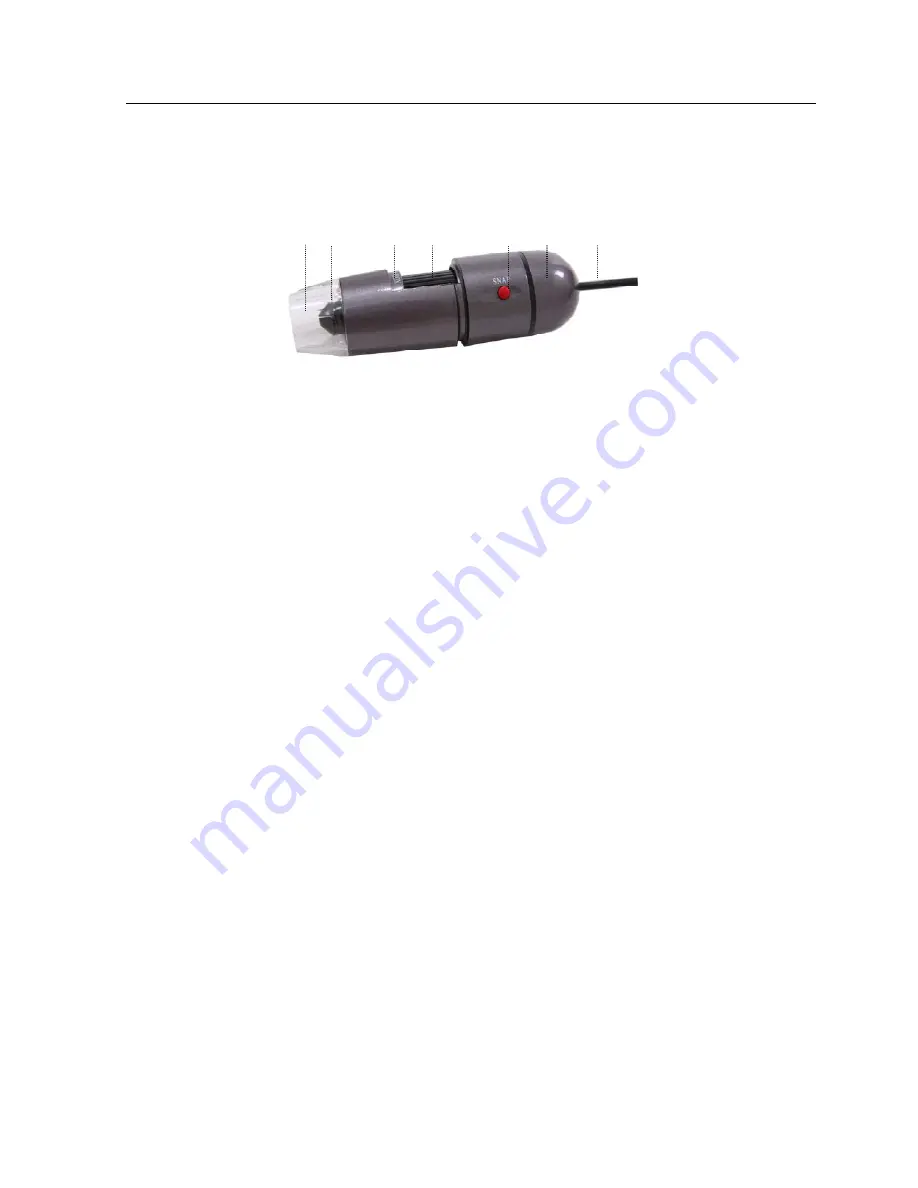
Parts of Microscope 


LED Light


 Lens  


Magnification  25X~600X


 Focus Roller


SNAP & Zoom Switch


 Body


 USB Line


Specification 

Image CMOS Sensor 


Controller High Speed DSP (Driver Free available) 


Focus Range 0mm ~ 40mm 


Snap Shot Software and Hardware 


Video Capture Resolution 1.3M. 


Built-in 8 White-light LED and adjustable illumination ensure the magnified images 
are clear and bright     


Still Image Capture Resolution1280*960,1600*1200,800*600,640*480,  
                            320*240 


Frame Rate 30 f/s under 600 LUX Brightness   


Digital Zoom 5X Sequence Mode 


Brightness Control Manual adjustment   


Magnification Range 25X ~ 600X (Manually) 


3/28                                                         

Summary of Contents for S04-600X

Page 1: ...CoolingTech 1 28 S04 600X Digital Microscope User Manual Prepared by Coolingtech Engineering Dept 2011 10 1...

Page 2: ...rvation 8 Jewelry coin Collections inspection 9 Visual Assistance 10 Others Digital Microscope S04 600X must be connected to the computer User interface is very friendly and you can do the Measure wor...

Page 3: ...ge 0mm 40mm Snap Shot Software and Hardware Video Capture Resolution 1 3M Built in 8 White light LED and adjustable illumination ensure the magnified images are clear and bright Still Image Capture Re...

Page 4: ...color Iron gun colors Notes before use 1 Don t dissemble the digital Microscope or change the interior parts it can cause damage 2 Don t clean the Microscope with alcohol organic solvents 3 Don t touc...

Page 5: ...ersion Connect the Digital Microscope by USB2 0 cable to your computer Double click my computer icon on your computer desktop below interface will shown up Double click the Video device icon as above...

Page 6: ...CoolingTech 1 Driver installation 1Click to continue the screen will show the installation progress 6 28...

Page 7: ...CoolingTech Click next to continue as followings Click next to continue as followings 7 28...

Page 8: ...CoolingTech Click continue Anyway as followings Click Finish to continue as followings 8 28...

Page 9: ...t to restart my computer now and click finish After restart your computer Plug in the USB port of Digital Microscope into Computer USB port Following the user guide by steps and complete by click Next...

Page 10: ...CoolingTech 5 When Drive are installed icon will appear on the desktop Double click it 10 28...

Page 11: ...CoolingTech 6 Interface Toolbar Preview 11 28 Area...

Page 12: ...n Before video and photo Please click Set capture file folder path or Set snapshot file path to set the file storage area 2 Click You can select the different equipment according to your request if yo...

Page 13: ...ore leaving factory If the values are changed negligently and click default to recover the factory shipped state Click General Setting and entering Special effective function Horizontal Flip and Verti...

Page 14: ...CoolingTech For example Object tracking and Scale in the yellow form 2 Click video capture pin 14 28 You can set the different output size according to your request 4 Click Photo and Video setting...

Page 15: ...CoolingTech Select Still Image capture and still capture Size Video Format AVI 15 28...

Page 16: ...CoolingTech 2 Measurement installations 1 Click to continue as followings 16 28...

Page 17: ...CoolingTech 2 Click next to continue as followings 3 Click next to continue as followings 17 28...

Page 18: ...CoolingTech 4 Click next to continue as followings 5 Click next to continue as followings 6 Click Install to continue as followings 18 28...

Page 19: ...CoolingTech Wait a few seconds while the installation taking place 7 Click Finish and the installation completes 19 28...

Page 20: ...CoolingTech 8 After the installation completes double click at computer desktop to start using the software Plug in the devices Display in operation window 20 28...

Page 21: ...CoolingTech 9 Click open the operation system Choose the Image resolution from 320 240 to 1600 1200 default at VGA Mode640 480 10 Click to use measurement function 21 28...

Page 22: ...CoolingTech 11 Click to open pictures and click to save pictures 12 Video PLAY Pause STOP 13 Image Parameter including Image setting and special effects 22 28...

Page 23: ...17 Click start calibration make sure certain accuracy Our experience told us that measurement could be controlled at 99 high precision Measure tolerance could be caused from human eye distortion and...

Page 24: ...CoolingTech 18 Key in the Measure data Pixel Unit and Click OK Warning Please do calibration again once Magnification Ratio changed 19 Color setting of display character 24 28...

Page 25: ...o export word or excel format Example Measure data under word file From Left to right Line ring Square Polygon Set line Length Oval Arc Point to Point distance Point to Line distance Parallel line Ang...

Page 26: ...CoolingTech For example 1 Line measurement For example 2 26 28...

Page 27: ...CoolingTech Rectangular measurements For example3 Ring measurements For example 4 Arc measurements 27 28...

Page 28: ...CoolingTech 3Please click to Continue when the NET Framework 2 0 is necessary and you must install the application Instmsia exe of disk if your computer operation system is MAC OS 28 28...

Reviews: