background image

2. Installation Guide

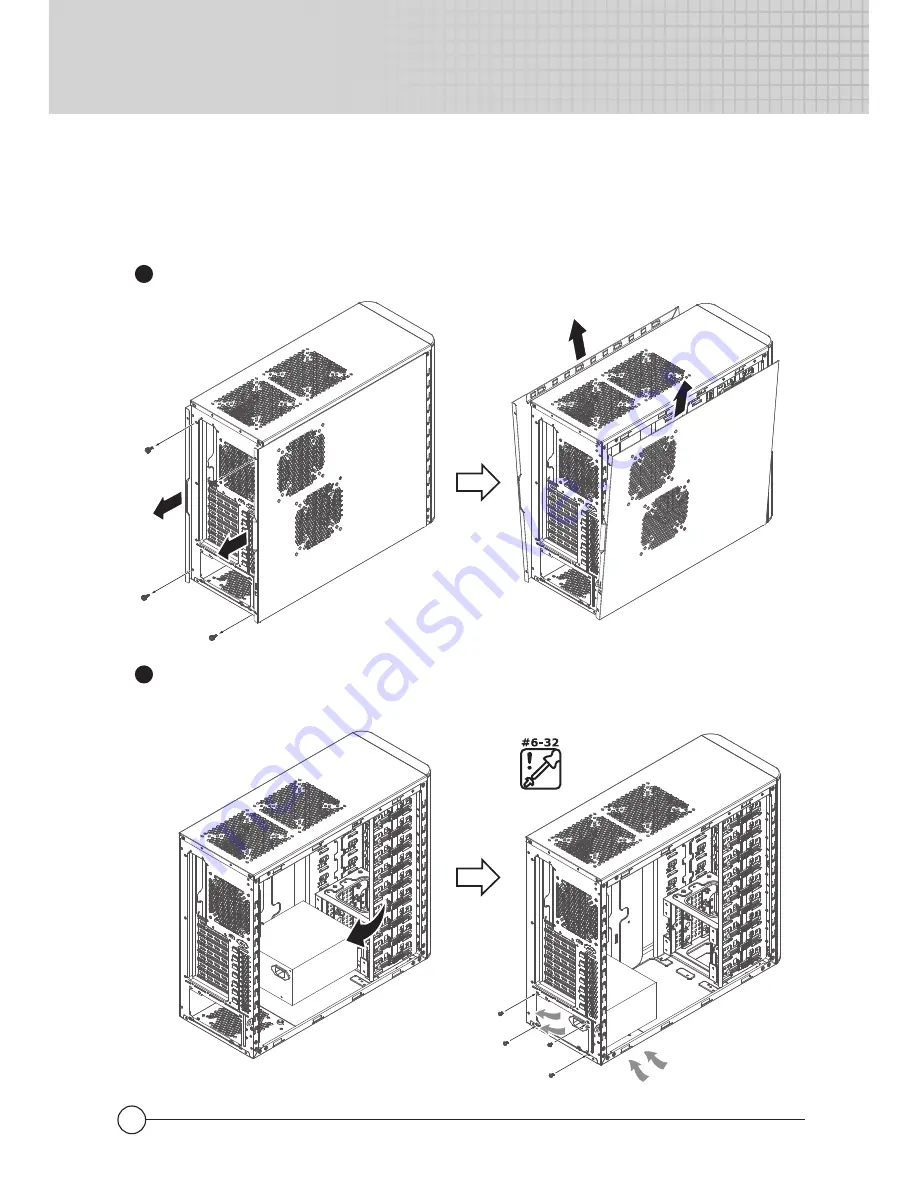
2.1 How to remove the side panel and install the power supply.

Remove the 4 screws and pull the side panel backward.

1

Place the PSU in the location as shown below.If the PSU has a single fan, 

please make sure the fan faces the bottom vent.

2

04

Note: The sequence of installation may be different, depending on the type of 

         case and devices used.

PSU air inlet

Centurion 590

Centurion 590

Summary of Contents for Centurion 590

Page 1: ...Centurion 590 Chassis Installation Guide User Manual English 使用说明 简体中文 ...

Page 2: ......

Page 3: ...e power supply 04 2 2 How to install the motherboard 05 2 3 How to install add on cards 05 2 4 How to install the 3 5 and 5 25 devices 06 2 5 Install Hard Drives in the 4 in 3 Device Module 08 2 6 How to install or replace case fans 09 2 7 Completing Installation 09 2 8 Cable management 10 3 Front Connector Installation Guide 11 Warranty Information 13 Centurion 590 Centurion 590 ...

Page 4: ...rive Bay 7 One 120x120x25 mm front intake fan Blue LED 1200 rpm 17 dBA One 120x120x25 mm rear exhaust fan 1200 rpm 17 dBA USB 2 0 x 2 IEEE 1394 x 1 Audio x 1 MIC x 1 Supports Intel HD Audio Standard ATX PS2 EPS 12V optional Available Color Dimension Weight Material M B 5 25 Drive Bay 3 5 Drive Bay Expansion Slot Cooling System I O Panel Power Supply Centurion 590 Centurion 590 POWER BUTTON IE 1394...

Page 5: ... 8 1 1 1 1 Parts Name 5 25 Shield Front LED fan 120 25mm 4 in 3 Device Module Rear fan 120 25mm Left side panel 03 4 3 2 1 6 5 7 8 9 10 11 Centurion 590 Centurion 590 Figure Parts Name Cable Tie Stand off 6 9mm 6 32 screw M3 screw HDD screw installing 3 5 device Q ty Used for Cable management M B tray M B tray power supply CD ROM FDD 3 5 Bracket 12 12 20 20 16 1 4 Fittings Pack ...

Page 6: ...ws and pull the side panel backward 1 Place the PSU in the location as shown below If the PSU has a single fan please make sure the fan faces the bottom vent 2 04 Note The sequence of installation may be different depending on the type of case and devices used PSU air inlet Centurion 590 Centurion 590 ...

Page 7: ...w to install add on cards Adjust the hole position of the M B with the MB tray and screw in the spacers 1 Make sure the holes on the Motherboard and chassis line up properly before securing the screws 2 Centurion 590 Centurion 590 F E D C A B ...

Page 8: ...2 4 How to install the 3 5 and 5 25 devices 06 Remove the front panel 1 Insert the device into 5 25 drive bay 2 Centurion 590 Centurion 590 A C A B D C E F ...

Page 9: ...07 How to install 3 5 devices 3 Centurion 590 Centurion 590 A B A D B C C ...

Page 10: ...08 2 5 Install Hard Drives in the 4 in 3 Device Module Centurion 590 Centurion 590 A B C D D C A M3 M3 HDD Screw B ...

Page 11: ...optional B Rear fan x 1 Supports 80 90 120mm fans C Front fan x 1 Supports 90 120mm fans D Left fan x 2 Supports 80 90 120 140mm fans optional Install replace top rear front left fans Centurion 590 Centurion 590 M5 2 7 Completing Installation or ...

Page 12: ...10 2 8 Cable management Centurion 590 Centurion 590 ...

Page 13: ...RT1R Green PORT2R Blue PORT2L Black AUD GND Gray SENSE2_RETURN Brown SENSE1_RETURN Orange SENSE_SEND White PRESENCE Red MIC BIAS Green Green FPOUT R Blue Blue FPOUT L Black AUD GND Green RET R Blue RET L showing connectors Case Connector Front Connector Installation Guide ...

Page 14: ...1 2 示意图 02 1 3 零件表 03 1 4 配件包 03 2 安装说明 04 2 1 拆下侧板和安装电源 04 2 2 安装主板 05 2 3 安装附加卡 05 2 4 安装光驱和软驱 06 2 5 安装硬盘 08 2 6 安装和更换机箱风扇 09 2 7 完成安装 09 2 8 线材管理 10 3 有害物质禁用表 11 4 I O面板安装说明 12 保修信息 13 工具需要图示 Centurion 590 Centurion 590 01 ...

Page 15: ... 1394 x 1 Audio x 1 SPK x 1 支持Intel HD Audio 标准 ATX PS2 EPS 12V 选购 POWER BUTTON IE 1394 MIC HEADSET USB 2 0 POWER LED HDD LED 前风扇 进风 120x120x25 mm x 1 蓝光LED 1200 rpm 17 dBA 后风扇 排风 120x120x25 mm x 1 1200 rpm 17 dBA 颜色 尺寸 重量 材质 5 25 装置 3 5 装置 扩充孔 散热系统 I O面板 电源 产品规格变更恕不另外通知 规格 产品简介 示意图 顶视图 前视图 右视图 左视图 主板类型 02 Centurion 590 Centurion 590 ...

Page 16: ......

Page 17: ...2 安装说明 2 1 拆下侧板和安装电源 移除4颗手动螺丝和拆下左右侧板 1 安裝电源 注意 电源风扇朝下 2 注意 安装的顺序可以不同 取决于安装装置的类型 电源散热孔 04 Centurion 590 Centurion 590 ...

Page 18: ...2 2 安装主板 2 3 安裝附加卡 主板和主板支架上的孔位对准后 将螺柱安装到主板支架上 1 在锁合前 请确认主板和机身已经完全对准孔位 2 Centurion 590 Centurion 590 05 F E D C A B ...

Page 19: ...2 4 安装光驱和软驱 移除前面板 1 安装光驱 2 06 Centurion 590 Centurion 590 A C A B D C E F ...

Page 20: ...安装软驱 3 Centurion 590 Centurion 590 07 A B A D B C C ...

Page 21: ...2 5 安装硬盘 08 Centurion 590 Centurion 590 A B C D D C A M3 M3 HDD 螺丝 B ...

Page 22: ...M5 A 顶部风扇x 2 支持 80 90 120 140mm 风扇 选购 B 后面 x 1 支持 80 90 120mm 风扇 C 前面 x 1 支持 90 120mm 风扇 D 右面 x 2 支持 80 90 120 140mm 风扇 选购 安装和更换顶部 后面 前面 右面的风扇 安装和更换机箱风扇 09 2 7 安装完成 Centurion 590 Centurion 590 ...

Page 23: ...2 8 线材管理 10 Centurion 590 Centurion 590 ...

Page 24: ...上述规范仅适用于中国法律 3 有害物质禁用表 11 Centurion 590 Centurion 590 ...

Page 25: ...range SENSE_SEND White PRESENCE Red MIC BIAS Green Green FPOUT R Blue Blue FPOUT L Black AUD GND Green RET R Blue RET L Case Connector 一些主板的IEEE1394a USB2 0 音效连接头与下图不符 安装前 请参阅主板 使用说明 请勿将USB2 0线连接至IEEE1394a插孔 否则将损坏机器 请勿将IEEE1394a线连接至USB2 0插孔 否则将损坏机器 下图为前面板I O电缆的连接线图 请参考主板使用说明的USB2 0 IEEE1394a 声音插孔章节的图示 另外 请选用 以下标准USB2 0 IEEE1394a 音效连接头 避免损坏本产品 I O面板安装说明 4 ...

Page 26: ...体中文 TC Cooler Master 保证本产品之材质及功能无瑕疵 并提供本产品二年之硬件有限保修服务 自购买日算起 请把您的收据放在安全之处 以免Cooler Master 要求您提供本证明 本产品专为计算机设计 一旦将本 产品用于其它用途 则保修无效 若您不熟悉硬件安装程序 请寻求专家之协助 保修服务仅适用于正常 使用下产生的故障 若本公司发现产品毁损之原因为滥用 改造 误用 疏忽 电压供应错误 空气及水 污染意外和自然灾害 则保修无效 注意 重贴或条形码遭毁损而无法辨识保修期限者 则不在此限内 简体中文 SC ...

Page 27: ...14 Centurion 590 Centurion 590 ...

Page 28: ...Centurion 590 Centurion 590 15 Centurion 590 Centurion 590 ...

Page 29: ...年 間 の保証を提供 します お買い上げ時のレシートを証明書として大切に保管してください メモ 部品に貼付されたラベルを剥がしたり 製品を改造された場合 保証は無効となります この保証は正常な使用に対して適用されます Cooler Masterの責任ではなく お客様の不当な取り扱いや保管 誤用や乱用 事故や不注意などによる欠損や損傷は保証対象外とさせていただきます 当製品はコンピュータ用に設計されたものです 当製品をその他の用途でご利用になると 保証は無効となります コンピュータのハードウェアインストールについて詳しくない方は 専門家の指示を受けてください ...

Page 30: ...Centurion 590 Centurion 590 17 Centurion 590 Centurion 590 ...

Page 31: ......

Page 32: ...510003510 GP 2008 01 2008 ...

Reviews: