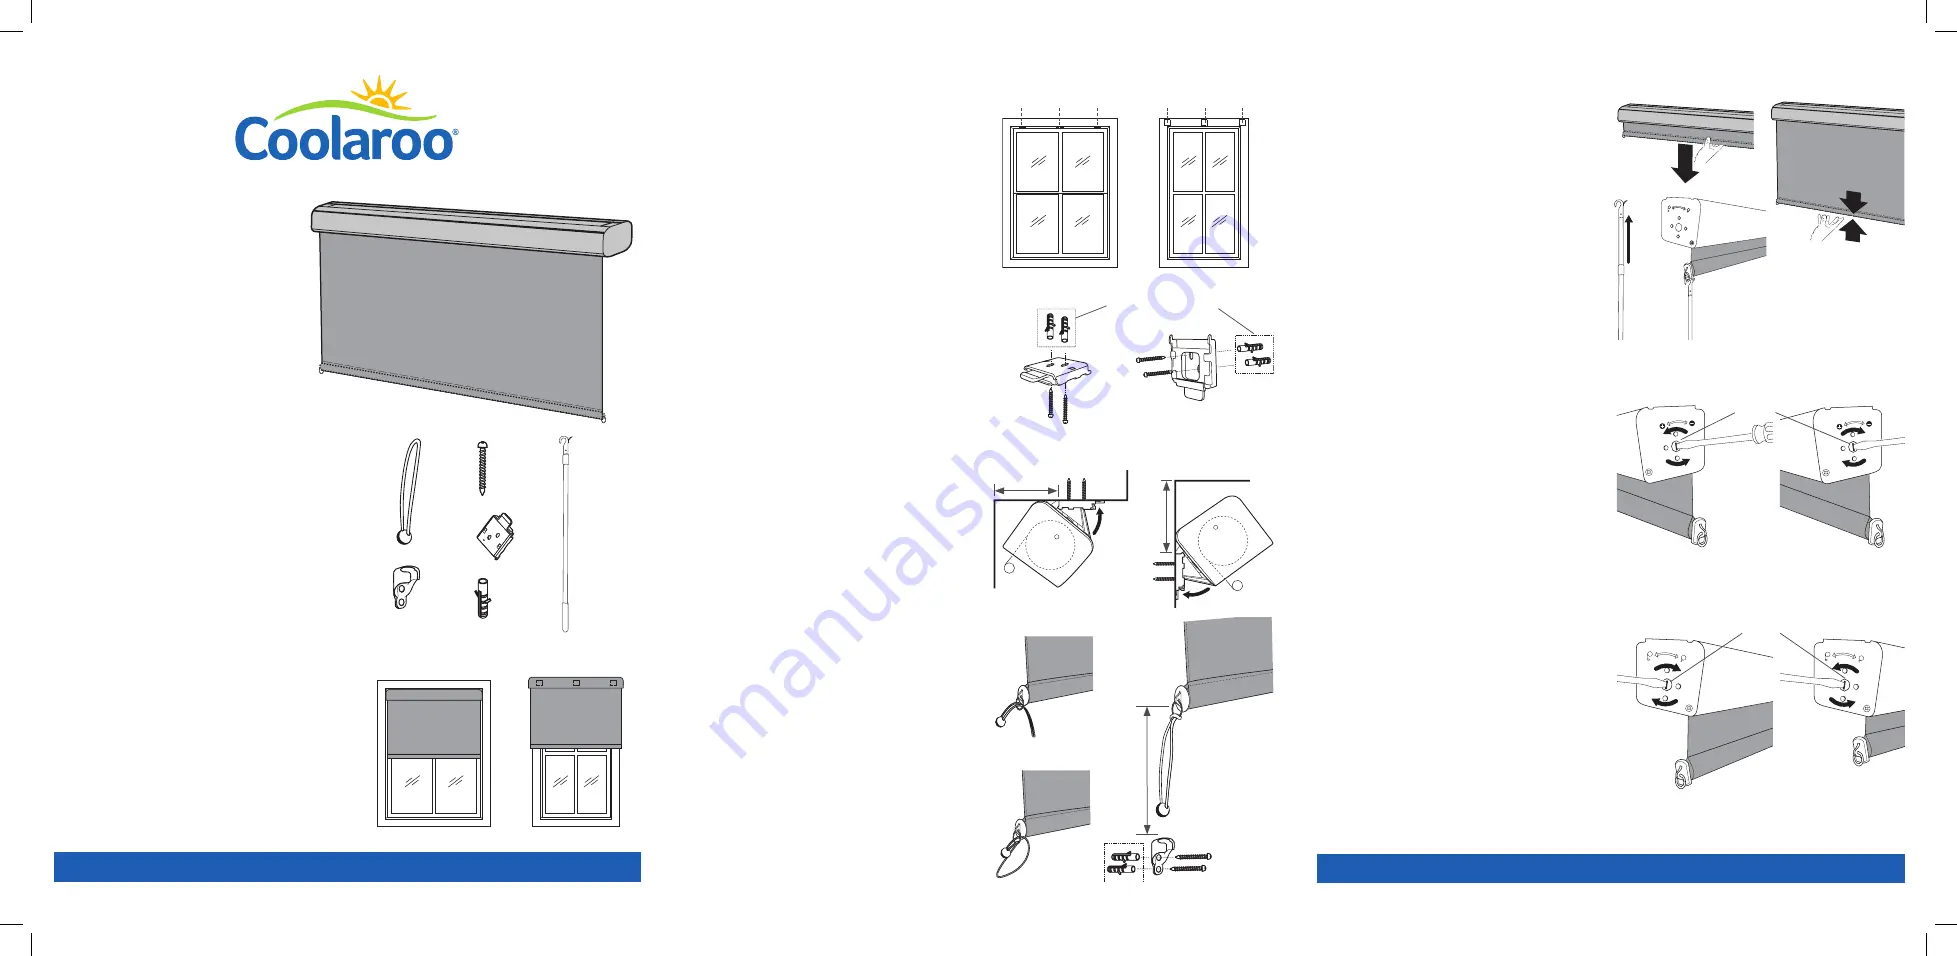
PARTS LIST
Take all parts out of the box and ensure
they are all present.
a) Aluminium pelmet
b) Blind
c) Bottom rail caps
d) Bottom rail
e) Bungees (2)
f) Receivers (2)
g) Timber screws (10)
h) Quick mount brackets (3)
i) Wall plugs (10)
j) Telescopic wand
WHAT ELSE YOU’LL NEED
• Drill bit
• Level
• Tape measure
• Pencil
• Screwdriver (Phillips-head & flat-head)
i
g
e
h
f
INSIDE OR OUTSIDE MOUNT
This blind can be fitted to the top (inside) or face
(outside) of your wall, depending on your installation
environment.
TOP (INSIDE) MOUNT
FACE (OUTSIDE) MOUNT
For latest information about this product visit www.coolaroo.com
STEP 1
Space the three quick mount brackets evenly
along the length of your blind. Mark the left, right
and centre bracket positions on your installation
surface.
NOTE:
For top mount installation the bracket tabs
should face forwards. For face mount installations
the bracket tab should face downwards. Allow at
least 5cm (2”) of clearance between the bracket
and the wall or ceiling to allow enough clearance for
fitting and removing the pelmet.
In the marked positions attach the three quick
mount brackets using the timber screws. Ensure
the screws are penetrating into tiimber. If mounting
to masonry, use the 5mm wall plugs.
IMPORTANT:
If the brackets are installed upside
down or backwards, the pelmet will not lock into the
brackets.
STEP 2
Fit the pelmet by first locating the hooks on the
bracket into the channel on the pelmet . Then push
the pelmet firmly onto the brackets until all three
latches snap securely into the channel.
NOTE:
Use the channels on top of the pelmet for
top (inside) mount installations and the channels
on the side of the pelmet for face (outside) mount
installations.
STEP 3
Bungee tie downs have been provided to secure
your exterior blind down in mild to moderate wind
conditions.
Thread the bungee cord through the end cap ring
and back through itself, making a lark’s head knot.
Use the timber screws to install the receiver
approximately 13cm (5”) below where the blind will
stop. Fit a receiver on each side of the blind. Use the
5mm wall plugs if screwing into masonry.
Attach the bungee to the receiver to secure the
blind when in the down position.
TOP (INSIDE) MOUNT
FACE (OUTSIDE) MOUNT
Use wall plugs if fixing
to masonry
Space quick mount brackets evenly
13
cm
(
5”
)
5cm (2”)
clearance
5cm (2”)
clearance
TOP (INSIDE) MOUNT
FACE (OUTSIDE) MOUNT
TOP (INSIDE) MOUNT
FACE (OUTSIDE) MOUNT
j
a
d
b
c
c
OPERATION
Raising and lowering the blind
To lower the blind, hold the centre of the bottom
rail and pull it down to the desired height.
To raise the blind pull the blind down slightly then
release it, allowing it to retract into the pelmet.
NOTE:
Use the telescopic wand if the blind cannot
be reached by hand. Extend the wand to it’s full
length then locate the hook into either end cap
and use it to lower the blind.
LOWER
RAISE
Spring adjuster
Adjusting the speed (tension)
To adjust the retraction speed of the blind, follow
these steps.
Increase the speed of the blind by turning the
spring adjuster counter-clockwise 1 - 2 rotations,
using a screwdriver, until you are satisfied with the
speed.
Decrease the speed of the blind by turning the
spring adjuster clockwise 1 - 2 rotations.
Adjusting the top position
To adjust the stop position of your blind when
retracted, follow these steps.
Lower the top position by turning the stop
adjuster counter-clockwise, using a screwdriver,
until satisfied with the blind position.
Raise the top position by turning the stop adjuster
clockwise, until satisfied with the blind position.
FASTER
SLOWER
Stop adjuster
LOWER
HIGHER
Retract your exterior blind when not in use, or before strong storms, to prevent damage.


