background image

13

ArcSoft VideoImpression™ 1.6 

Movie Making  Software

ArcSoft  VideoImpression™  is  an  easy-to-use  video  and  image  editing  software  program.    The  program 

enables users to create and edit new videos using existing video and image files - making desktop video 

presentations for home, business, and the Web.

Lets make a video!

Follow these basic steps to make your first video.

Step 1  Click on new Icon.

Step 2  Using the 

 selector button select video templates.

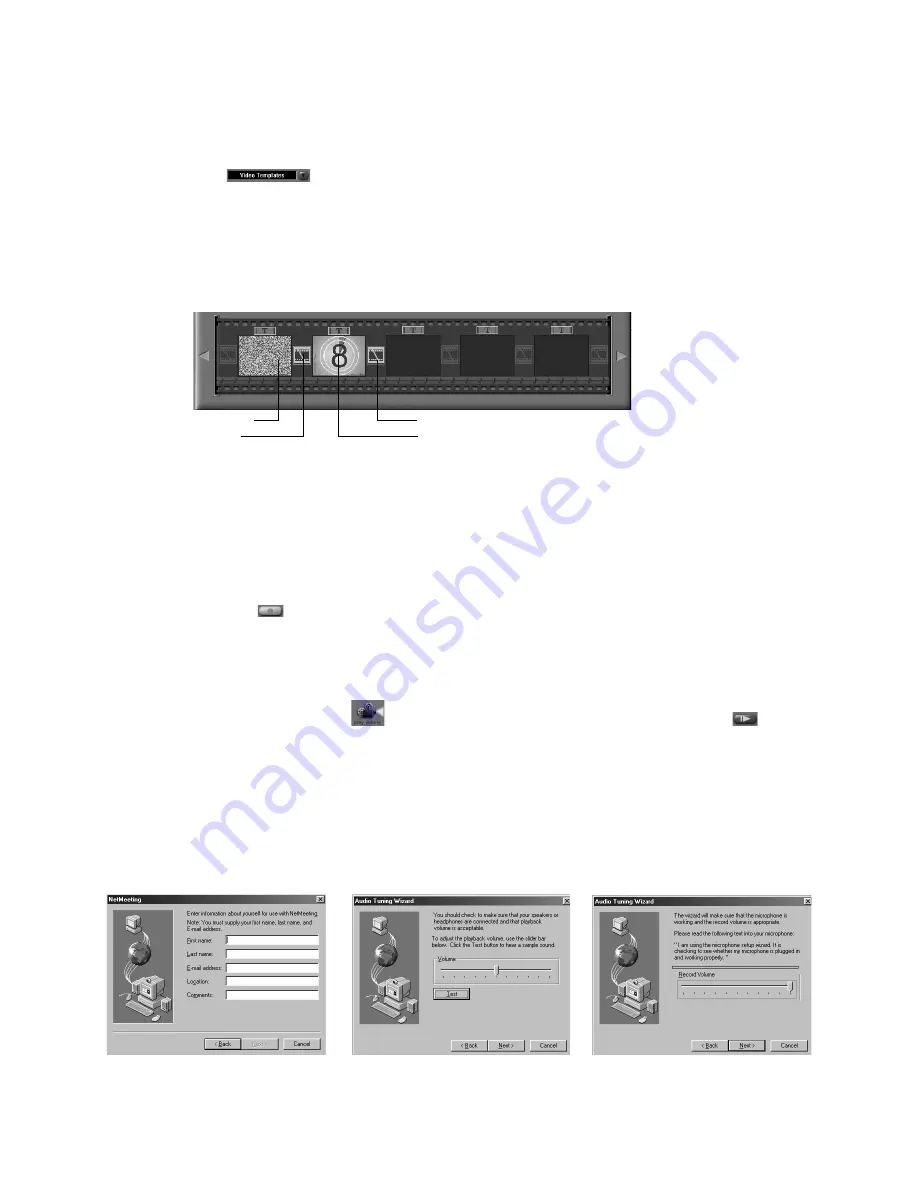
Step 3  Double click on the Static.avi screen in the video template selection and a copy will appear in the 

first large frame on the storyboard on the bottom.

Step 4  Double click on the small frame directly right of the large frame. A new template will appear at 

the top called “special effects” Double click on the “1. Fire” special effect which will now drop into 

the special effect frame you highlighted. 

Step 5  Double click on the next right large frame and repeat step 3 using a video template and double 

click template 5. 


Countdown.avi. Repeat step 4.

Static.avi
1. Fire

Countdown.avi

1. Fire

Storyboard


Adding an existing video.

Step 6  To add a video you have already made double click on the next large frame in the story board to 

the right. Click on the “Get” icon and select a  video you had made and filed in the folder called 

“album” click on Get, with the selector click on the down arrow and select desktop and then double 

click on “Album” folder and select a file ending with .mov (video file) the video will appear in the 

video templates. Double click on the video and it will appear just like other video templates in the 

storyboard.  Now go to step 10.


Alternatively you can produce a live video.


Ensure your 

Stylus Mega

 is connected to the computer via the USB cable. Click on the capture 

icon.

Step 7  And press the 

 record icon. Wait for the video link to go live and now you’re recording, press 

the ESC key on your keyboard to end the video.  

Step 8  Press the “Save” icon and name your file, and then press “save”. Video impression will ask you 

where you want to place your video. Select “video template”.

Step 9  Select  the  “album”  icon  and  your  video  clip  you  have  just  produced  will  appear  in  the  video 

templates. Double  click on your video, your video will now drop into the storyboard.  


Running the video.

Step 10  Select the “play movie” icon 

 which will assemble your video together. Press the 

 play icon 

to watch your completed video. Watch to see how the special effects merge between the frames 

on the story board. Now you try to make your own and also try the audio template.

Microsoft® Netmeeting™ 

 Web Cam software

NetMeeting™ provides the most complete conferencing solution for the Internet and corporate intranet.  

Powerful features let you communicate with both audio and video, collaborate on virtually any Windows-

based application, exchange graphics on an electronic whiteboard, transfer files, use the text-based chat 

program, and much more.  Using your PC and the Internet, you can now hold face-to-face conversations 

with friends and family around the world.

Adobe® Acrobat® Reader 

.PDF File Editing Software

Adobe® Acrobat® Reader lets you view and print Adobe Portable Document format (PDF) files on all major 

computer platforms, as well as fill in and submit Adobe PDF forms online.

Summary of Contents for Stylus Mega

Page 1: ...TM User s Manual Stylus Mega M EG A P IX EL 1 3 ...

Page 2: ...duct Overview 1 Flash Connector 1 3 MEGA PIXEL 2 1 3 4 5 2 Lens 3 Shutter Button 4 USB Port 5 Viewfinder 1 Viewfinder 1 2 3 4 5 6 2 LCD Display 3 Flash Button 4 Battery Compartment 5 Microphone 6 Mode Button ...

Page 3: ...batteries 8 Connecting the flashlight to the camera 8 Setting the flash mode 8 Using the test button 8 5 Installing the Software onto a Computer 9 Window 98SE Users 9 Install the software 9 Software included with your camera 9 Computer system requirements 14 6 Transferring Pictures Movie Clips Audio To Your Computer 14 Before you transfer pictures 14 Connecting to your computer 14 Transferring vie...

Page 4: ...ed Replay Audio clips Save Movie clips and Audio to the computer memory Communicate Send the movie and audio over the internet to family and friends Camera Package Contents Stylus Mega USB Cable Pouch Flash Light Optional Camera Stand 4 x AAA Alkaline Batteries 2 for camera and 2 for flash unit optional My Camera CD ROM includes My Camera Driver PhotoStudio 4 0 PC ArcSoft Funhouse 1 0 PC ArcSoft P...

Page 5: ...e images taken will be lost Do not press the Mode button when the camera is not installed with 2 x AAA alkaline batteries otherwise images taken will be lost If the camera is hang after installing batteries take the batteries out Then put them back again to re activate the camera Battery Replacement 4 x AAA Alkaline batteries are supplied with the product 2 for the camera and 2 for the flashlight ...

Page 6: ...n taken Back View Viewfinder Front View Shutter Button 1 3 MEGA PIXEL Other Picture Taking settings Setting Section Set Picture Quality Setting the Picture Quality Using the flash mode Setting the flash mode Self Timer Setting the self timer Set Movie Mode Setting camera to make a Movie Deleting Pictures Deleting Pictures from the camera Setting the Picture Quality M 1 Pressing the Mode button M w...

Page 7: ...a can record audio clips which can be played back using a computer 1 Switch the camera on using the mode button select the 2 Place your camera close to the source of the sound you wish to record 3 Press the shutter button to start recording your audio clip 4 The camera LCD will display the audio clip length in seconds whilst the audio is being recorded 4 Press the shutter to end the audio recordin...

Page 8: ...g the flashlight to the camera 1 Connect the flashlight to the camera by inserting the power connection plug into the flash power plug hole on top of the camera 1 2 1 3 MEGA PIXEL 1 3 MEGA PIXEL Setting the flash mode 1 Switch the camera ON 2 Set the picture resolution using the mode button 3 Press the Flash button the camera LCD will display a flashing until the flash mode is ready 4 The Green LE...

Page 9: ...n following the on screen prompts NOTE When prompted to do so register your name and the other details requested for further on line support You must be connected to your internet service provider to register on line electronically Software included with your camera The Stylus Mega software CD contains the following software Cool iCam My Camera Picture Transfer Software My Camera software enable P...

Page 10: ...variety of fantasy backgrounds Users can get their own images from digital cameras scanners disk drives and Photo CDs and seamlessly combine them with just a few clicks of the mouse The fantasy backgrounds include fictional characters classic works of art Olympic heroes 50 s funnies bathing beauties muscle men and a lot more 1 Click Start Programs ArcSoft Software Suite Funhouse 1 0 2 Click 1 Get ...

Page 11: ...5 Print Preview to print a hardcopy Using live images 8 You can also capture a live shot when your Digital Camera is connected to your PC by the following steps 9 Go to Get Template to select the template and then press OK to confirm Important Make sure the Digital Camera CD ROM is in the CD ROM Drive 10 Go to Get Photo and then click the Live Video Mode icon and the Live icon will flash to indica...

Page 12: ...otoPrinter 2000 2 Choose the Page Layout The selected page layout will on shown 3 Click Get Photo and then Acquire Select TCG 201 Camera as source The capture interface will show up To capture image s scroll through the image s stored in our camera and click Transfer When you have finish click on Cancel to go back to window Acquire OK 4 The captured images will be shown on the photo library panel ...

Page 13: ...video and it will appear just like other video templates in the storyboard Now go to step 10 Alternatively you can produce a live video Ensure your Stylus Mega is connected to the computer via the USB cable Click on the capture icon Step 7 And press the record icon Wait for the video link to go live and now you re recording press the ESC key on your keyboard to end the video Step 8 Press the Save ...

Page 14: ... Go to Start Programs Arcsoft software suite PhotoStudio 4 0 4 Select or create a new album to transfer your pictures to File Open Album New Album and type in a new album name 5 Select File Source TCG 201 Camera Select 6 Select All images or the image s you wish to transfer and select the Transfer button Viewing the pictures 1 All the pictures selected have now been transferred into the PhotoStudi...

Page 15: ...o take a picture from the live video 6 Close the Photo taken The computer will ask you whether to save the photo 7 A dialogue box will appear select a location on your computer hard drive and type a file name for your photo clip Now click on the Save button 8 The computer will now process the Photo clip into the file location described in 7 9 The movie clip has now been stored on your computer 7 U...

Page 16: ...n failure Check all cables connections are secured Conflict with another camera driver capture device If you have any other camera installed on your computer remove the camera and it s driver completely from your system to avoid conflict with another camera or capture device Go to the computer desktop Right click on My Computer Click Properties Select Device Manager Double click on CD_ROM double c...

Page 17: ...technical support and frequently asked questions FAQ s Cool iCam Online Services Website http www cool icam com Customer Support 10 Appendix Technical Specifications Memory Internal memory 16MB SDRAM Image Performance for Video on Web cam Approximately 24fps for 320 x 240 pixel Still Image Resolution High Resolution 1280 x 1024 pixel no compression Normal Resolution 1280 x 1024 pixel 4 to 1 compre...

Page 18: ...m your PC or TV before cleaning it ALWAYS remove dust or stains with a soft cloth dampened with water or neutral detergent NEVER place hot items on the surface of the Camera NEVER attempt to open or disassemble Camera as this will affect any warranty claim Regulatory Information FCC Notice This device complies with Part 15 of FCC Rules Operation is subject to the following two conditions 1 This de...

Reviews: