background image

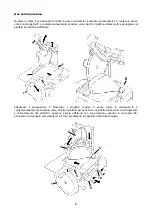
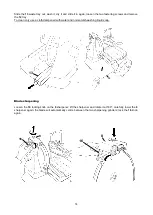
Prima  di  iniziare  il  taglio  del  prodotto  rimuovere  il  paralama 

10

  allentando  il  pomolo 

10.1

  e  spostarlo  dalla 

posizione di riposo (A) alla posizione di lavoro (B) scoprendo il tal modo il filo della lama stessa; bloccare il 
paralama 

10

 nella nuova posizione riavvitando il pomolo 

10.1

ATTENZIONE 

Utilizzare  sempre  guanti  di  protezione  antitaglio  ed  antiscivolo  operando  con  grande  attenzione,  senza 
distrarsi. 

PERICOLO DI TAGLIO! 

Ruotare  il  volano 

1


avviando  l’operazione  di  taglio  con  deposizione  delle  fette  sul  piatto 

12

;  riportare  il 

paralama 

10

 in posizione di riposo (A) ad operazioni di taglio terminate. 

MAI LASCIARE LA MACCHINA INUTILIZZATA CON IL FILO DELLA LAMA SCOPERTO! 


Pulizia della macchina 


Per  le  operazioni  di  pulizia  utilizzare  esclusivamente  un  panno  inumidito  con  acqua  e  normale  detersivo 
liquido per stoviglie. 

Attenzione: 

utilizzare  sempre  guanti  di  protezione  antitaglio  ed  antiscivolo  eseguendo  le  operazioni  di 

seguito descritte con grande attenzione, senza distrarsi.


PERICOLO DI TAGLIO! 

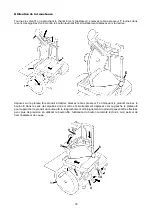
Ruotare  il  volano 

1

  avvicinando  il  carrello 

3


(verso  l’operatore);  ruotare  in  senso  orario  la  manopola 

5

  e 

contemporaneamente spostare verso destra il piatto portamerce 

6

; togliere il prodotto dal piatto 

6

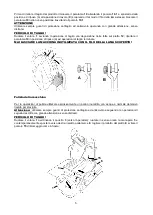
; svitare il 

pomolo 

15

 di bloccaggio come in figura; 


10 

10.1 


15 

Summary of Contents for 90415008

Page 1: ...sind Marken der PENTAGAST eG Ruhrstrauch 4 D 36100 Petersberg Tel 49 0 66 1 93 48 3 0 Fax 49 0 66 1 93 48 3 25 info pentagast de www pentagast de Vorbereitung Aufschnittmaschine Artikel Nr 90415008 V...

Page 2: ...VOLANO 350 370 Affettatrice a volano Uso e manutenzione Flyweel slicer Use and maintenance Trancheuse volant Emploi et maintenance Schneidemaschine Mit Handrad Gebrauch und Wartung...

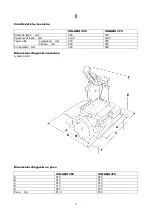
Page 3: ...ore di taglio mm 0 2 5 0 2 5 Taglio utile Larghezza mm 270 270 Altezza mm 240 250 Corsa piatto mm 320 320 Dimensioni d ingombro massime valori in mm Dimensioni d ingombro e peso VOLANO 350 VOLANO 370...

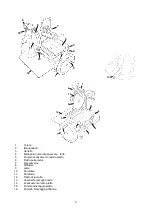
Page 4: ...lo 4 Manopola numerata spessore fetta 5 Pomolo avanzamento rapido piatto 6 Piatto portamerce 7 Pressamerce 8 Affilatoio 9 Lama 10 Paralama 11 Parafetta 12 Piatto di raccolta 13 Vaschetta raccogli scar...

Page 5: ...il prodotto da affettare abbassare il pressamerce 7 bloccando il prodotto ruotare in senso orario la manopola 5 e contemporaneamente spostare verso sinistra il piatto 6 per avvicinare il prodotto all...

Page 6: ...10 in posizione di riposo A ad operazioni di taglio terminate MAI LASCIARE LA MACCHINA INUTILIZZATA CON IL FILO DELLA LAMA SCOPERTO Pulizia della macchina Per le operazioni di pulizia utilizzare escl...

Page 7: ...e in figura con grande attenzione partendo dal centro verso l esterno 15 6 3 9 aprire il parafetta 11 e pulirne con cura l interno rimuovere il paralama 10 previo allentamento del relativo pomolo di b...

Page 8: ...azioni di pulizia utilizzare esclusivamente un panno inumidito con acqua e normale detersivo liquido per stoviglie Affilatura lama Allentare il pomello di bloccaggio 16 dell affilatoio 8 sollevare l a...

Page 9: ...lama si sia formata una leggera bava mettere nuovamente in rotazione il volano e premere contemporaneamente solo il pulsante 8 2 per 2 3 secondi riportare l affilatoio nella posizione originaria 8 1 8...

Page 10: ...350 370 Cut thickness mm 0 2 5 0 2 5 Actual cut Width mm 270 270 Height mm 240 250 Tray run mm 320 320 Maximum dimensions values in mm Dimensions and weight VOLANO 350 VOLANO 370 A 600 600 B 510 510...

Page 11: ...Handle 3 Trolley 4 Slice thickness graduated knob 5 Plate quick forward 6 Goods holder tray 7 Presser 8 Sharpener 9 Blade 10 Blade protector 11 Slice protector 12 Collection plate 13 Waste collection...

Page 12: ...the goods to slice on the 6 tray 7 3 1 5 6 6 lower the 7 goods presser to hold the product in place rotate the 5 knob clockwise and simultaneously move the 6 tray to the left thus bringing the product...

Page 13: ...12 plate once completed slicing return the 10 blade protection to idle position A WHEN THE MACHINE IS NOT IN USE ALWAYS COVER THE BLADE Cleaning the machine For all cleaning operations always and exc...

Page 14: ...ean the 9 blade as illustrated starting from the centre and towards the outside 15 6 3 9 open the 11 slice protection and carefully clean the inside loosen the locking 10 1 knob to remove the 10 blade...

Page 15: ...only use a cloth dampened with water and normal dishwashing liquid soap Blade sharpening Loosen the 16 locking knob on the 8 sharpener lift the sharpener and rotate it at 180 carefully lower the 8 sh...

Page 16: ...edge has made a slight burr set the hand wheel in rotation again and simultaneously press the 8 2 knob only for 2 3 seconds return the blade sharpener to its original position 8 1 8 2 Lubrication One...

Page 17: ...70 paisseur de coupe mm 0 2 5 0 2 5 Coupe utile Largeur mm 270 270 Hauteur mm 240 250 Course chariot mm 320 320 Dimensions d encombrement maximum valeurs en mm Dimensions et poids VOLANO 350 VOLANO 37...

Page 18: ...ign e num rot e paisseur tranche 5 Levier d avancement rapide plateau 6 Plateau porte produit 7 Presse produit 8 Aff teur 9 Lame 10 Protection lame 11 Guide tranche 12 Plateau de recueil 13 Cuvette d...

Page 19: ...au 6 le produit d biter baissez le bras presseur 7 en bloquant le produit tournez le bouton 5 dans le sens des aiguilles d une montre et simultan ment d placez vers la gauche le plateau 6 pour rapproc...

Page 20: ...ition repos A lorsque l op ration de coupe est termin e QUAND VOUS N UTILISEZ PAS LE TRANCHEUR NE LAISSEZ JAMAIS LE COUTEAU AVEC LE FIL A NU Nettoyage de la machine Pour les op rations de nettoyage ut...

Page 21: ...aution en partant du centre verse l ext rieur 15 6 3 9 ouvrez le d viateur de tranche 11 et nettoyez en l int rieur toujours avec pr caution retirez le prot ge lame 10 apr s avoir desserre la poigne d...

Page 22: ...yer utiliser uniquement un chiffon imbib d eau et d un d tergent normal pour la vaisselle Aff tage de la lame Desserrer le pommeau de blocage 16 de l aff teur 8 soulever ce dernier et le tourner de180...

Page 23: ...est form une l g re bavure orientez de nouveau le volant et appuyez simultan ment seulement sur la touche 8 2 pendant 2 3 secondes replacez le dispositif d aff tage sa position d origine 8 1 8 2 Lubr...

Page 24: ...350 370 Schnittst rke mm 0 2 5 0 2 5 Nutzbarer Schnitt Breite mm 270 270 H he mm 240 250 Tellerhub mm 320 320 Maximale Au enma e Angaben in mm Au enma e und Gewicht VOLANO 350 VOLANO 370 A 600 600 B...

Page 25: ...er Schneidgutscheibe 5 Knauf f r Schnellvorschub 6 Schneidgutteller 7 Schneidgutpresse 8 Schleifvorrichtung 9 Klinge 10 Klingenschutzabdeckung 11 Schutz f r Schneidgutscheibe 12 Aufnahmeteller 13 Abfa...

Page 26: ...en Aufschnitt auf den Teller 6 legen die Schneidgutpresse 7 senken und das Schneidgut damit blockieren den Knauf 5 in den Uhrzeigersinn drehen und gleichzeitig den Schneidgutteller 6 nach links versch...

Page 27: ...en nach beendetem Vorgang die Klingenschutzabdeckung 10 wieder in die geschlossene Stellung A zur ckf hren DIE MASCHINE NIEMALS BEI FREIGESETZTER KLINGE UNBENUTZT LASSEN Reinigung der Maschine Zur Rei...

Page 28: ...rsichtig von der Mitte ausgehend nach au en reinigen 15 6 3 9 den Scheibenschutz 11 ffnen und die Innenseite sorgf ltig reinigen die Klingenschutzabdeckung 10 abnehmen nachdem der Verriegelungskugelgr...

Page 29: ...ein mit Wasser und normalem fl ssigen Geschirrsp lmittel getr nktes Tuch benutzen Klinge schleifen Den Verriegelungsknopf 16 der Schleifvorrichtung 8 lockern die Schleifvorrichtung heben und um 180 d...

Page 30: ...e gebildet hat das Handrad nochmals drehen und gleichzeitig nur die Taste 8 2 dr cken und 30 bis 40 Sekunden lang gedr ckt halten die Schleifvorrichtung in die urspr ngliche Position 8 1 8 2 Schmieren...

Page 31: ...30...

Page 32: ...31...

Reviews: