Contura 750 Installation Instructions Manual Download Page 26

GB

18

Lighting Instructions

It is important that the correct amount of wood is used, espe-
cially when lighting. If you are lighting the fire for the first time 
you should use a set of scales to see how much 2.0 kg kindling is. 
Also check what the normal and maximum weights look like. 
The stove may only be lit with the hatch closed. 
Always open the hatch carefully and slowly to prevent blow back 
because of the changing pressure in the stove.
The function of the stove differs depending on the draft condi-
tions in the chimney. Achieving the correct setting for the 
combustion air damper, suitable size and amount of wood usually 
takes a few attempts.

Lighting in the
right way

Correctly sized wood

Lighting

Adding wood

Note that if too little kindling is used when lighting, or if the 
wood is too thickly cut, the firebox will not reach the correct 
operating temperature. Incorrect lighting can lead to poor com-
bustion with heavy sooting and may result in the fire going out 
when the hatch is shut.

If the house has mechanical ventilation, open a window near to 
the fireplace prior to lighting. Leave the window open for a few 
minutes until the fire has caught properly.

Kindling: Finely chopped wood
Length: 25-30 cm
Diameter: 2 - 5 cm
Amount per firing: 2.0 kg
(approx. 10-12 finely chopped pieces)

Feeding Wood: Chopped wood
Length: 25-30 cm
Diameter: 7 - 9 cm
Normal amount: 1.3 kg/hour (2 pieces)
Max amount: 2.4 kg/hour (max 3
pieces per insertion. Max 1.8 kg per insertion)

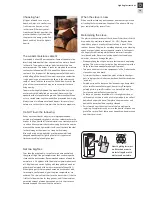
It is important that the wood catches fire 
quickly. Quick lighting is achieved by opening the 
combustion air damper fully or by leaving the 
hatch ajar for a moment. 
Pyre lighting produces a lot of smoke and can 
cause quick gas ignition in the worst instance 
resulting in hearth damage.

Important!

NOTE!
The left hand handle that controls the grate disc must be 
closed during lighting.

1.  Open the control for the combustion air fully. 
2.  Insert paper or firelighters and about 2.0 kg of thinly chopped 

kindling into the firebox. Stack the wood crosswise.

3.  Light the fire.
4.   Set the hatch to the lighting position, that is with the lower 

hook against the lock roller to create a sufficient gap (see 
figure).

5.   When the fire has caught fully after approx 5-10 minutes, 

close the hatch completely.

6.   A slight amount of soot may build up on side glass during the 

start-up fire. This is normal and vanishes after a period.

7.   A fresh load of logs should not be put on until the start-up fire 

has become a glowing bed of embers.

1.   Open the hatch a few centimetres and allow the vacuum in the 

firebox to equalise for a few seconds before opening the hatch 
fully.

2.   Add 2-3 logs of a combined weight of approx 1.2–1.5 kg. Lay 

the logs diagonally on each other so that the flame can take 
easily. Then close the hatch.

3.   The combustion damper must be completely open for 3-5 

minutes or until the logs turn black and catch fire. If slower 
combustion is then required, the supply of combustion air can 
be reduced. The conditions for controlling combustion vary 
depending on the temperature in the firebox and the draft in 
the chimney.

4.   An average energy output of 5 kW is achieved when the com-

bustion air damper is 40% open and 2 logs weighing about 
1.3-1.5 kg are added once per hour.

5.   The lowest output of 3-4 kW is obtained when the combus-

tion air damper is 30% open. In this operating position it is 
important that the combustion air damper is fully open for the 
first 3-5 minutes so that the wood has time to ignite properly 
before the supply of combustion air is reduced. A condition 
for regulating the output is a thick bed of embers and high 
temperature in the firebox. When the fire has died down to 
embers more wood should be added.

Summary of Contents for 750

Page 1: ... Approved Document J Should any conflict apply between these instructions and the original manufacturers instructions then the most stringent advice must apply Please note that it is a legal requirement under England and Wales Building Regulations that the installation of the stove is either carried out under Local Authority Building Control approval or is installed by a Competent Person registere...

Page 2: ...ossibility of disturbing any asbestos in the course of installation then please seek specialist guidance and use appropriate protective equipment Metal Parts When installing or servicing this stove care should be taken to avoid the possibility of personal injury STOVE PERFORMANCE Refer to the manufacturer s main instruction manual for details of the stove s performance PREPARATORY WORK AND SAFETY ...

Page 3: ...230 mm x 230 mm Remedial action should be taken if required seeking expert advice if necessary If it is found necessary to line the chimney then a flue liner suitable for solid fuel must be used in accordance with Building Regulations Approved Document J Any existing chimney must be clear of obstruction and have been swept clean immediately before installation of the stove If the stove is fitted i...

Page 4: ...ey to be swept through the appliance Hearth The hearth should be level and able to accommodate the weight of the stove and its chimney if the chimney is not independently supported The weight of the stove is indicated in the brochure The stove should preferably be installed on a non combustible hearth of a size and construction that is in accor dance with the provisions of the current Building Reg...

Page 5: ...e the diameter of the flue to the minimum required 150 mm section of the chimney or liner All joints in the connection between the stove and the chimney must be made gastight using fire cement and where necessary fire proof rope infill Means should be made for sweeping the entire length of the flue be that through the appliance or by suitable sweeping hatch in the flue Commissioning and handover E...

Page 6: ...the fire go out c Check for flue or chimney blockage and clean if required d Do not attempt to relight the fire until the cause of the fume emission has been identified and corrected If necessary seek expert advice The most common cause of fume emission is flueway or chimney blockage For your own safety these must be kept clean at all times IMPORTANT NOTES General Before lighting the stove check w...

Page 7: ...the chimney will require sweeping after a month of continuous operation This is a precaution to ensure that any softer deposits left from the open fire usage have not been loosened by the higher flue temperatures generated by the closed stove In situations where it is not possible to sweep through the stove the installer will have provided alternative means such as a soot door After sweeping the c...

Page 8: ...quires a permanent and adequate air supply in order for it to operate safely and efficiently In accordance with current Building Regulations the installer may have fitted a permanent air supply vent into the room in which the stove is installed to provide combustion air This air vent should not under any circumstances be shut off or sealed USER OPERATING INSTRUCTIONS Please read the important noti...

Page 9: ... an offence to acquire an unauthorised fuel for use within a smoke control area unless it is used in an exempt appliance exempted from the controls which generally apply in the smoke control area The Secretary of State for Environment Food and Rural Affairs has powers under the Act to authorise smokeless fuels or exempt appliances for use in smoke control areas in England In Scotland and Wales thi...

Page 10: ...d with a mechanical stop to prevent closure of the air control vent beyond the 28 open position when sold into smoke control areas The Contura i4 series must be fitted with a mechanical stop to prevent closure of the air control vent beyond the 30 open position when sold into smoke control areas The Contura i5 series must be fitted with a mechanical stop to prevent closure of the air control vent ...

Page 11: ......

Page 12: ...811142 BAV GB 7 2014 03 03 NIBE AB Box 134 285 23 Markaryd Sweden www contura eu ...

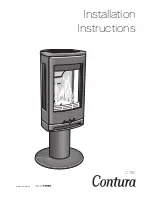
Page 13: ...C 780 www contura eu Installation Instructions ...

Page 14: ...e aspect of our vision to be a company of the future setting high quality standards regarding the environment Certification number 378 001 www contura eu EC Declaration of conformity Manufacturer name NIBE AB NIBE STOVES address Box 134 Skulptörvägen 10 SE 285 23 Markaryd Place of manufacture Markaryd Sweden PrODuct Product type Stove fired by solid fuel type designation Contura 780 Standard EN 13...

Page 15: ...ad how to best light your stove in the lighting instructions The stove becomes very hot During operation certain surfaces of the stove become very hot and can cause burn injury if touched Be aware of the strong heat radiated through the hatch glass Placing flammable material closer than the safe distance indicated may cause a fire Pyre lighting can cause quick gas ignition with the risk of damage ...

Page 16: ...uitable technicians Building application These main insructions may give guidance which would contravene national building regulations Please refer to supplementary instructions or ask your local authority for advice regarding building regulations Before installing a stove or erecting a chimney it is necessary for you to make a building application permission to your local authority Structural sup...

Page 17: ...connection sleeve is 150 mm The stove requires a draft in the chimney of at least 12 Pa The draft is affected both by the length and area of the chimney and by how well sealed it is Minimum recommended chimney length is 3 5 m and a suitable cross section area is 150 200 cm 140 160 mm in diameter A flue with sharp bends and horizontal routing reduces the draught in the chimney Maximum horizontal fl...

Page 18: ...be selected In hot areas the duct should be insulated with 30 mm mineral wool covered with a moisture inhibitor plastic It is important that the lead in between the pipe and the wall or floor is sealed using jointing compound A 1 m length of condensation insulated ducting for combustion air is available as an accessory Through the external wall Indirect air supply through the external wall Through...

Page 19: ...nces for the stove When connecting to a steel flue also note the safety distance requirements of the flue The safety distance between an un insulated flue and a combustible part of the building should be at least 450 mm Installation distances WHEN INSTALLING TURNTABLE OPTION the following installation distances do not apply See the separate installation instructions for turntable 631 400 278 278 2...

Page 20: ...Y Remove loose parts before the insert is placed on its back 3 4 Do not tighten the screws before the sides and back are installed Do not tighten the screws until the stove has been raised again 2 1 Installing C 780 ...

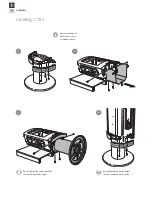
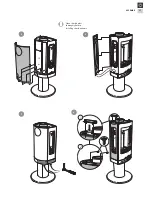
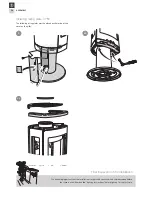
Page 21: ...GB 57 ASSEMBLY Clean the side glass thoroughly before installing the side panels 5 8 6 7 1 2 ...

Page 22: ... must be placed on the inside of the cover on the pillar Final inspection of the installation It is extremely important that the installation is inspected by an authorised chimney sweep before the stove is used Also read the Lighting instructions before lighting for the first time ...

Page 23: ...VAL How to remove the hearth surround Handle the vermiculite with care Lift the smoke baffle with one hand whilst removing the sides The side posts need not be removed when sweeping Reinstall in reverse order 2 1 ...

Page 24: ...u Contura reserves the right to change colours materials dimensions and models at any time without special notice Your dealer can give you the most up to date information Stoves shown in brochures may have extra equipment 811079 IAV SE EX C780 8 2012 06 14 ...

Page 25: ...Lighting Instructions C 750 C 780 www contura eu ...

Page 26: ...h damage Important NOTE The left hand handle that controls the grate disc must be closed during lighting 1 Open the control for the combustion air fully 2 Insert paper or firelighters and about 2 0 kg of thinly chopped kindling into the firebox Stack the wood crosswise 3 Light the fire 4 Set the hatch to the lighting position that is with the lower hook against the lock roller to create a sufficie...

Page 27: ...bers The ash must be stored in a fireproof container with a lid for at least one week before being disposed of The grate and other cast iron components in the firebox can be cleaned using a wire brush It is important from a combustion point of view to check gas kets as worn gaskets hinder combustion when the stove draws extra air Painted parts on the stove can be cleaned using a damp cloth with a ...

Page 28: ...the room Check that the combustion air damper is open The smoke outlet of the stove may be blocked with soot which can occur after sweeping Lift the smoke baffle out and check Finally go through the lighting instructions again Perhaps the amount of kindling was too small and therefore the base embers were too weak and cold to light the next load of wood There is always a certain amount of soot on ...

Reviews: