background image

Parameter 

Supported Values 

Protocol 

None, Modbus RTU or Modbus ASCII 

Default: Modbus RTU


Addressing Mode 

Standard or Extended 

Default: Standard


4.1.2 

COM2 RS-232 Serial Port 

Connections to COM2 are made through a RJ-45 modular connector. The wiring and pin 
connections for this connector are described in section 

4.1.4-RJ-45 Modular Connector for RS-232

Refer to section 

3.1-


Field Wiring Connections

 for the location of COM2 on the SCADAPack 32P. 

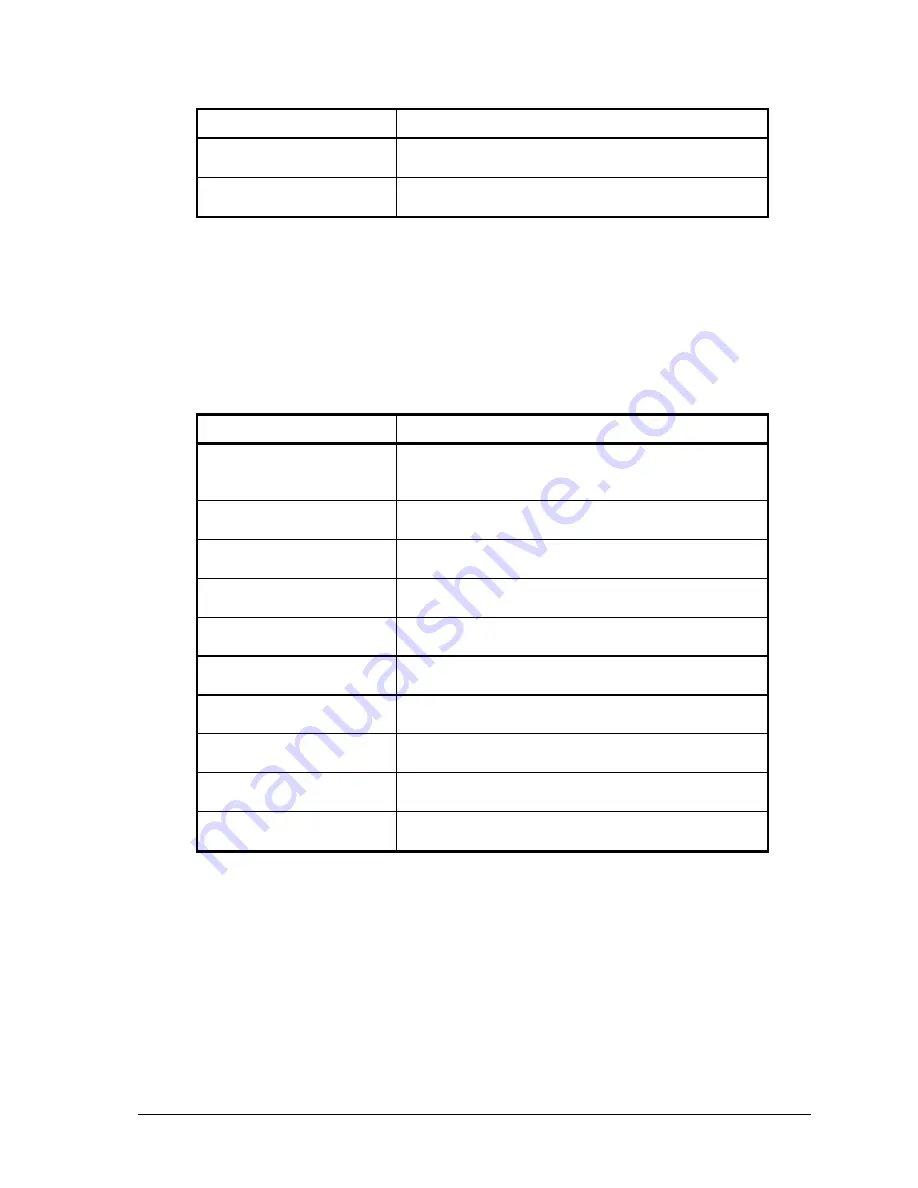
The following table shows the serial and protocol communication parameters supported by COM2. 
These parameters are set from TelePACE, ISaGRAF Workbench or from an application program 
running in the SCADAPack 32P controller. Default values are set when a Cold Boot or Service Boot 
is performed on the SCADAPack 32P controller. 

Parameter 

Supported Values 

Baud Rate 

300, 600, 1200, 2400, 4800, 9600, 19200, 38400, 
57600 and 115200. 

Default: 9600


Duplex 

Full or Half 

Default: Full


Parity 

Odd, None or Even 

Default: None


Data Bits 

7 or 8 Bits 

Default: 8 Bits


Stop Bits 

1 or 2 Bits 

Default: 1 Bit


Receive Flow Control  

ModbusRTU or None 

Default: ModbusRTU


Transmit Flow Control 

Ignore CTS or None 

Default: None


Station 

1 to 65534 

Default: 1


Protocol 

None, Modbus RTU or Modbus ASCII 

Default: Modbus RTU


Addressing Mode 

Standard or Extended 

Default: Standard


4.1.3 

COM4 RS-232 Serial Port 

Connections to COM4 are made through a RJ-45 modular connector. The wiring and pin 
connections for this connector are described in section 

4.1.4

-

RJ-45 Modular Connector for RS-232

Refer to section 

3.1-


Field Wiring Connections 

 for the location of COM4 on the SCADAPack 32P. 

The following table shows the serial and protocol communication parameters supported by COM4. 
These parameters are set from TelePACE, ISaGRAF Workbench or from an application program 
running in the SCADAPack 32P controller. Default values are set when a Cold Boot or Service Boot 
is performed on the SCADAPack 32P controller. 

SCADAPack 32P Controller Hardware Manual 
May 26, 2006 


16

Summary of Contents for SCADAPack 32P

Page 1: ...Controller Hardware Manual CONTROL MICROSYSTEMS SCADA products for the distance 48 Steacie Drive Telephone 613 591 1943 Kanata Ontario Facsimile 613 591 1022 K2K 2A9 Technical Support 888 226 6876 Canada 888 2CONTROL ...

Page 2: ...6 and TeleBUS are registered trademarks of Control Microsystems Inc All other product names are copyright and registered trademarks or trade names of their respective owners Material used in the User and Reference manual section titled SCADAServer OLE Automation Reference is distributed under license from the OPC Foundation SCADAPack 32P Controller Hardware Manual May 26 2006 1 ...

Page 3: ...tion 10 3 2 7 System Grounding 11 3 3 Internal Analog Inputs 11 3 4 Digital Counter Inputs 12 3 5 Interrupt Input 13 3 6 Status Output 13 4 SERIAL COMMUNICATION 15 4 1 RS 232 Serial Communications Ports 15 4 1 1 COM1 RS 232 Serial Port 15 4 1 2 COM2 RS 232 Serial Port 16 4 1 3 COM4 RS 232 Serial Port 16 4 1 4 RJ 45 Modular Connector for RS 232 17 4 2 RS 232 Wiring Examples 18 4 2 1 DTE to DTE with...

Page 4: ... Run Mode 29 6 2 Service Mode 29 6 3 Cold Boot Mode 30 6 4 SCADAPack 32P LED Indicators 30 6 5 LED Power Control 31 6 6 Status LED and Output 31 6 6 1 I O Module Error Indication 32 6 6 2 Register Assignment Checksum Error 32 6 6 3 Too Many I O Operations Requested Error 32 6 7 Configuration Switches 33 6 7 1 Digital Input Filters 33 6 7 2 Line Frequency Selection 34 7 MAINTENANCE 35 7 1 Fuses 35 ...

Page 5: ... 5 Power Supply 38 8 6 I O Capacity 39 8 7 Digital Inputs 39 8 8 Digital Outputs 39 8 9 Approvals and Certifications 39 Index of Figures Figure 1 SCADAPack 32P 5 Figure 2 5232 Controller Module 8 SCADAPack 32P Controller Hardware Manual May 26 2006 4 ...

Page 6: ... for connection to modems and radio modems The RS 232 and RS 485 ports operate at baud rates from 300 baud to 38400 baud Using 5000 Series I O modules can expand the I O capacity of SCADAPack 32P Controllers A maximum of forty 5000 Series I O modules may be connected for an expansion of up to 512 digital outputs 512 digital inputs 128 analog inputs 32 counters and 32 analog outputs The 5232 Contro...

Page 7: ...de for installations within Canada and in accordance with the authority having jurisdiction WARNING EXPLOSION HAZARD SUBSTITUTION OF COMPONENTS MAY IMPAIR SUITABILITY FOR CLASS 1 DIVISION 2 WARNING EXPLOSION HAZARD WHEN IN HAZARDOUS LOCATIONS TURN OFF POWER BEFORE REPLACING OR WIRING MODULES WARNING EXPLOSION HAZARD DO NOT DISCONNECT EQUIPMENT UNLESS POWER HAS BEEN SWITCHED OFF OR THE AREA IS KNOW...

Page 8: ...ush the connector onto the pins Apply even pressure to both ends of the connector 3 1 1 5232 Controller Board Field Wiring Connectors The 5232 Controller board has six termination connectors for the connection of field wiring Refer to the diagram Figure 2 5232 Controller Module for field wiring connector locations Primary power input connections output power connection and ground connections are w...

Page 9: ...With input power applied the 5232 Controller board power supply provides an internal 5V output to power 5000 Series modules through the inter module cable IMC The 5V supply has a 1 3A output capacity of which 500mA is required by the 5232 Controller board The remaining capacity 800mA is used to power 5000 Series modules connected through the IMC cable When the 5232 Controller board is powered with...

Page 10: ...ation uses a single Class 2 transformer to power the SCADAPack 32P 24V are available on the controller module connector P3 They are used to power the analog circuitry for the analog input circuits on additional 5000 Series Analog I O modules AC DC PWR IN DC PWR 120 Vrms 16 Vrms 1 2 3 4 5 6 Class 2 Transformer P3 24 V for transmitters SCADAPack 32P 3 2 4 Recommended DC Power Supply Configuration Th...

Page 11: ...roller next to the power input connector and fuses This link may be cut in DC applications only AC DC PWR IN DC PWR 1 2 3 4 5 6 P3 SCADAPack 32P 24V Battery Supply 3 2 6 Recommended 5103 Power Supply Configuration When additional power is required by the system 5000 Series 5103 power supplies can be used in combination with the SCADAPack 32P controllers Refer to the System Configuration Guide for ...

Page 12: ...rogram The ambient temperature input measures the temperature at the controller circuit board It is useful for measuring the operating environment of the controller and returns an integer value in the range 40 to 75 deg C or 40 to 167 deg F The temperature reading represents temperatures in the range 40 C to 75 C or 40 F to 167 F Temperatures outside this range cannot be measured For TelePACE appl...

Page 13: ...Controller Digital Inputs register assignment to read the DIN Counter inputs as digital inputs For ISaGRAF applications use the cntrCtrl I O connection to read the DIN Counter inputs as counters and the dinCtrl I O connection to read the DIN Counter inputs as digital inputs Each of the three digital counter DIN Counters inputs on the SCADAPack 32P controller has a switch selectable filter which li...

Page 14: ...nput For ISaGRAF applications use the cntrint I O connection to read the INT Cntr input as a counter input and the dinint I O connection to read the INT Cntr input as a digital input The diagram below shows how to wire this input 3 4 2 5 28V INT 2 1 5 6 7 8 P4 3 6 Status Output The SCADAPack 32P status output indicates an alarm condition to an external device The output is ON capable of conducting...

Page 15: ...of this relay are used to activate an alarm The relay in this application has a 24V coil with greater than 400Ω resistance Relay Coil Specifications 24V 400 ohms 60mA 3 4 STATUS NC NO COM 24 V NC ALARM CONTACTS closed during power failures and fault conditions 2 1 5 6 7 8 P4 SCADAPack 32P Controller Hardware Manual May 26 2006 14 ...

Page 16: ...n RS 485 mode Refer to Figure 2 5232 Controller Module for the location of COM1 and jumpers J9 and J10 For information on using COM1 as a RS 485 serial port refer to section 4 4 RS 485 Serial Communication Port Connections to COM1 are made through a RJ 45 modular connector The wiring and pin connections for this connector are described in section 4 1 4 RJ 45 Modular Connector for RS 232 The follow...

Page 17: ...uplex Full or Half Default Full Parity Odd None or Even Default None Data Bits 7 or 8 Bits Default 8 Bits Stop Bits 1 or 2 Bits Default 1 Bit Receive Flow Control ModbusRTU or None Default ModbusRTU Transmit Flow Control Ignore CTS or None Default None Station 1 to 65534 Default 1 Protocol None Modbus RTU or Modbus ASCII Default Modbus RTU Addressing Mode Standard or Extended Default Standard 4 1 ...

Page 18: ...32 serial ports using a 8 pin female RJ 45 connectors configured as Data Terminal Equipment DTE The recommended specification for RS 232 cable length is a maximum of 50 feet or 15 2 meters Shielded cable must be used and the shield should be connected to chassis ground at one end The following diagram shows the pin connections for the RS 232 RJ 45 port connector for COM1 COM2 and COM4 RJ 45 Modula...

Page 19: ...cation port to transmit data When the attached device does not provide this signal the controller keeps the line at a MARK When the attached device does provide this signal it must set CTS to MARK to allow the controller to transmit data 8 RTS Output This pin is a MARK if full duplex operation is selected for the port This pin is set to a MARK just before and during transmission of data if half du...

Page 20: ...M port DTE DTE DCD RxD TxD DTR GND RTS CTS 5V DCD RxD TxD DTR GND RTS CTS See device specifications for pin numbers 4 2 3 DTE to DCE with Handshaking DCE devices require different wiring The handshaking lines must be connected in most cases Note that many DCE devices are half duplex Select half duplex operation with these devices The diagram below shows common connection of a SCADAPack with a DCE ...

Page 21: ...4 4 RS 485 Serial Communication Port Serial port COM1 on the SCADAPack 32 controller may be configured as an RS 485 serial communication port A jumper must be installed on J9 to operate COM1 in RS 232 mode Refer to section 3 1 Field Wiring Connections for the location of J9 When configured as a RS 485 port COM1 transmits and receives differential voltages to other RS 485 devices on a network The R...

Page 22: ...vel is a voltage of 3V or greater and a SPACE level is a voltage of 3V or less Pin Function Description 1 5V Output This pin can be connected to the 5V power supply by installing a jumper at J4 on the SCADAPack 32P 2 Rx Input The DCD led is on for a MARK level 3 Tx Output This pin is normally at a MARK level This pin is at a SPACE level when DTR is de asserted 4 GND This pin is connected to the sy...

Page 23: ... resistor is built into the SCADAPack 32P controller When these termination resistors are used the biasing generally has to be increased in order to generate at least 0 2V across the Rx input To connect the termination resistors Install a jumper across J8 to terminate the Rx pair Install a jumper across J7 to terminate the Tx pair To disconnect the termination resistors Remove the jumper across J8...

Page 24: ...rk 4000 feet 1200 m maximum length 4 5 2 Two wire mode Two wire operation uses one pair of wires for transmitting and receiving data Tx must be connected to Rx and Tx must be connected to the Rx This pair of wires becomes the transmitting and receiving pair The following diagram shows the wiring details for a two wire connection SCADAPack 32P Controller Hardware Manual May 26 2006 23 ...

Page 25: ...le is used to connect from an RJ 45 based RS 485 port on the SCADAPack 32P controller to other RS 485 devices The cable has a RJ 45 connector on one end and stripped wires at the other end A 10 foot long cable is available from Control Microsystems as part number 297234 RJ45 Function Wire color Connect to Chassis Shield 3 Tx Orange 6 Tx Blue 5 Rx Grey 2 Rx Brown 4 GND Black 7 Do not connect Yellow...

Page 26: ...RJ45 Function Wire color 8 Do not connect Green 1 5V Red SCADAPack 32P Controller Hardware Manual May 26 2006 25 ...

Page 27: ...255 255 Default 0 0 0 0 The IP Address is the address of the controller The IP address is statically assigned Contact your network administrator to obtain an IP address for the controller The Subnet Mask is determines the subnet on which the controller is located The subnet mask is statically assigned Contact your network administrator to obtain the subnet mask for the controller The Gateway deter...

Page 28: ...s the server to use all connections for incoming connections Setting the value below the maximum limits the number of incoming connections from remote devices This reserves the remaining connections for use by the controller for outgoing connections The TCP Port parameter sets the port used by the Modbus TCP protocol In almost all cases this should be set to 502 This is the well known port number ...

Page 29: ... 350 feet but the actual limit is based on signal loss and the noise in the environment This may limit the practical distance to less than 100m or 350 feet The Ethernet cables should not be run in parallel with power or any cables that generate noise SCADAPack 32P Controller Hardware Manual May 26 2006 28 ...

Page 30: ...d during application programming and maintenance work When the SCADAPack 32P controller starts in SERVICE mode The default serial communication parameters are used See section 4 1 RS 232 Serial Communications Ports of this manual for a description of the default parameters The user defined TCP IP parameters are used for the Ethernet port The default Modbus TCP parameters are used for the Ethernet ...

Page 31: ...the LED POWER button is released before the STAT LED begins to flash the SCADAPack 32P controller will start in SERVICE mode 6 4 SCADAPack 32P LED Indicators There are twenty three LEDs on the SCADAPack 32P SCADAPack 32P These LEDs are used to indicate the operational status of the controller All LEDs except the 5V LED can be disabled to conserve power Refer to section 6 5 LED Power Control for de...

Page 32: ...OWER push button toggles the LED power state Press the LED POWER push button to toggle LED power state from disable to enable or from enable to disable The default setting of the LED power state is LED power enabled The LED power returns to the default state 5 minutes after the LED POWER push button is last pressed The application program may change the default state and time to return to the defa...

Page 33: ...e by removing the module from the Register Assignment Table Download the changes to the controller The Status LED should stop flashing If a module is currently not connected to the controller delete it from the Register Assignment Table Download the changes to the controller The Status LED should stop flashing If unused modules must be intentionally left in the Register Assignment Table the I O er...

Page 34: ...tches See section 3 1 Field Wiring Connections for SW1 location Slide the switch actuator to the right side of the switch to enable the switch function Slide the switch actuator to the left side of the switch to disable the switch function 6 7 1 Digital Input Filters Each of the three digital counter DIN Counters inputs on the SCADAPack 32P SCADAPack 32P can be filtered Filtering limits the maximu...

Page 35: ...ing the line frequency This side for 50Hz This side for 60 Hz How to Set the Frequency Switch Determine the desired range Slide the actuator to the side of the switch shown in gray 60 Hz Operation SW1 2 1 2 3 4 0 1 not used Options Filters SW1 2 1 2 3 4 0 1 not used Options Filters 50 Hz Operation SCADAPack 32P Controller Hardware Manual May 26 2006 34 ...

Page 36: ...ing unit Always replace a defective fuse with a fuse of the same rating Under no circumstances should a fuse be bypassed or replaced with a fuse of a higher rating The fuse is a Littelfuse Nano SMF Littelfuse part number LF R452 001 Control Microsystems part number 200072 In all cases investigate and correct the cause of the fuse failure before replacement Common causes of fuse failure are short c...

Page 37: ...tery by gently lifting it straight up from the circuit board The battery has two pins that mate with two sockets on the circuit board Replace the battery A replacement tie wrap is not necessary Cold boot the controller Refer to section 6 3 Cold Boot Mode section in of this manual for the Cold Boot procedure Warning If a cold boot is not done the behavior of the controller is unpredictable The cont...

Page 38: ...8Mbytes SDRAM 1024kBytes CMOS RAM Non volatile RAM CMOS RAM with lithium battery retains contents for 2 years with no power Clock calendar 1 minute month at 25 C 1 3 minutes month 0 to 50 C Internal temperature Measurement range 40 C to 75 C Accuracy 5 C Measurement range 40 F to 167 F Accuracy 9 F Lithium battery monitor Accuracy 0 2V 8 3 Communications Communication Ports 2 RS 232 serial ports C...

Page 39: ... Ethernet port connected to a network LINK LED I O module LED power status LED Status LED shows functional status 5V power LED LED power not applicable Run LED Forced I O LED Counter Inputs 0 1 2 and 3 LEDs Push button LED power toggle 8 5 Power Supply Power Input AC DC PWR IN 16Vrms 20 13 to 24Vdc nominal 30Vdc maximum DC power Input DC PWR 30V maximum 10 7V typical turn on 9V typical turn off 5 ...

Page 40: ...Input Frequency Counter 0 1 2 5 kHz maximum with filter OFF 30 Hz maximum with filter ON Counter Input Frequency Counter 3 500 Hz maximum Transient Protection Transient 2 5kV surge withstand capability as per ANSI IEEE C37 90 1 1989 8 8 Digital Outputs Status Output Opto coupler open collector transistor 30V 60mA opens on fault Transient Protection Transient 2 5kV surge withstand capability as per...

Page 41: ...electromagnetic compatibility The Low Voltage Directive is not applicable to this product SCADAPack 32P Controller Hardware Manual May 26 2006 40 ...

Reviews: