Regulatory Compliance
FCC
This device complies with Part 15 of the FCC Rules. Operation is subject to the following two conditions: (1)
this device may not cause harmful interference, and (2) this device must accept any interference received,
including interference that may cause undesired operation of this device.
Son fonctionnement est soumis aux deux conditions suivantes: (1) cet appareil ne doit pas causer
d’interférences nuisibles et (2) cet appareil doit accepter toute interférence reçue, y compris les inter-
férences qui peuvent causer un mauvais fonctionnement du dispositif.
This equipment has been tested and found to comply with the limits for a Class B digital device, pursuant
to Part 15 of the FCC Rules. These limits are designed to provide reasonable protection against harmful
interference in a residential installation. This equipment generates, uses, and can radiate radio frequency
energy and, if not installed and used in accordance with the instructions, may cause harmful interference
to radio communications. However, there is no guarantee that interference will not occur in a particular
installation. If this equipment does cause harmful interference to radio or television reception, which can be
determined by turning the equipment off and on, the user is encouraged to try to correct the interference by
one or more of the following measures:
•
Reorient or relocate the receiving antenna.
•
Increase the separation between the equipment and receiver.
•
Connect the equipment into an outlet on a circuit different from that to which the receiver is con-
nected.
•
Consult the dealer or an experienced radio/TV technician for help.
This product has been tested to the requirements of, and shown to be in compliance with, the following
requisite standard:
Industry Canada
This Class B digital apparatus complies with Canada ICES-003.
Cet appareil numérique de la classe B est conforme à la norme NMB-003 du Canada.
Electrical Testing Labs (ETL)
This product has been tested by ETL and has been found to be in compliance
with:
UL 60065, 7th Edition, 2006 + A1; 2006 - Audio, Video and Similar Electrical Apparatus — Safety Require-
ments
CAN/CSA C22.2 No. 60065-03, Ed. 1; Revision: 01/01/2007 Standard for Audio, Video
and Similar Electrical Apparatus
Europe
CE Declaration of Conformity
IMPORTANT!
Any changes or modifications not expressly approved by the party
responsible for compliance could void the user’s authority to operate this equipment.
North America
About this Document
©2011 Control4. All rights reserved. Control4, the Control4 logo, the Control4 iQ logo and the Control4 certi-
fied logo are registered trademarks or trademarks of Control4 Corporation in the United States and/or other
countries. All other names and brands may be claimed as the property of their respective owners. Pricing
and specifications are subject to change without notice.
Part Number: 200-00094, Rev. D 3/21/2011
Recycling
For information on recycling, please go to www.control4.com/recycling.
Limited 2-Year Warranty
For complete warranty information, including details on consumer legal rights as well as warranty exclu-
sions, visit www.control4.com/warranty.
Launch Composer. Connect to a Local or Remote Director: Open the Director project
for the controller that will control the multi tuner. For more information, refer to
Com-
poser Pro Getting Started
.
Add the multi tuner to the system tree:
1
2
Configure the Multi Tuner V2
Use the Control4 Composer software to add the multi tuner to an existing system and
configure it:
In the System Design view, highlight the room in the tree where the multi tuner will
reside.
In the My Drivers tab (on the right), go to Audio/Video > Tuner and double-click
Tuner.
In the list displayed, double-click the applicable Control4 Multi Tuner V2 model:
C4-TUN2-E-B or C4-TUN2-E-B_with_C4-XMOD (if C4-XMOD is installed). The
associated Tuner objects now display in the tree in the selected room.
a
b
c
Set AV and Network connections:
3
In the Connections view, click the
Control/AV
tab (on the left).
For each tuner object in the tree—such as Tuner, Tuner 2, or
Tuner XM (if using the driver “C4-TUN2-E-B_with_C4-XMOD”)—highlight each one
and ensure it is connected to a radio.
For each tuner object in the tree, highlight each Audio Video Output and then drag
and drop them one-by-one onto an item in the Input Devices list below. The as-
sociation displays in both lists.
Click the Network tab (on the left), right-click on the tuner with the appropriate ad-
dress type: IP (center screen), then choose Identify.
Press the Select Dial on the multi tuner front panel to identify this device to the
system. After a brief delay, the network address for this multi tuner is added to the
Device list.
a
b
c
d
e
Verify that multi tuner is an accessible device: Go to the System Design view and high-
light the room, then go to Properties tab (top and center) > Audio Video Devices tab
(center) to view the Available Audio Sources list for that room.
Now that you have successfully configured the multi tuner, continue to the next section
to set up radio stations.
4
5
Connect to Composer using a Local connection to the Director to which you added the
multi tuner.
Choose the
Media
view.
Highlight a radio in the Media list (on the left): XM Radio, FM Radio, or AM Radio and
then click Search (upper-right).
When the dialog box appears, enter your zip code in the box and then click
Search
.
The available stations display in the Search Results list.
In the Search Results list, select the stations to be added to the user interfaces (On-
Screen Navigator, Wireless Touch Screen, Mini Touch Screen, System Remote Control,
and LCD Keypad): Select individually or click
Select All
.
Click
OK
. The selected stations populate the XM, FM, or AM Radio pane.
Repeat step 3 through step 6 for the remaining radios.
From the File menu, click
Refresh Navigators
. Each radio station you selected is now
available from within the Navigator interfaces.
For XM Tuner models:
1
2
3
4
5
6
7
8
9
Set Up the Radio Stations
To provide users easy access to radio stations throughout the system and to enrich
graphical interfaces, use Composer to search for radio broadcasts and refresh Navigator
interfaces.
Click the
System Design
view and highlight T
uner XM
in the project tree.
On the Properties tab, ensure that the tuner has a good signal and that the SDARS
ID matches the Radio ID listed on Channel 0 of the tuner.
a
b
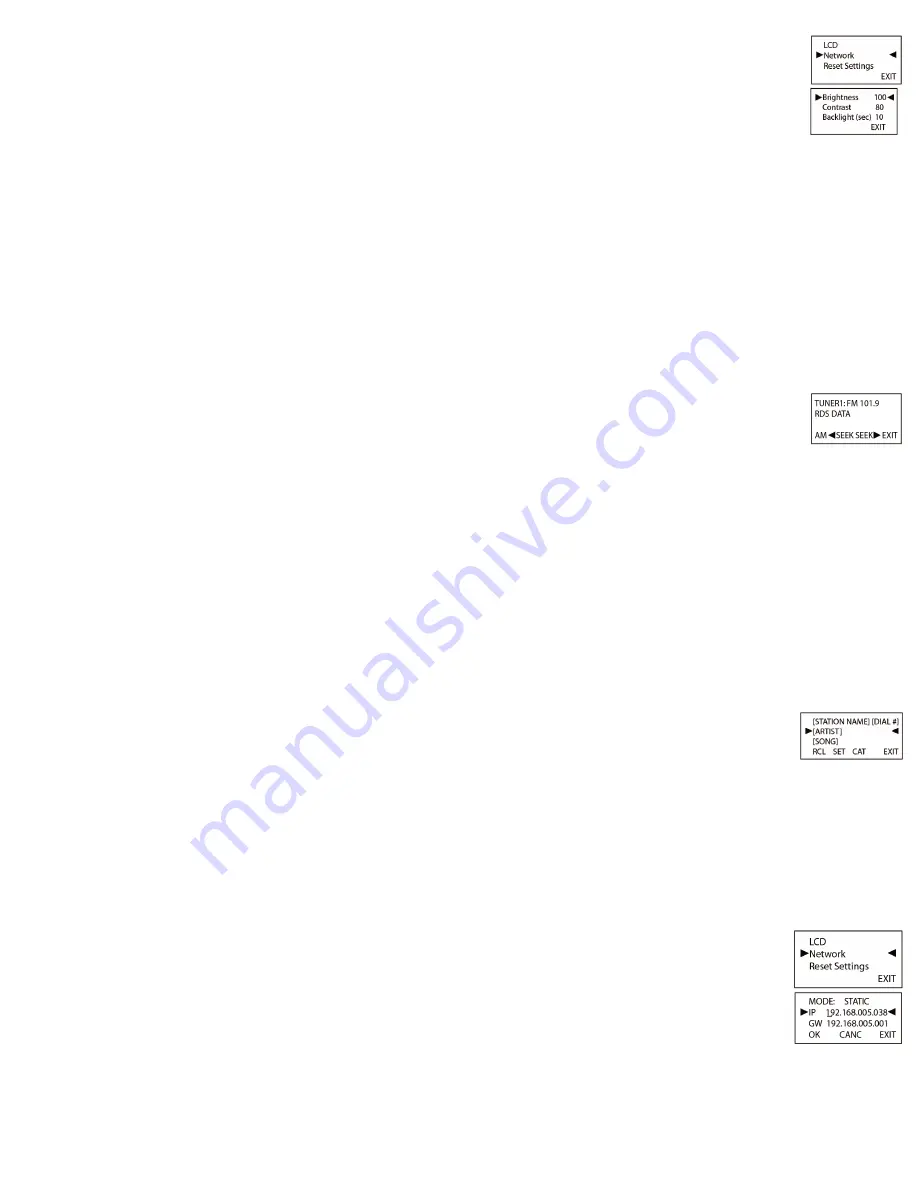
Set LCD Display Preferences
At the main menu, choose Setup. The Settings menu displays with
LCD selected (as shown)
Press the
Select Dial
.
The LCD menu displays.
•
Brightness—Supported range: 0 to 100
•
Contrast—Supported range: 0 to 100
•
Backlight (sec)—Supported settings are:
•
OFF (Always Off)
•
5 to 90 seconds (default is 10 seconds)
•
ON (Always On)
1
2
3
4
5
Any button push or dial push or turn will turn on the LCD Backlight unless OFF is set. If
a specific time is set, this tells the Backlight how long to wait before turning off. If ON is
set, the Backlight will remain on.
At the LCD menu, use the Select Dial to highlight an option, then press the dial to enter
Edit mode. In Edit mode, only the number to be edited is
highlighted.
In Edit mode, turn the Select Dial to change a setting, then press the dial again to exit
Edit mode.
To return to the main menu, choose Exit twice.
Set the Channels from the Front Panel
Tuner 1 (TUN1) to an AM or FM channel:
1
2
3
•
TUNER 1
—Displays the radio station call numbers. It defaults to an FM chan-
nel until you set it.
•
AM/FM
—Press this button to toggle the tuner dial to either AM or FM stations.
When you press the AM menu button, an AM channel displays with the option
to toggle to an FM channel. When you press the FM menu button, an FM
channel displays with the option to toggle to an AM channel.
•
< SEEK SEEK >
—Press these buttons to go to the next available station.
•
EXIT
—Press this to return to the main menu.
Choose
AM
or
FM
to view the first available station.
To change the station, turn the
Select Dial
or press one of the Seek buttons as
needed.
To return to the main menu, press
Exit
.
a
b
c
d
Set a default setting for each tuner from the front panel:
At the main menu, press
TUN1
to tune in an AM or FM channel.
The Tuner 1 menu displays. (In this example, the tuner is tuned
to an FM channel with the AM menu option to toggle to an AM
channel.)
Set Tuner 2 (TUN2) to an AM or FM channel, just as you did for Tuner 1 (TUN1) in step
1, and then press Exit to return to the main menu.
(For tuners upgraded with the XM Module) Set XM tuner (XM) to an XM channel:
a
b
c
d
Press XM to tune in an XM channel. The menu options are:
•
RCL—View preset channels.
•
SET—Set a preset channel.
•
CAT—Display current category.
•
EXIT—Press this to return to the main menu.
To change to another XM channel, turn the Select Dial to scroll through available
channels, then press the dial to select the displayed channel.
To view XM channels in categories: (1) Press CAT. (2) Press the first and fourth
buttons to scroll through available categories. (3) Turn the Select Dial to scroll
through the stations available in the current category. (4) Press the dial to select the
displayed channel.
To return to the main menu, press Exit.
Network Settings
To view network settings:
1
2
3
At the main menu, choose Setup. The Settings menu displays
with LCD selected (as shown).
Turn the
Select Dial
to highlight Network , then press the dial.
The Ethernet settings display. MAC Address, IP Address, De-
fault Gateway Configuration.
When finished viewing, press
Exit
to return to the Setup menu
screen or press Exit twice to return to the main menu.
Set the Static IP Address on the Front Panel
1
2
3
At the main menu, choose Setup. The Settings menu is displayed.
Turn the
Select Dial
to highlight Network , then press the dial. The Ethernet settings
are displayed.
Turn the Select dial to highlight the mode, press the dial (to get into Edit mode), rotate
the Select dial to change the mode to STATIC, and then press the dial or press OK to
save the setting.
4
5
6
Turn the Select dial to highlight the address you want to change and then press the dial
(to get into edit mode). The first octet of the address is selected. Turn the Select dial
up or down to change the value. When the desired value is achieved, press the dial to
advance to the next octet.
Press OK (accept) or CNCL (cancel or revert to previous) to either accept the current
address or revert to the previous address.
When the address has been set up as desired, the tuner must be reset before the
changes will take effect. Press RST to reset the tuner.
The Multi Tuner V2 complies with the standards described in this section
European Contact Information
Control4 UK Limited
Unit 3, Green Park Business Centre
Sutton-on-the-Forest, York
YO61 IET, United Kingdom
+44 (0) 134781 2300,
United States Contact Information
Control4 Corporation
11734 S. Election Road, Suite 200
Salt Lake City, UT 84020-6432, USA
Tel (801) 523-3100
Product:
Multi Tuner V2
(Model # C4-TUN2-E-B; may include Model #C4-XMOD )
The undersigned hereby declares, on behalf of Control4 Corporation, that the above-refer-
enced product, to which this declaration relates, is in conformity with the provisions of:
•
Council Directive 89/336/EEC (May 3, 1989) on Electromagnetic Compatibility
•
Council Directive 1999/5/EC (Mar 9, 1999) on Radio & Telecommunication Terminal
Equipment (R&TTE)
•
Council Directive 73/23/EEC (Feb. 19, 1973) on Low Voltage Equipment Safety
•
Council Directive 93/68/EEC (Jul. 22, 1993) Amending Directives 89/336/EEC and
73/23/EEC
and has been tested to the requirements of, and shown to be in compliance with, the follow-
ing requisite standards:
•
EN 300 328 V1.7.1 (2006-10), Electromagnetic Compatibility and Radio Spectrum
Matters (ERM); wide band transmission systems; data transmission equipment operat-
ing in the 2.4 GHz ISM band and using wide band modulation techniques.
•
EN 55022: 2006 Information Technology Equipment
•
EN 55024: 1998 + A1: 2001 Information Technology Equipment—Immunity character-
istics—limits and methods of measurement
•
IEC 60065:2001 amendment 1: 2005 Audio Video and similar electronic apparatus.
This product is susceptible to RF interference between 5MHz and 20MHz.
The Technical Construction File required by these Directives is maintained at the corporate
headquarters of Control4, Salt Lake City, Utah, U.S.A.
Signed,
Brett Molen—Vice President, September 23, 2008
Dansk: Vigtigt! Lederen med grøn/gul isolation må kun tilsluttes en klemme
mærket eller
Norsk: Apparatet må tilkoples jordet stikkontakt.
Suomi: Laite on liitettävä suojamaadoituskoskettimilla varustettuun pistorasiaan.
Svensk: Apparaten skall anslutas till jordat uttag.
Third-Party Disclaimer
Sirius and XM subscriptions are sold separately and are governed by the Sirius Terms and Condi-
tions (see www.sirius.com) or the XM Customer Agreement (see www.xmradio.com). Be sure to
read these agreements before you purchase your subscription. Your service and subscription
will automatically renew according to the Plan you choose, at the then current renewal rate until
you call SiriusXM to cancel.
XM tuners and home docks or Sirius tuners (each sold separately) are
required to receive the Sirius or XM satellite radio service. It is prohibited to copy, decompile, disassemble,
reverse engineer, hack, manipulate or otherwise make available any technology or software incorporated
in receivers compatible with the Sirius or XM Satellite Radio Systems.
SiriusXM U.S. Satellite Service is
available only to those at least 18 years of age in the 48 contiguous USA and DC, with Sirius also
available in PR (with coverage limitations), while SiriusXM Internet Radio is available throughout
our satellite service area including PR and also in AK and HI.
Service available in Canada; see www.
siriuscanada.ca or www.xmradio.ca.
SELF-INSTALLATION
instructions and tips are provided for your
convenience. You must determine if you have the knowledge, skills and ability required to properly perform
an installation.
SiriusXM shall have no liability for damage or injury resulting from the installation or use
of any SiriusXM product or third party product. SiriusXM product warranties do not cover the installation,
removal or reinstallation of any product.
Sirius, XM and all related marks and logos are trademarks of Sirius
XM Radio Inc. and its subsidiaries. All other marks and logos are the property of their respective owners.
All rights reserved.
To listen to Satellite Radio on your Satellite-Ready receiver, you’ll need to add either a Sirius or XM Satel-
lite Radio tuner (sold separately). Satellite Radio is available to residents of the United States (except
Alaska and Hawaii), Puerto Rico, and Canada.
Satellite Radio delivers an incredible variety of commercial-free music including Pop, Rock, Country, R&B,
Hip-Hop, Jazz, Classical and much more, plus coverage of all the top professional and college sports,
including play-by-play and expert sports talk and analysis. You also get exclusive entertainment, talk,
comedy, family programming, local traffic and weather and news from your most trusted sources.
Whether you purchase a Sirius or XM tuner, you’ll need to activate and subscribe to the service to listen
to Satellite Radio. Easy-to-follow installation and setup instructions are provided with the satellite tuners.
Whichever service you choose, there are a variety of programming packages available, including the
option of adding “The Best of Sirius” programming to your XM tuner or “The Best of XM” programming to
your Sirius tuner, enabling you to enjoy the most popular programming among both services. The “Best of”
packages are not available to Sirius Canada or XM Canada subscribers at this time.
Family friendly packages are also available to restrict channels that feature mature programming.
To subscribe to XM, U.S. customers should visit www.xmradio.com or call 1-800-XMRADIO
(1-800-967-2346); Canadian customers should visit www.xmradio.ca.
To subscribe to Sirius, U.S. and Puerto Rico customers should visit www.sirius.com or call
1-888-539-SIRIUS (1-888-539-7474). Canadian customers should visit www.siriuscanada.ca.
Listen to Satellite Radio


