background image

6

Before you begin ...

The CHERRY ROLLERMOUSE™ is an ergonomic alternative to a conventional mouse for use with 
PCs and laptops.

For information on other products, downloads and much more, visit us at www.cherry.de.

1 For  your  safety

RSI stands for "Repetitive Strain Injury"

RSI results from small, continually repeated movements.
• Set up your workspace for maximum ergonomic benefit.
• Position the keyboard with the supports provided so that your wrists are at a comfortable angle.
• Take several short breaks, with stretching exercises if necessary.
• Change the position of your body often.

The operating instructions contain information on effective and reliable use.
• Read the operating instructions carefully.
• Keep the operating instructions and pass them on to other users.

Switching from a conventional mouse to the ROLLERMOUSE™ often feels a little 
unfamiliar at first.

• Give yourself a week to get used to it.
• Adjust the keyboard to the correct height using the keyboard supports provided 


(see 2 "Attaching the keyboard supports").

• Make sure to only use the ROLLERMOUSE™ and do not use your conventional mouse in 

parallel.

2 Attaching the keyboard supports

Use the keyboard supports to connect the ROLLERMOUSE™ to the keyboard and adjust the height 
of the keyboard.

1 If necessary, fold in the feet of your keyboard so that it lies flat.
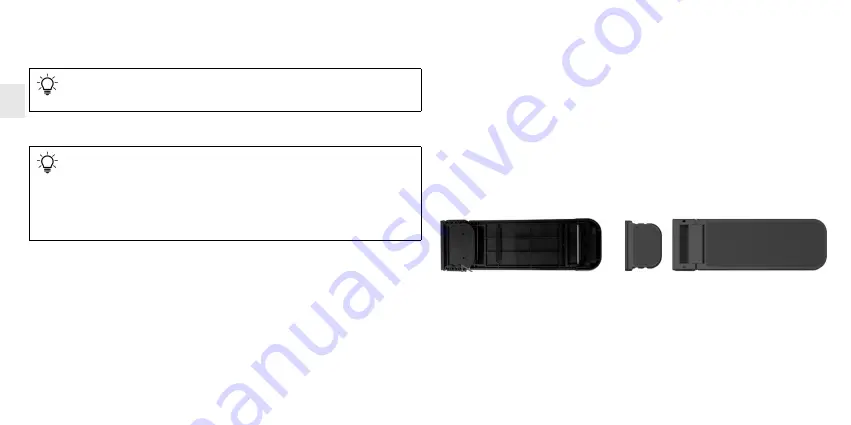
2 Insert the two keyboard supports provided with the ROLLERMOUSE™ laterally into the holder 

section on the back of the ROLLERMOUSE™ so that the rubber pads face upwards.

3 Place your keyboard on the keyboard supports.
4 Position the ROLLERMOUSE™ so that it is centered under the space bar.
5 Fold the feet at the ends of the keyboard supports in or out until you have found a comfortable 

keyboard position. Ideally, this should be slightly higher than the rollerbar, as otherwise you 
may accidentally operate it while typing.

6 If the keyboard is too high for you, you can reduce the size of the keyboard supports. To do this, 

remove the long part of the supports (with the hinges) from the short part that is in the holder 
section of the ROLLERMOUSE™.

3 Connecting the ROLLERMOUSE™ to the PC or laptop

• Connect the USB plug of the ROLLERMOUSE™ to the USB port on the PC or laptop.

The driver is installed automatically.

OPERATING MANUAL

EN

Summary of Contents for Cherry ROLLERMOUSE

Page 1: ...CHERRY ROLLERMOUSE Ergonomic Mouse Solution Bedienungsanleitung 3 Operating Manual 6 Mode d emploi 9 64410088 01 DE EN FR Jul 2020 ROLLERMOUSE is a trademark of the Contour Design Group ...

Page 2: ...click Clic droit Kopieren Copy Copier Doppelklick Double click Double clic Linksklick Left click Clic gauche Einfügen Paste Coller Rollstab für Zeigerbewegung Rollerbar to move pointer Barre mobile pour le déplacement du pointeur Mausrad Scroll wheel Molette de souris FUNKTIONEN FUNCTIONS FONCTIONS ...

Page 3: ...t parallel Ihre konventionelle Maus Machen Sie mehrere kleine Pausen ggf mit Dehnübungen Ändern Sie oft Ihre Körperhaltung 2 Tastaturstützen anbringen Mit den Tastaturstützen verbinden Sie die ROLLERMOUSE mit der Tastatur und stellen die Höhe der Tastatur ein 1 Klappen Sie ggf die Füße Ihrer Tastatur ein sodass diese flach aufliegt 2 Führen Sie die beiden beiliegenden Tastaturstützen der ROLLERMOU...

Page 4: ...den Linksklick und die Einstelltaste gleichzeitig für 2 Sekunden gedrückt Die LEDs zeigen die eingestellte Klickstärke Je weiter rechts die LED leuchtet desto stärker müssen Sie den Rollstab drücken um einen Linksklick auszulösen Wenn alle LEDs leuchten ist die Klickfunktion des Rollstabs ausgeschaltet 2 Lassen Sie die Einstelltaste los und ändern Sie die Einstellung bei weiter gedrückter Linkskli...

Page 5: ...en das Gerät beschädigen Verwenden Sie zur Reinigung keine Lösungsmittel wie Benzin oder Alkohol und keine Scheuermittel oder Scheuerschwämme Verhindern Sie dass Flüssigkeit in das Gerät gelangt 3 Hinweise zur Reinigung des Sensors finden Sie unter www cherry de 4 Reinigen Sie das Gerät mit einem leicht feuchten Tuch und etwas mildem Reinigungsmittel z B Geschirrspülmittel 5 Trocknen Sie das Gerät...

Page 6: ...sure to only use the ROLLERMOUSE and do not use your conventional mouse in parallel 2 Attaching the keyboard supports Use the keyboard supports to connect the ROLLERMOUSE to the keyboard and adjust the height of the keyboard 1 If necessary fold in the feet of your keyboard so that it lies flat 2 Insert the two keyboard supports provided with the ROLLERMOUSE laterally into the holder section on the...

Page 7: ...et The further to the right the LED lights up the more you have to press the rollerbar to trigger a left click When all the LEDs are on the rollerbar click function is deactivated 2 Release the adjustment button and change the setting with the scroll wheel while still holding down the left click button The LEDs show the new setting 5 2 Adjusting the click volume of the rollerbar 1 Press and hold t...

Page 8: ...interference received including interference that may cause undesired operation Note This equipment has been tested and found to comply with the limits for a Class B digital device pursuant to part 15 of the FCC Rules These limits are designed to provide reasonable protection against harmful interference in a residential installation This equipment generates uses and can radiate radio frequency en...

Page 9: ...stématiquement avec la ROLLERMOUSE et n utilisez pas votre souris classique en parallèle 2 Mise en place des supports de clavier Les supports de clavier permettent de connecter la ROLLERMOUSE au clavier et de régler la hauteur du clavier 1 Le cas échéant repliez les pieds de votre clavier de façon à ce qu il repose à plat 2 Insérez les deux supports de clavier de la ROLLERMOUSE fournis sur le côté...

Page 10: ...lage enfoncés pendant 2 secondes Les LED indiquent quelle est la sensibilité de clic paramétrée plus la position de la LED allumée se situe vers la droite plus vous devez appuyer fort sur la barre mobile pour effectuer un clic gauche Si toutes les LED sont allumées la fonction de clic de la barre mobile est désactivée 2 Relâchez le bouton de réglage et modifiez le réglage à l aide de la molette de...

Page 11: ...s agressifs peuvent endommager l appareil Pour le nettoyage n utilisez pas de solvants tels que l essence ou l alcool ni aucun produit ou éponge abrasif Empêchez la pénétration de liquide dans l appareil 3 Vous trouverez des informations sur le nettoyage du capteur sur le site www cherry de 4 Nettoyez l appareil avec un chiffon légèrement humide et un détergent doux p ex du produit vaisselle 5 Séc...

Page 12: ... ORG CHERRY youtube com channel UChsaJqZnGDZ_Nq1v9 261NQ twitter com org_cherry instagram com cherry_original blog cherry de xing com companies cherrygmbh linkedin com company cherry Cherry GmbH Cherrystraße 91275 Auerbach OPf Germany www cherry de ...

Reviews: