


03
Table of Contents
03. What’s in the Box
03. Technical Parameters of the F17 Drone
03. Product Assembly
04. Product Assembly cont.
05. Product Assembly cont.
06. Action Camera Installation
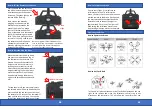
07. Major Parts of the Drone
07. Remote Controller
08. How to Pair the Remote to the Drone
08. How to Start and Stop the Drone
09. How to Calibrate the Drone
09. Operating the Drone
10. How to Fine-Tune the Drone
10. Drone Light Indicator Descriptions
11.
Remote controller power indicator light description
12. Product Components
13. Product Components cont.
13. Troubleshooting
02
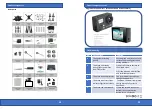
What’s in the Box
Products/ spare parts included in the box
•
8 Propeller Blades
•
4 Protection Guards
•
4 Landing Gear Legs
•
1 Camera Mount Kit
•
1 Screwdriver
•
2 Wrenches
•
1 User Manual
•
Diagonal
:
12.2inch
•
Overall height
:
5.5inch
•
Brushless motor
:
1806
•
Gross Weight
:
about 17.1 oz
(with high landing gear,
protecting guard
,
battery)
Technical Parameters of the Drone
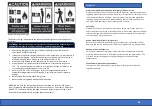
Propeller Installation/ Removal
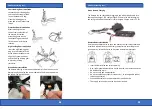
Product Assembly
Install propeller A and B on the corresponding motor shaft and fix the
rotor propellers tightly by rotating them in the direction shown in this
diagram. Propellers will be labeled accordingly
A
A
A
A
B
B
B
B
•
Please make sure that the clockwise and counterclockwise
propellers are installed correctly on the motors. Failure to do
so will cause the aircraft to fly abnormally.
•
Use caution when installing propellers as they are a little sharp
•
Please use Contixo propellers for this aircraft.
•
Extra propellers can be ordered if needed.
•
1 Quick Installation Guide
•
1 Warranty Card
•
1 Remote Control
•
1 Charger
•
1 Drone Battery
•
Battery
:
7 4V 2100mAh
•
Charging Time
:
about 3.5 hours
•
Maximum flying time
:
about 18 minutes
(without mounting the high landing gear
and protecting guard)


