Intended use
The product is designed to be installed in a computer PCI slot, where it provides inputs and
outputs for audio signals. Furthermore, the plug-in card has a digital audio output.
This product complies with the applicable National and European requirements. All names
of companies and products are the trademarks of the respective owners. All rights reserved.
Package Contents
• Plug-in card
• CD with driver
• Operating Instructions
Features
• Intended for installation in a PCI slot
• Analogue 7.1 audio output
• Optical digital output
• Optical digital input
• Internal connection for the digital or analogue audio signal from a CD/DVD drive
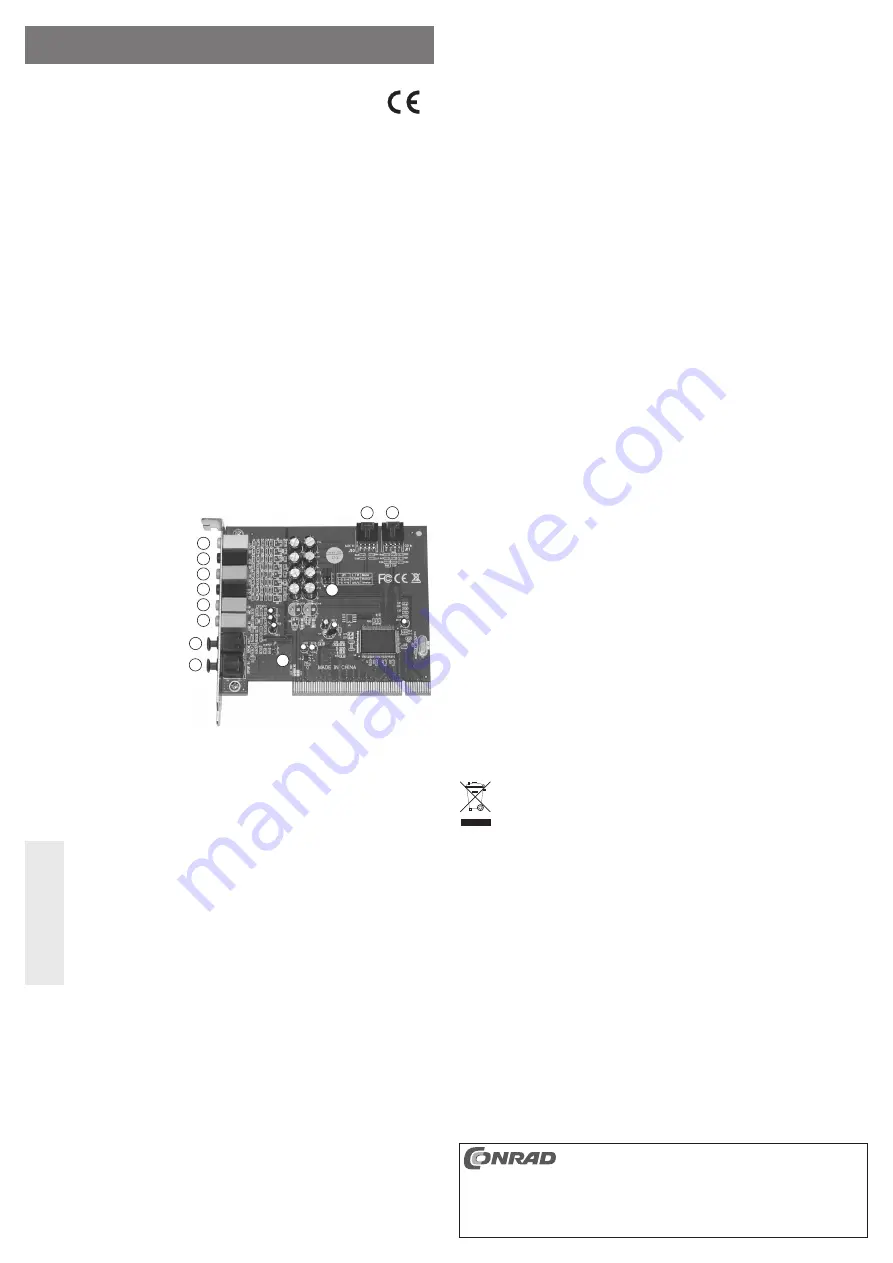
Connection and Control Elements
1 Front output (green)
1
2
6
4
5
3
8
7
10
11
12
9
2 Rear output (black)
3 Centre/bass output (orange)
4 Subwoofer output (black)
5 Microphone input (pink)
6 Line input (light blue)
7 Optical digital output
(with safety plug)
8 Optical digital input
(with safety plug)
9 Aux
input
10 CD input (connect with the ana-
logue output of a CD/DVD drive)
11 Jumpers for changing the signals centre/bass (output 3), see imprint next to the jumpers
12 Digital input (either connection “8” or connection “12” can be used, but not both connections
at the same time), connector pin “G” = GND, connector pin “S” = digital signal
Installation
Ꮨ
If you do not have the expertise to perform the installation, please arrange for
the installation to be carried out by SUITABLY QUALIFIED PERSONNEL or a
suitable specialist shop!
Incorrect installation can cause damage to the plug-in card and also to your
computer and all connected devices.
Caution, lethal hazard!
Switch off the computer in which the plug-in card is to be installed and discon-
nect all devices from the mains voltage by removing the plugs from the mains
socket! Just turning off at the on/off switch is not enough!
• Open your computer‘s case and carefully remove the cover.
• Locate a free PCI slot, remove the corresponding slot bracket and insert the card into the slot.
Screw the plug-in card tight, make sure it is positioned correctly in the PCI slot!
• If required, connect your audio devices to the corresponding connectors on the sound card.
☞
If you want to use the digital input (connection “12”) (connector pin “G” = GND, con-
nector pin “S” = digital signal), you must not connect any device to the optical input
“8”!
• If necessary, secure all the cables with cable ties, so they cannot obstruct your computer‘s
fan.
• Close the computer housing.
• Connect your computer and monitor to the mains voltage and switch on all devices.
• If your computer does not start correctly, switch it off immediately and check all the settings
and cable connections.
Before opening the computer again, it must be disconnected from the mains
voltage again, see above!
Driver installation
• After Windows has started, it automatically recognises the plug-in card as new hardware.
Cancel the automatic hardware recognition.
• Place the enclosed CD into an appropriate drive on your computer.
• Depending on the operating system, you will
fi
nd the installation programme in the respective
sub-directory on the CD, for example for Windows 7.
Start the “Setup.exe” program and follow all software instructions.
☞
It might be necessary to restart Windows, before the sound card is recognised cor-
rectly.
Tips and Notes
• If the middle loudspeaker sounds unusually dull, the signal on the connector “3” has been
mixed up, the audio signal of the sub-woofer reaches the middle loudspeaker and vice versa.
Remedy: Move the two jumpers “11” to the corresponding opposite position (see imprint on
the PCB). Alternatively, (if you have connected an audio cable with a 3.5 mm TRS connector
on two RCA plugs/cinch connectors), just swap the two RCA plugs with each other.
• In order for the 7.1 outputs of the sound card to be supported, a suitable playback software
and also an appropriate audio source (e.g. DVD, Bluray) are required.
• Use either the optical input (connection “12”) or the digital input (connection “8”). It is not
possible to use both connections at the same time.
• Before you can use the optical input or output, you have to remove the safety plug. The latter
protects the optical jack from dust. Insert the safety plug again if you do not need the cor-
responding jack any longer.
• The analogue audio inputs “9” and “10” can be connected e.g. to a CD/DVD drive or a TV
tuner card.
Please note that with an optical drive the transfer of the audio signals from DVDs or Bluray
takes place digitally via the IDE or SATA interface.
Should the drive have an analogue audio output (4-pole
fl
at jack, same as the jack “10” on
the sound card), no audio signal will be emitted via this output. Only when playing back “real”
audio CDs (this will not work for MP3 CDs!), there might be an analogue signal.
• For recordings you always have to select the correct input in the audio settings of Windows
(to be found in the control panel).
For example, if you connect the microphone of a headset and you want to use the voice
recorder with the microphone, you have to select the microphone input in the audio settings
fi
rst. If the recording sound is too low, set the correct recording level in the audio settings.
If the recording via the microphone is still too low, enable the microphone gain/boost in the
audio settings of Windows and check that the microphone on the headset is turned on.
Disposal
Dispose of an unserviceable product in accordance with the relevant statutory regu-
lations.
O P E R A T I N G I N S T R U C T I O N S www.conrad.com
PCI sound card 7.1 SPDIF
Item no. 87 39 54
Version 11/11
These operating instructions are a publication by Conrad Electronic SE, Klaus-Conrad-Str. 1,
D-92240 Hirschau (www.conrad.com).
All rights including translation reserved. Reproduction by any method, e.g. photocopy, micro
fi
lming,
or the capture in electronic data processing systems require the prior written approval by the editor.
Reprinting, also in part, is prohibited.
These operating instructions represent the technical status at the time of printing. Changes in
technology and equipment reserved.
© Copyright 2011 by Conrad Electronic SE.


