background image

49

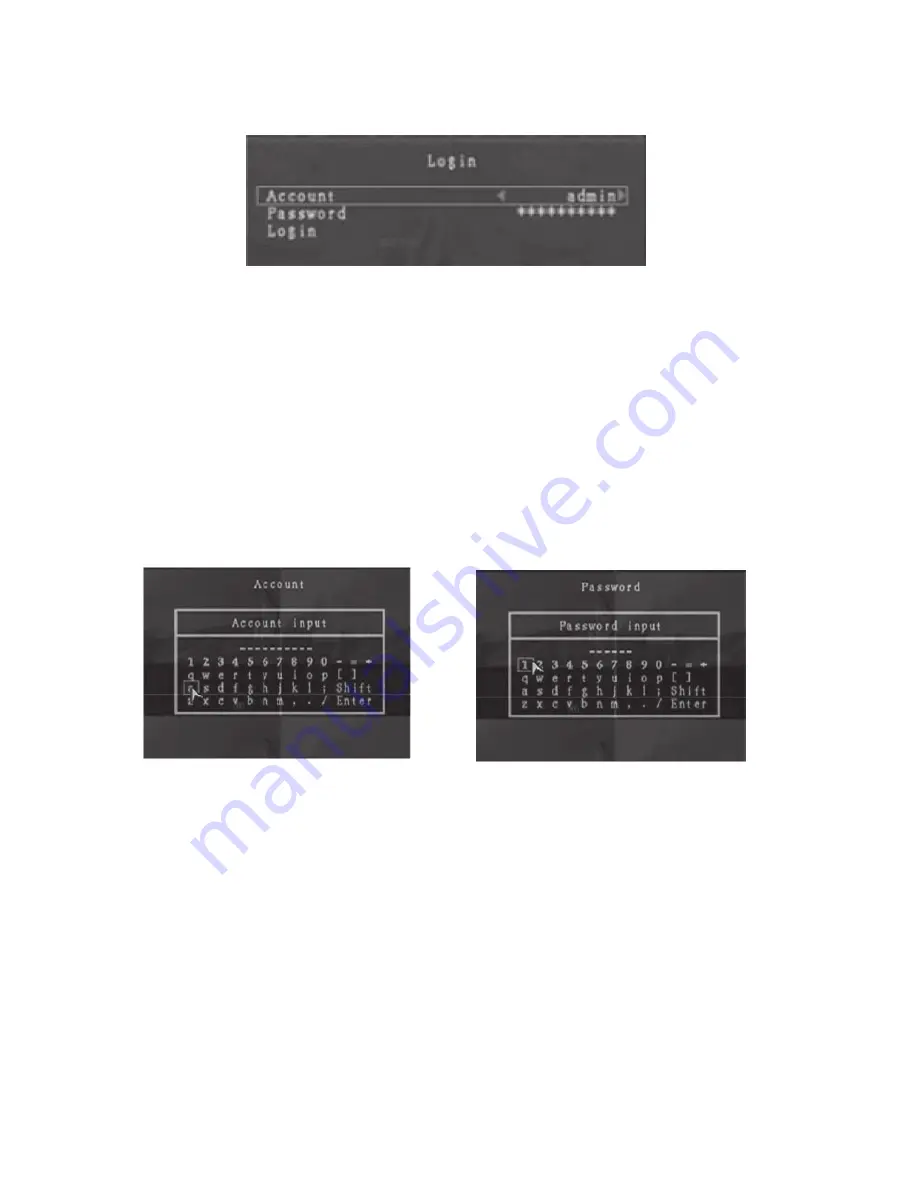
11. LOGIN

Press the “MENU/ESC” (14) button at the screen or the “MENU” button (41) of the remote control to
access the main menu. If password protection is activated, you need to log in. 

There are three password levels: admin (highest level), operator and guest (lowest level). 

If the user does not log in, only the live camera images can be viewed on the screen.

The default password for the administrator account (full access) is account = admin,
password = 111111.

The system accepts up to four user accounts. The administrator can determine the login name, pass-
word and password level (see next chapter).

11.1 Explanation of password levels (admin, operator, guest)

admin:
The administrator has unlimited access to all menu functions.

operator:
The operator also has unlimited access to all menu functions. The only exceptions are changing the user
accounts, formatting the hard disk and changing his own password.

Summary of Contents for 75 16 99

Page 1: ...Version 03 10 4 Kanal 25 9cm DVR Monitor Seite 4 35 4 Channel 25 9 cm DVR screen Page 36 67 Best Nr Item No 75 16 99 BEDIENUNGSANLEITUNG OPERATING INSTRUCTIONS...

Page 2: ...halte finden Sie in dem Inhaltsverzeichnis mit Angabe der entsprechenden Seitenzahlen auf Seite 4 These operating instructions belong with this product They contain important informati on for putting...

Page 3: ...3 Produktansicht oben Produktansicht vorne Product view top Product view front Produktansicht hinten Fernbedienung Product view rear Remote control...

Page 4: ...schlussterminals 15 b Inbetriebnahme 15 9 Systemmen 16 10 Hauptbildschirm 16 11 LOGIN 17 11 1 Erl uterung der Passwort Levels admin operator guest 17 12 Hauptmen SETUP 19 12 1 Hauptmen bersicht 19 12...

Page 5: ...Aufnahmedauer 28 16 Installation und Erl uterung der mitgelieferten Software 29 17 Grundfunktionen der mitgelieferten Software 30 a File ffnen 30 b Schnappschuss Funktion 30 c Men OPTIONS 30 d About...

Page 6: ...ieb sicherzustellen m ssen Sie als Anwen der diese Bedienungsanleitung beachten Alle enthaltenen Firmennamen und Produktbezeichnungen sind Warenzeichen der jeweiligen Inhaber Alle Rechte vorbehalten B...

Page 7: ...sen werden k nnen Dieser LCD Monitor mit Digitalrekorder ist in der Lage auch w hrend einer Aufnahme gleichzeitig eine Wiedergabe auszuf hren Durch die integrierte Bewegungserkennung kann bei Ver nder...

Page 8: ...onitor mit Digitalrekorder in Verbindung mit anderen Ger ten wie z B einer berwachungskamera oder einem Monitor benutzt so m ssen die Bedienungsanleitungen und Sicherheitshinweise dieser angeschlossen...

Page 9: ...ungsversorgung der Fernbedienung d rfen ausschlie lich 2 x 1 5V Micro Batterien Typ AAA ver wendet werden Kondensatoren im Ger t k nnen noch geladen sein selbst wenn es von allen Spannungsquellen getr...

Page 10: ...Es besteht Explosionsgefahr Herk mmliche Batterien d rfen nicht aufgeladen werden Es besteht Explosionsgefahr Laden Sie ausschlie lich daf r vorgesehene wiederaufladbare Akkus verwenden Sie ein geeig...

Page 11: ...ndet 13 Status LED PWR Diese LED leuchtet gr n sofern die Betriebs spannung ordnungsgem anliegt 14 Taste MENU ESC 15 Taste UP 16 Taste SEL EDIT 17 Lautsprecher 18 Taste REW 19 Taste PAUSE 20 Taste PLA...

Page 12: ...entsprechende Steckbr ckenposition f r das jeweilige Videoformat ist auf der Platine gekenn zeichnet Um an die Steckbr cke heranzukommen ist es notwendig die Festplattenhalterung auf der R ckseite zu...

Page 13: ...A Festplatte in den vorgese hen Montageschacht Als Montageschacht dient die Abdeckung des Festplattenschachtes 27 selbst Befestigen Sie die SATA Festplatte am Monta geschacht mit geeigneten Schrauben...

Page 14: ...berwachung angeschlossen werden es handelt sich hierbei um einen Cinch Anschluss Schlie en Sie am Anschlussterminal 28 falls ben tigt entsprechende Sensoren Alarmgeber oder eine geeignete PTZ Kamera...

Page 15: ...n EIN Nachdem der LCD Monitor mit Digitalrekorder eingeschaltet wurde initialisiert sich das Ger t W hrend der Initialisierung wird das Herstellungsdatum der Firmware sowie die Versionsbezeichnung der...

Page 16: ...TRAST Kontrast COLOR Farbe AUDIO VOLUME Lautst rke FUNCTION NORMAL DOWN Monitorbild um 180 Grad drehen ZOOM 16 9 4 3 Bildformat SYSTEM S ROLOC AUTO PAL NTSC SECAM Videoformat PRESET SLEEP hierbei hand...

Page 17: ...t werden Von Werk aus lautet das Passwort f r den Administrator Account Vollzugriff account admin password 111111 Das System erlaubt bis zu vier Benutzer Accounts Der Administrator kann den Login Name...

Page 18: ...ie rechte Mousetaste um das im rechten Bild gezeigte Men fenster zu ffnen Erl uterung der Men Symbole Ansicht Videoeingang 1 Wiedergabe der Aufnahme Liste Ansicht Videoeingang 2 PTZ Schalter Ansicht V...

Page 19: ...uptmen verlassen Untermen verlassen Taste UP 15 47 DOWN 25 48 Cursor nach oben bzw unten bewegen Taste SEL EDIT 16 42 Diese Taste dient dazu um ein Men auszuw hlen oder Optionen zu editieren bearbeite...

Page 20: ...n Record Ansicht des Men s Record a Record frameRate Anhand der Men option Record frameRate wird die Anzahl der Bilder pro Sekunde frames per second festgelegt Je mehr Bilder pro Sekunde Sie w hlen de...

Page 21: ...lungsm glichkeiten zur Ver f gung Farbe Grau Es findet zu diesem Zeitpunkt keine Aufzeichnung statt Farbe Rot Der Digitalrekorder zeichnet stetig auf zu diesem Zeitpunkt Farbe Gelb Hierbei wird eine A...

Page 22: ...deaktiviert 5 10 15 20 25 30 Zeit in Sekunden der akustischen Alarmierung CONT kontinuierlicher akustischer Alarm welcher nur durch Dr cken einer Taste deaktiviert werden kann c Event REC duration Gi...

Page 23: ...t werden Dr cken und halten Sie die lin ke Maustaste markieren Sie den gew nschten Bereich lassen Sie anschlie end die linke Maustaste wieder los Dr cken Sie anschlie end die rechte Mousetaste 12 5 Me...

Page 24: ...hen der vollen Festplattenkapazit t automatisch die ltest aufgezeichneten Videodateien berschrieben und ersetzt durch aktuelle Format HDD W hlen Sie diese Men option um s mtlich gespeicherte Daten auf...

Page 25: ...e Aktivierung ON bzw Deaktivierung OFF der Tastent ne f Time Set Format Einstellung des Datum Anzeigeformats Time Einstellung Datum und Uhrzeit Apply Diese Option anw hlen um die get tigten Einstellun...

Page 26: ...stplatte in den Monitor eingebaut wurde kann kein Firmware Upgra de durchgef hrt werden Bevor ein Firmware Upgrade durchgef hrt werden kann muss jegliche Aufnahme gestoppt werden 12 8 Men Search Im Me...

Page 27: ...14 BACKUP via USB Speicherstick Dieser 4Kanal Monitor mit Digitalrekorder besitzt die M glichkeit die bisherig get tigten Aufzeichnungen auf einen USB Speicherstick zu sichern Die gesicherten Aufzeic...

Page 28: ...NDISK CRUZER micro 4GB FLEX FD 02 1GB KINGSTON Data Traveler 2GB KINGSTON Data Traveler 1GB LEMON LEMON USB Driver 1GB 15 bersicht Aufnahmedauer Die folgend dargestellten Daten sind basierend auf dem...

Page 29: ...em Bildschirm Schlie en Sie den USB Speicherstick mit den gesicherten Aufzeichnungen an einen freien USB Port Ihres PCs an Klicken Sie auf das Icon um die Software zu starten 1 Datei ffnen 2 Schneller...

Page 30: ...chuss Funktion Klicken Sie auf das Symbol um einen Schnappschuss zu t tigen Klicken Sie anschlie end die rechte Mousetaste und w hlen Sie im PopUp Men OPTIONS aus Legen Sie bei Path for still capture...

Page 31: ...Taste F1 auf Ihrer Tastatur um n here Informationen zur Software zu erhalten e VVF Dateien in AVI Dateien umwandeln Um VVF Dateien in AVI Dateien umzuwandeln bet tigen Sie die rechte Mousetaste und w...

Page 32: ...gestartet werden soll Klicken Sie die rechte Moustaste w hlen Sie Capture kli cken Sie auf Mark In Bewegen Sie den Wiedergabe Scrollbalken an die gew nschte Stelle des Video ab welcher der Mit schnit...

Page 33: ...Digitalrekorder Stellen Sie sicher dass das Netzteil vom LCD Monitor mit Digitalrekorder getrennt ist Entfernen Sie die Schrauben der Abdeckung des Festplattenschachtes 27 Nehmen Sie die Abdeckung des...

Page 34: ...gen gt ein sauberes trockenes und weiches Tuch Bis auf die beschriebenen Batteriewechsel sind keine zu wartenden Teile an diesem Produkt vorhanden 21 Entsorgung a Allgemein Entsorgen Sie die Produkte...

Page 35: ...ohne Standfu Sonstiges USB 2 0 Schnittstelle zur Sicherung bisherig get tigter Auf zeichnungen Integrierter L fter Backup Batterie Typ CR1220 Anschl sse Anschlussterminal 28 4 x SENSOR IN 1 x Alarm R...

Page 36: ...m of the connection terminal 47 b Commissioning 47 9 System menu 48 10 Main screen 48 11 LOGIN 49 11 1 Explanation of password levels admin operator guest 49 12 Main menu SETUP 51 12 1 Main menu overv...

Page 37: ...Installation and explanation of the supplied software 61 17 Basic functions of the supplied software 62 a Open file 62 b Still capture function 62 c OPTIONS menu 62 d About Viewer 63 e Converting VVF...

Page 38: ...from the manufacturer To maintain this status and to ensure safe operation you as the user must observe these operating instructions All company names and product designations contained herein are tr...

Page 39: ...cal or acoustic alarm This LCD screen with digital recorder is able to play back a video even while recording Due to the integrated motion detection a recording can be started when changing certain im...

Page 40: ...r devices e g a surveillance camera or a screen the operating instructions and security notices of the connected devices must be observed absolutely The operation of this LCD screen with digital recor...

Page 41: ...may never be plugged in or unplugged with wet hands Never pull on the power cable Only unplug it by pulling the plug from the power outlet Ensure that the mains adapter is not connected to the LCD scr...

Page 42: ...e battery charger If the device will not be used for a longer period e g in case of storage remove the inserted battery If batteries are too old they may leak and cause damage to the product which lea...

Page 43: ...PWR status LED This LED lights up green when the operating voltage is properly supplied 14 MENU ESC button 15 UP button 16 SEL EDIT button 17 Speakers 18 REW button 19 PAUSE button 20 PLAY button 21 F...

Page 44: ...C The jumper shown in the left image can be used to select PAL or NTSC as video format The respective jumper position is indicated on the circuit board for the respective video format To reach the jum...

Page 45: ...rd disk in the intended instal lation slot the installation slot is the hard disk slot cover 27 itself Fasten the SATA hard disk to the installation slot with suitable screws Carefully replace the cov...

Page 46: ...ected to the AUDIO INPUT 31 sockets this is a RCA socket Connect the respective sensors alarms or suitable PTZ camera PTZ PAN TILT ZOOM a suitable PTZ camera is optionally available to the connection...

Page 47: ...ning Set the ON OFF switch 25 to ON When the LCD screen with digital recorder is switched on the device initialises During initialisation the firmware manufacturing date and the firmware version name...

Page 48: ...T Brightness CONTRAST modifies contrast COLOR AUDIO VOLUME FUNCTION NORMAL DOWN rotate screen display by 180 degrees ZOOM 16 9 4 3 image format SYSTEM S ROLOC AUTO PAL NTSC SECAM video format PRESET S...

Page 49: ...screen The default password for the administrator account full access is account admin password 111111 The system accepts up to four user accounts The administrator can determine the login name pass w...

Page 50: ...to open the menu window shown in the figure on the right Explanation of the menu options Video channel 1 display Replay the recording list Video channel 2 display PTZ switch Video channel 3 display A...

Page 51: ...utton 41 Access main menu leave main menu leave sub menu Buttons UP 15 47 DOWN 25 48 Move cursor up or down SEL EDIT button 16 42 This button is used to select a menu or to edit change options It can...

Page 52: ...hue g Saturation Adjusts saturation 12 3 Record Menu Displays the Record menu a Record frameRate The menu option Record frameRate is used to deter mine the number of frames per second The more frames...

Page 53: ...active There are 6 possible settings Grey colour At this point of time there is not recording Red colour At this point of time the digital recorder always records Yellow colour A recording is started...

Page 54: ...wing settings are possible OFF acoustic alarm is deactivated 5 10 15 20 25 30 time of the acoustic alarm in seconds CONT continuous acoustic alarm that can only be activated if a button is pressed c E...

Page 55: ...omfortably with the sup plied mouse Hold down the left mouse button mark the desired area and then let go of the button Then press the right mouse button 12 5 Screen menu Displays the Screen menu a Bo...

Page 56: ...ption to YES the oldest video files will automatically be overwritten and replaced by the lat est ones once the hard disk capacity is reached Format HDD Select this menu option to delete all data save...

Page 57: ...e Keypad Tone Activates ON or deactivates OFF the keypad tone f Time Set Format Sets the date display format Time Adjustment of time and date Apply Select this option to confirm the settings made g Ev...

Page 58: ...upgrading firmware If there is no hard disk installed in the screen you will not be able to upgrade firmware Before performing a firmware upgrade all recordings must be stopped 12 8 Search menu In se...

Page 59: ...gs made Playback of the previous recordings is explained in chapter 12 8 Search menu 14 BACKUP via USB memory stick This 4 channel screen with digital recorder is able to save recordings made to a USB...

Page 60: ...icro 4GB FLEX FD 02 1GB KINGSTON Data Traveler 2GB KINGSTON Data Traveler 1GB LEMON LEMON USB Driver 1GB 15 Recording duration overview The following data is based on the PAL video format and a 320 GB...

Page 61: ...low the instructions on the screen Connect the USB memory drive with the backup files to a free USB port of your PC Click the icon to start the software 1 Open file 2 Rewind 3 Reverse playback 4 One f...

Page 62: ...VVF and click OPEN b Still capture function Click the icon to make a new still capture Then click the right mouse button and select OPTIONS from the popup menu Select the path where the capture is to...

Page 63: ...ch time and date are displayed d About Viewer Press F1 on the keyboard for more information on the software e Converting VVF files to AVi files To convert VVF files into AVI files press the right mous...

Page 64: ...to be started Click the right mouse button select Capture and click Mark In Then move the playback scroll bar to the respective position of the video where the capture is to be end ed Click the right...

Page 65: ...screen with digital recorder Ensure that the mains adapter of the LCD screen with digital recorder is disconnected Remove the hard disk slot cover 27 screws Carefully take off the hard disk slot cover...

Page 66: ...does not have any serviceable parts except for mentioned battery replacement 21 Disposal a General Information Please dispose of the products at the end of their life cycles according to the relevant...

Page 67: ...ther Features USB 2 0 interface for backup of recordings made Integrated fan backup battery type CR1220 Connection terminal connections 28 4 x SENSOR IN 1 x Alarm relay contact 2A 28V DC 2A 125V AC 1...

Page 68: ...68...

Page 69: ...69...

Page 70: ...technischen Stand bei Drucklegung nderung in Technik und Ausstattung vorbehalten Copyright 2009 by Conrad Electronic SE Legal notice These operating instructions are a publication by Conrad Electroni...

Reviews: