


Multi Card Reader 8.9cm
Version 11/10
Item-No. 41 41 87
°
Use in accordance with manufacturer’s instructions
The product is intended for installation in an 8.9cm/3.5” slot of a computer case. It is used
to read/write memory cards.
This product complies with the applicable National and European requirements. All names
of companies and products are the trademarks of the respective owner. All rights reserved.
Content of Delivery
• Multi Card Reader
• Operating Instructions
Features
• Various types of memory cards can be inserted, e.g. SD/SDHC, microSD/microSDHC,
CF, MS, etc.
• USB2.0 (backwards compatible with USB1.1)
• USB port on front side
• Switch to turn on/off the card reader
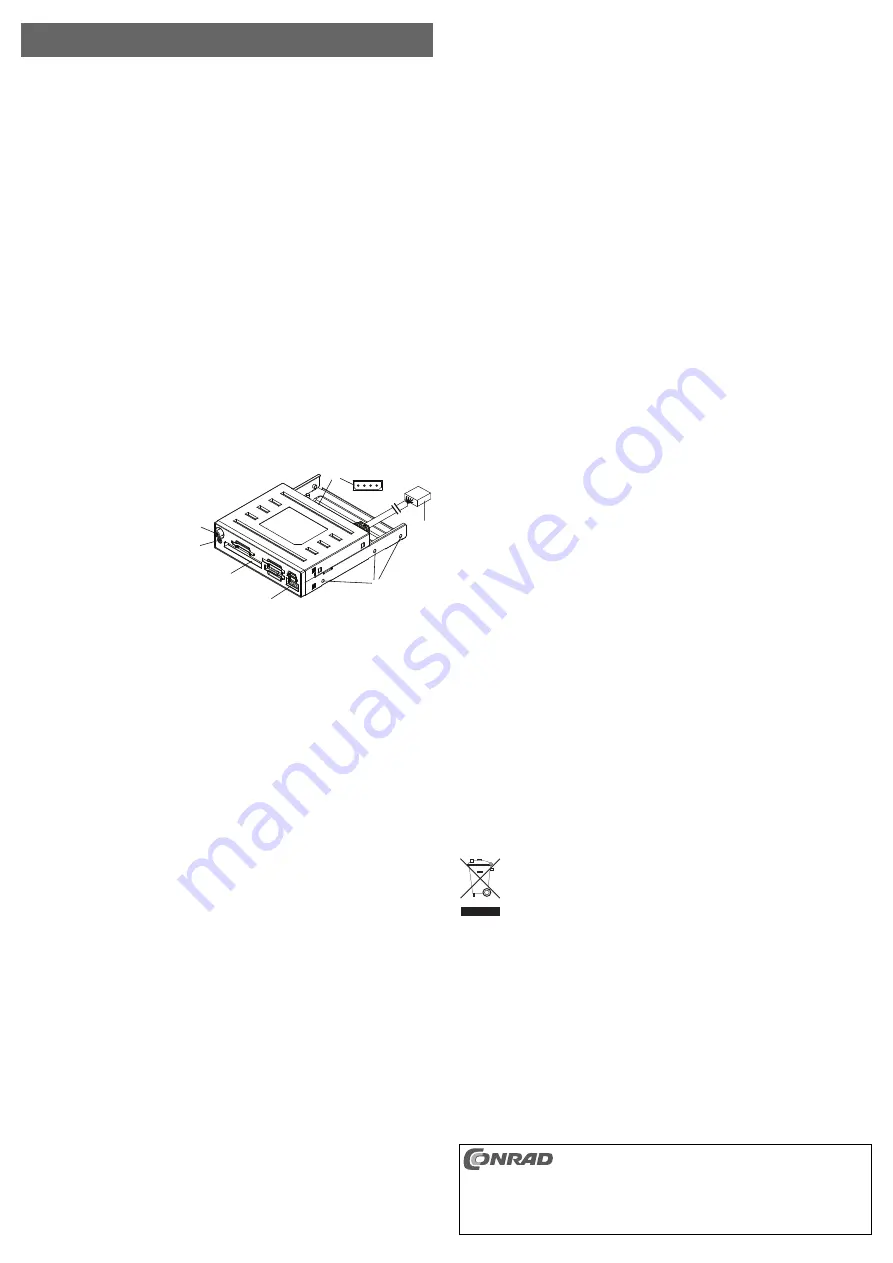
Operating Controls
1 Hole for fastening screw
2 USB-Port
3 Slots for memory cards
4 LED
5 On/Off switch for card reader
6 Power socket
7 10-pin USB plug, connect with
internal USB port of the main board
Installation
If you do not have the expertise required to carry out the installation,
please contact a specialist or a specialised shop and let them carry out
the installation!
Incorrect installation can cause damage to the product, your computer
and all connected devices.
Caution, lethal hazard!
Switch off the computer in which the product is to be installed as well as
all connected devices and disconnect all devices from the mains voltage,
remove the power plug from the mains supply! Switching off with the
ON/OFF button is not sufficient!
• Open the case of your computer and carefully remove the cover.
• The multi card reader can be inserted into a free 8.9cm/3.5“ slot of your computer case.
With a suitable mounting frame, the multi card reader can also be inserted into a large
slot (13.335cm/5.25”); this type of frame can be acquired from the accessories dealers.
With some computer casings you have to remove a metal shielding plate for the corres-
ponding slot after removing the plastic cover, before the multi card reader can be inserted
and tightened in the computer casing.
• Connect the 10-pin plug (7) on the end of the cable with an internal USB connection on
your main board.
☞
One of the 10 contacts of the plug is locked, preventing a wrong insertion of the
plug.
• The power connection (6) on the multi card reader is to be connected with the PC mains
adapter.
• Secure all cables, so that they cannot slip out of the ports and obstruct a fan in the PC
case. Use cable ties, for example, to secure them.
• Replace the computer case.
• Connect your computer and monitor to the mains voltage and switch on all devices.
• If your computer does not start correctly, switch it off immediately and check all settings
and cable connections.
1
2
3
4
5
6
7
O P E R A T I N G I N S T R U C T I O N S
www.conrad.com
Before re-opening the computer, disconnect it again from the mains
voltage, please see above!
Driver installation
The drivers are already contained in Windows (minimum requirement Windows ME).
Windows automatically recognises the card reader and installs all the necessary drivers.
Windows automatically assigns additional drive letters.
☞
The card reader needs to be switched on (blue LED lighting) for the
computer/the operating system to recognise the card reader; please note the
next section.
Turning on/off the Card Reader, LED Functions
The card reader can be turned on/off with the switch (5).
• Switch position 1 (switch button is slightly further inside the case):
The card reader is activated, the blue LED is lighting. If a memory card is inserted, an
additional red LED lights up. The red LED lights up during read/write access to an
inserted memory card.
• Switch position 2 (switch button slightly further outside the case):
The card reader is de-activated, the blue LED goes out.
Connecting a USB device
A USB device (e.g. USB stick, USB hard drive, USB scanner, etc.) may be connected to
the front USB port (2). USB devices with higher power consumption may also be used if
operated via the computer mains adapter.
Reading/Writing to Memory Cards
A memory card is integrated into the system in the same way as a conventional removable
media drive.
For instance, with Windows file manager you can read the data on the memory card (or
store data on the memory card), in the same way as you use the hard disk or a USB stick.
The red LED flashes during read/write access to the memory card.
Removing Memory Card
When read/write access is effected to the memory card, wait until this access is finished
(red LED stops flashing).
Then, carefully remove the memory card(s) from the card reader.
☞
If the memory card is removed during a read/write access, the data on the
memory card can be damaged. The memory card may possibly even require
subsequent re-formatting.
Tips & Advice
• Ensure that the read-only access (slide switch on the memory card; if available) is in the
off position, when deleting from, or writing to, SD/MS memory cards.
• Preferably, use an internal USB2.0 port for connection of the card reader.
The maximum data signalling rate used by USB1.1 is only about 800kByte/s.
With USB2.0, several Mbyte/s are possible, depending on the speed of your memory
card! Thus, for faster transfer always use a USB2.0 port for the card reader (a
tremendous saving of time during data transfer).
Disposal
Electrical and electronic products do not belong in the household waste!
Dispose of an unserviceable product in line with the relevant statutory
regulations.
These operating instructions are a publication by Conrad Electronic SE, Klaus-Conrad-Str. 1, D-92240
Hirschau (www.conrad.com).
All rights including translation reserved. Reproduction by any method, e.g. photocopy, microfilming, or
the capture in electronic data processing systems require the prior written approval by the editor.
Reprinting, also in part, is prohibited.
These operating instructions represent the technical status at the time of printing. Changes in
technology and equipment reserved.
© Copyright 2010 by Conrad Electronic SE.


