


Intended use
The product serves as a camera that can transmit the captured image over a USB connection to a PC.
Thanks to the integrated lens, particularly small objects/surfaces can be magni
fi
ed and imaged. The power
is supplied via a USB port. The camera has an additional polarizing
fi
lter, which
fi
lters out annoying light
in
fl
uences (for example re
fl
ections from the device being tested).
This product complies with the applicable National and European requirements. All names of companies and
products are the trademarks of the respective owners. All rights reserved.
Package Contents
• Microscope camera
• Table stand
• CD with driver/software
• Calibration Template
• Operating Instructions
Safety Instructions
The warranty will be void in the event of damage caused by failure to observe these safety
instructions! We do not assume any liability for any consequential damage!
We do not assume any liability for material and personal damage caused by improper use
or non-compliance with the safety instructions. In such cases the warranty will be null
and void.
• The unauthorised conversion and/or modi
fi
cation of the product is not permitted, for reasons
of safety and regulation (CE).
• The product should only be used in dry indoor areas, it must not be exposed to damp or wet
environments!
• The product is not a toy and should be kept out of the reach of children.
•
Caution, LED light:
Do not look directly into the LED light!
Do not look into the beam directly or with optical instruments!
• Do not leave packing materials unattended. They may become dangerous playthings for chil-
dren.
• Handle the product with care; it can be damaged by impacts, blows, or accidental drops, even
from a low height.
Driver/Software Installation
☞
Operating and applications software are subject to constant change through updates. For this
reason, not all eventualities but only the basic software installation can be shown in this guide.
• Start your operating system. Place the CD included in the delivery in an appropriate drive on your computer.
• The software now starts automatically and you can install the software. If the CD does not start automati-
cally, start the installation program on the CD manually (the root directory of the CD, for example, “autorun.
exe” or similar). Follow all the software instructions.
On the desktop of your computer a new
fl
ow pattern symbol is created. Now connect the microscope camera
to a free USB 2.0 port on your computer. The operating system recognises the new hardware and completes
the driver installation. Note any information from the manufacturer which is present on the CD.
• Start by double clicking the newly created
fl
ow pattern symbol of the software.
• Click the button “Settings” to make the basic settings of the software for “image resolution, image adjust-
ment, selection of USB camera, etc”.
• With the computer keyboard or by clicking on “Capture”, you can choose whether to take an image (keyboard
“F4”), a video (keyboard “F8”) or a timed variation of an image or video (keyboard “F5”).
• A “Click here” symbol should appear. Here you will be asked to use test recordings to create a reference
(Calibration – for example with graph paper or the calibration template from the original packaged product)
for later messages and displays. To do this, follow the instructions in the English “Help File”. If you only
want to look at the topics, you can ignore this message.
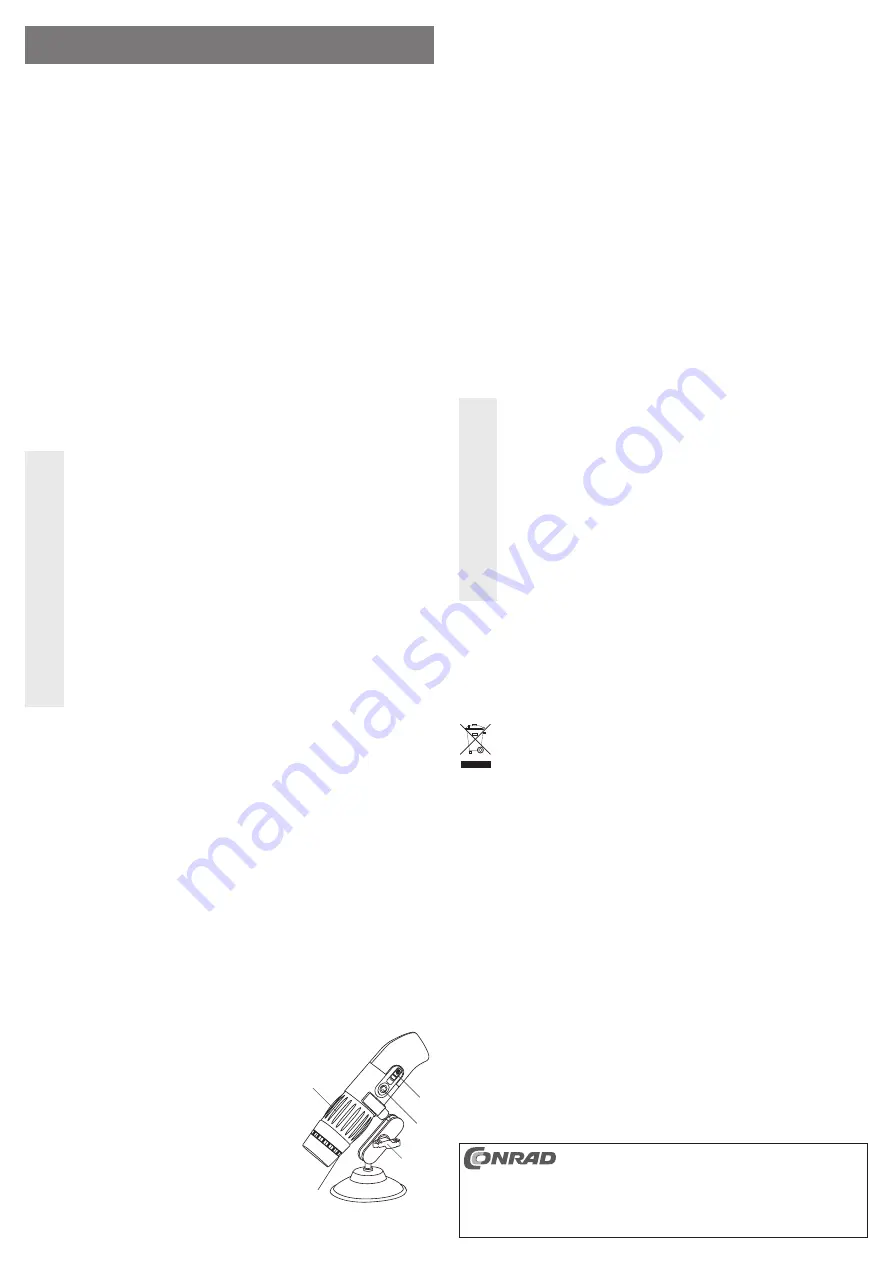
Controls
1 Objective (with LED illumination)
2 Adjustment dial
3 Slide switch for LED illumination
4 Photo key
5 Locking bolt
6 Stand
7 Adjustment ring for the polarizing
fi
lter
Operation
• The LED lights in the front lens can be switched off with the slide switch (3) (button position OFF) or two
brightness levels can be selected (button positions “1” and “2”).
• Move the lens (1) of the microscope camera as close as possible to the desired object (e. g. place the front
on a newspaper).
• Adjust the picture until the image is sharp by using the adjustment dial (2).
• The camera has additionally a so-called polarizing
fi
lter. You can improve the image reproduction for
objects with a highly re
fl
ective surface by switching the illumination to level 1 (half brightness) and turning
the adjustment ring (7) to fade down the re
fl
ection or at least reduce it.
☞
Slowly turn the dial, so that the image is placed directly in the lens, and can be brought optically
into focus in two levels of magni
fi
cation.
Do not over wind the adjustment dial. Turn the adjustment wheel slowly, so that you can focus
the picture accurately. Turn the adjustment dial (2) in one direction or the other, until a sharp
picture can be seen on the computer monitor, at one of the two zoom levels .
With
re
fl
ective surfaces or objects, the LED light can result in over bright pictures or re
fl
ections.
• Turn the microscope camera or the object to be viewed until the picture is aligned as desired.
Make sure no objects touch the lens as they might damage it. Do not touch the internal optical
parts (the lenses will become dirty).
• The microscope camera can be
fi
xed at a given position using the table stand included in the delivery; the
locking bolt (5)
fi
xes the position of the table stand.
• Button (4) on top of the microscope camera is used to control the camera function of the software.
Handling
Never use the product immediately after it has been taken from a cold room to a warm one. The
resulting condensation can destroy the product.
Allow the device to reach room temperature before switching it on. This may take several hours.
The housing must not be opened! Any maintenance or repair work may only be carried out by
authorised personnel.
The following unfavourable conditions are to be avoided when installing or transporting the product:
- Excessive humidity or damp
- Extreme cold or heat
- Dust or
fl
ammable gases, fumes or solvents
- Strong vibrations
- Strong magnetic
fi
elds such as those found in the vicinity of machinery or loudspeakers
When setting up/using the product, ensure that the cables are not bent, over-tightened or
squeezed.
Cleaning
Check the lens of the microscope camera occasionally, clean it of dust and dirt. Use an appropriate lens
cleaning system, e. g. a clean, soft brush. Do not press too hard on the optics/mechanics of the camera,
since it may be damaged. Furthermore, you may cause scratch marks on the lens.
Disposal
Dispose of an unserviceable product in accordance with the relevant statutory regulations.
Technical Data
Sensor .........................................3488 x 2616 Pixel (9 MP)
USB Connection ..........................USB2.0
Operating voltage ........................5 V= (via USB)
Lighting ........................................8 white LEDs
Magni
fi
cation ...............................Max. approx. 200x
Focus range .................................10 mm to 200 mm
Dimensions (W x L) .....................approx. 37 x 140 mm
O P E R A T I N G I N S T R U C T I O N S www.conrad.com
Digital microscope camera
USB 9.0MP 200X
Item no. 19 13 77
Version 06/12
These operating instructions are a publication by Conrad Electronic SE, Klaus-Conrad-Str. 1,
D-92240 Hirschau (www.conrad.com).
All rights including translation reserved. Reproduction by any method, e.g. photocopy, micro
fi
lming,
or the capture in electronic data processing systems require the prior written approval by the editor.
Reprinting, also in part, is prohibited.
These operating instructions represent the technical status at the time of printing. Changes in
technology and equipment reserved.
© Copyright 2012 by Conrad Electronic SE.
2
3
4
5
1
6
7


