background image

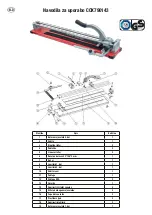
Please keep these instructions and read them carefully before using the tile cutting machine. 

A.  Safety instructions


- Keep away from children. 


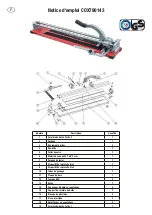
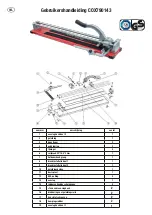
- The tile cutting machine is fitted with a replaceable cutting wheel. Check the cutting wheel‘s backlash and turnability before use and correct if necessary. 


- Clean the machine after use and store in a safe, dry place.  


- Not suitable for natural stone tiles and/or heavily structured tiles. 


- Place the machine on a level, clean and solid surface before use. 


- Caution: Cut/broken tiles have sharp edges. 


- Problems can arise with tiles that have been fired multiple times. Ask a specialist (tiler).

B.  Cutting and breaking tiles 


- Mark the break line with pencil/permanent marker. 


- Push the tile against the mechanical stop, the glazed side must face upwards. 


- Position the cutting wheel at the beginning of the line marked. 


- Press the cutting lever/cutting wheel downwards, onto the tile, pushing forward along the marking. Make sure that there is a uniform grinding noise. Repeat 

the process if necessary.  


- Position the breaking device at the front on the tile and press the handle downwards carefully. IMPORTANT: The cutting wheel must not touch the tile!

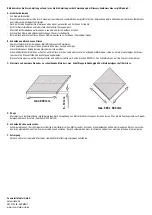
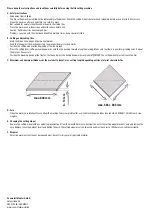
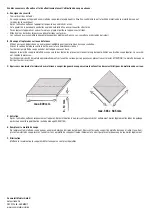
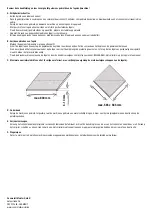
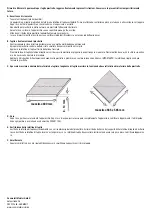
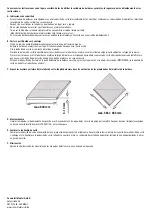
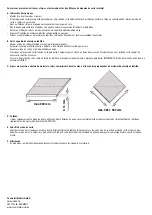
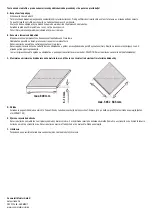
C.  Maximum and minimum thickness of the material to be cut; max. cutting length depending on tiles’ material characteristics.

D.  Care 


- Clean the machine carefully after use. Allow the machine to dry completely after use. Lubricate the guide tubes (household oil, COX591100) after each clea-

ning/use.

E.  Changing the cutting wheel 


- Replace the cutting wheel with an original replacement part from the manufacturer only. Unscrew the nut of the cutting wheel bracket‘s axle and remove the 

axle. Replace the cutting wheel, insert and tighten the axle. The cutting wheel must run smoothly and must have just a little backlash. Lubricate slightly.

F.  Disposal 


- Defective machines that cannot be repaired must be sent for disposal of recyclable material.

Conmetall Meister GmbH

Hafenstraße 26 
29223 Celle 

·

 GERMANY

www.conmetallmeister.de

max. 800 mm

max. 565 x 565 mm

- 14 

mm

Summary of Contents for 4035300889884

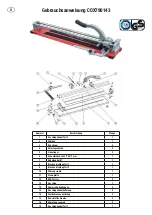
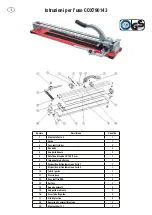
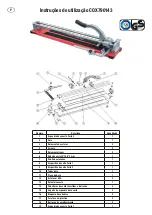
Page 1: ...lager 2 6 Schneidr dchen 22 10 5 2 mm 1 7 Hebelhandgriff 1 8 Brechvorrichtung Teil 1 1 9 Brechvorrichtung Teil 2 1 10 F hrungsrohre 1 11 Grundplatte 1 12 EVA Polster 2 13 Anschlag 1 14 Gummierte Eckka...

Page 2: ...chneidr dchen nach unten auf die Fliese dr cken und dabei nach vorne entlang der Markierung schieben Auf ein gleichm iges Knirschge r usch achten Wenn erforderlich den Vorgang wiederholen Brechvorrich...

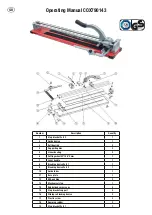
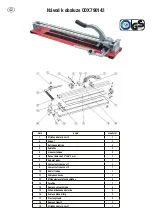
Page 3: ...ear bearing 2 6 Cutting wheel 22 10 5 2 mm 1 7 Lever handle 1 8 Breaking device Part 1 1 9 Breaking device Part 2 1 10 Guide tubes 1 11 Base plate 1 12 EVA padding 2 13 Mechanical stop 1 14 Rubberised...

Page 4: ...ing forward along the marking Make sure that there is a uniform grinding noise Repeat the process if necessary Position the breaking device at the front on the tile and press the handle downwards care...

Page 5: ...oupe 22 10 5 2 mm 1 7 Poign e de levier 1 8 Dispositif de rupture Partie 1 1 9 Dispositif de rupture Partie 2 1 10 Tubes de guidage 1 11 Plaque de base 1 12 Tampon EVA 2 13 But e 1 14 Capuchons d angl...

Page 6: ...er de coupe la molette de coupe vers le bas tout en les glissant vers l avant le long du rep re Veillez un bruit de coupe r gulier Le cas ch ant r p tez le processus Positionnez le dispositif de ruptu...

Page 7: ...2 6 snijdraad 22 10 5 2 mm 1 7 hefboomhandgreep 1 8 breekinstallatie deel 1 1 9 breekinstallatie deel 2 1 10 geleidingsbuizen 1 11 basisplaat 1 12 EVA vulling 2 13 aanslag 1 14 rubberen hoekbeschermin...

Page 8: ...op de tegel en schuif daarbij langs de markering naar voren Let erop dat de tegel een gelijkmatig knarsgeluid maakt Herhaal het proces indien nodig Plaats de breukmachine vooraan op de tegel en duw de...

Page 9: ...ina di taglio 22 10 5 2 mm 1 7 Impugnatura della leva 1 8 Dispositivo di frantumazione Parte 1 1 9 Dispositivo di frantumazione Parte 2 1 10 Tubi di guida 1 11 Piastra base 1 12 Cuscinetti in EVA 2 13...

Page 10: ...di taglio verso il basso sulla piastrella e spingerla in avanti lungo la marcatura Prestare attenzione a che lo stridio sia unifor me Se necessario ripetere la procedura Applicare il dispositivo di fr...

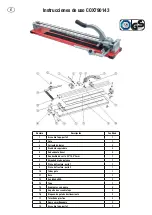
Page 11: ...neal 2 6 Ruedecilla de corte 22 10 5 2 mm 1 7 Empu adura de palanca 1 8 Pieza de fractura parte 1 1 9 Pieza de fractura parte 2 1 10 Tubos gu a 1 11 Base 1 12 Acolchado EVA 2 13 Tope 1 14 Esquineras c...

Page 12: ...o largo de la marca Procure contra la base y corte la baldosa o azulejo a lo largo de la marca presionando hacia abajo la palanca de corte y desliz ndola hacia delante Procure que haya un sonido de fr...

Page 13: ...2 10 5 2 mm 1 7 Punho da alavanca 1 8 Dispositivo de corte Parte 1 1 9 Dispositivo de corte Parte 2 1 10 Tubos guia 1 11 Placa de base 1 12 Estofo em EVA 2 13 Batente encosto 1 14 Coberturas de canto...

Page 14: ...ca de corte roda de corte para baixo e empurrar para a frente ao longo da marca o Prestar aten o a um ru do de corte regular Se necess rio repetir o processo Colocar o dispositivo de corte sobre o azu...

Page 15: ...lo isko 2 6 ezac kole ko 22 10 5 2 mm 1 7 Rukoje p ky 1 8 L mac za zen st 1 1 9 L mac za zen st 2 1 10 Vodic trubka 1 11 Z kladov deska 1 12 Etylenvinylacet tov podlo ka 2 13 Zar ka 1 14 Gumov chr ni...

Page 16: ...a tek vyzna en ry ezac p ku stla te dol na dla dici a p i tom ji posunujte pod l zna ky D vejte pozor aby sk p n bylo rovnom rn V p pad pot eby postup zopakujte Nasa te l mac za zen na dla dici a stla...

Page 17: ...Klzn lo isko 2 6 Rezacie koliesko 22 10 5 2 mm 1 7 R ka p ky 1 8 L mac pr pravok as 1 1 9 L mac pr pravok as 2 1 10 Vodiaca ty 1 11 Z kladov doska 1 12 Podlo ka EVA 2 13 Doraz 1 14 Pogumovan rohov kry...

Page 18: ...lada ku a pritom pos vajte dopredu pozd vyzna enej iary Dbajte na rovnomern kr pav zvuk V pr pade potreby postup zopakujte L mac pr pravok nasa te vpredu na obklada ku a p ku opatrne zatla te smerom n...

Page 19: ...5 Linearni le aj 2 6 Rezalno kolesce 22 10 5 2 mm 1 7 Ro aj 1 8 Lomilnik 1 del 1 9 Lomilnik 2 del 1 10 Vodilni cevi 1 11 Podlaga 1 12 Podloga EVA 2 13 Omejilo 1 14 Gumijasti itniki vogalov 4 15 Dr al...

Page 20: ...na plo ico in pri tem re ite naprej vzdol ozna ene rte Bodite pozorni da bo zvok krtanja enakomeren e je treba ponovite postopek Lomilnik namestite spredaj na plo ico in previdno pritisnite ro ico nav...

Page 21: ...2 6 Tarcza tn ca 22 10 5 2 mm 1 7 Uchwyt d wigni 1 8 Przyrz d ami cy Cz 1 1 9 Przyrz d ami cy Cz 2 1 10 Rura prowadnicy 1 11 P yta podstawowa 1 12 Tapicerka EVA 2 13 Ogranicznik 1 14 Gumowe nakr tki...

Page 22: ...na pocz tku zaznaczonej linii Docisn d wigni tn c tarcz tn c do p ytki jednocze nie przesuwaj c j do przodu wzd u oznaczenia Zwr ci uwag na r wnomierny odg os skrzypie nia Je li to konieczne powt rzy...

Page 23: ...Lineaarinen laakeri 2 6 Leikkuupy r 22 10 5 2 mm 1 7 Vipukahva 1 8 Katkaisulaite Osa 1 1 9 Katkaisulaite Osa 2 1 10 Ohjainputki 1 11 Pohjalevy 1 12 EVA pehmuste 2 13 Vaste 1 14 Kumitettu kulmansuojus...

Page 24: ...eikkuupy r alas laatan p lle ja ty nn eteenp in merkitty linjaa pitkin Pid huolta siit ett leikkuu ni on tasainen Mik li tarpeen toista menettely Aseta katkaisulaite laatan eteen ja paina vipu varovas...

Reviews: