


REMOT
E
CONTRO
L
Displa
y
Indicato
r
Speed, Time, Distance (Distance travelled km), Calories, Scan (random display).
NB. For faster adjustment of Time
or Speed press and hold the relevant button.
SWITCHIN
G
ON/OF
F
1.
Plug the socket into the wall. Switch the red button below the remote control support to
position I. To switch the machine on press (1) on the remote control.
2.
To switch the machine off press (1) on the remote control. Switch the red button below
the remote control support to position 0 and then unplug the unit from the wall.
EXERCISE
S
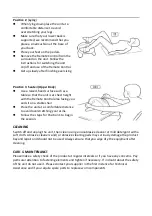
Positio
n
1
:
Seate
d
(Lowe
r
Body
)
Use a stable, sturdy chair.
Place the unit at a comfortable distance from the chair to
avoid overstretching your legs.
Make sure that your lower back is supported; we
recommend that you place a small cushion at the base of
your back.
Sit on the chair and place your feet on the pedals.
Remove the Remote Control from the surround on the
unit. Follow the instructions for switching the unit on/off
and use of the Remote Control.
1
Power On/Off
2
Time (Time selection button; 115 min)
3
Decrease Speed (12 settings)
4
Increase Speed (12 settings)
5
Forward/Reverse (Pedal direction)
6
Mode (Press to display speed, time,
distance or calories
Summary of Contents for Electric Mini Exercise Bike
Page 1: ...Electric Mini Exercise Bike ...
Page 8: ......


