48
INSTALLATION GUIDE
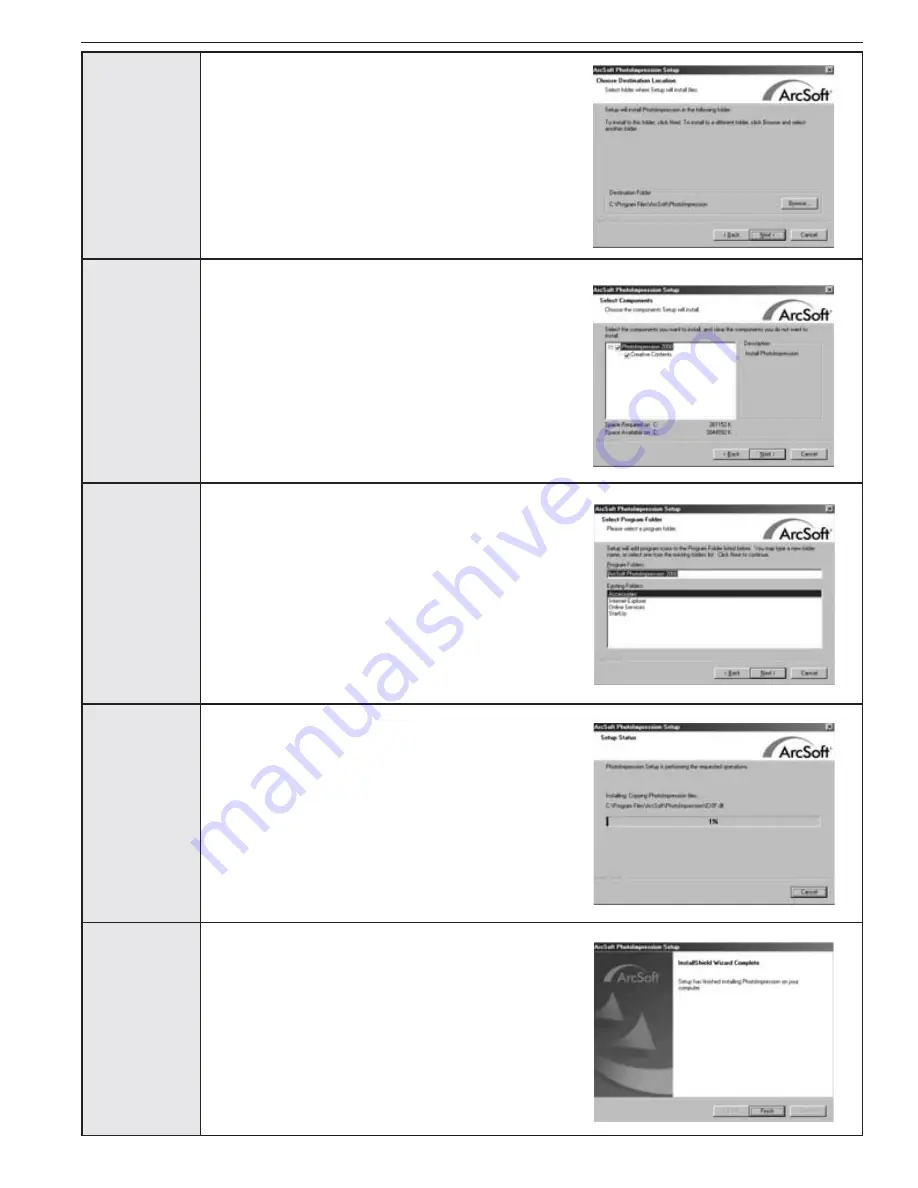
Step 9
Click
[Next >]
Step 10
Make sure all two applications are checked and then click
Step 11
Step 12
The screen will show the status of the installation
Step 13
[Finish]
Page 1: ...www concord camera com User s Guide User s Guide...
Page 2: ...engineered and manufactured to give you dependable operation Read this manual before operating the camera to become more familiar with it This manual has been written and formatted with depth and det...
Page 3: ...12 Flash Ready LED 13 Viewfinder 14 Diopter wheel 15 Auto Focus LED 16 LCD 17 Tripod Socket 18 Reset Button 19 LCD On Off Button 20 Menu Button 21 Memory Card Slot 22 Battery Compartment 23 Battery Me...
Page 4: ...Off 12 Setting the camera s operational mode 12 TAKING PICTURES 13 Taking a Picture with the Viewfinder 13 Flash Ready LED 13 Taking a Picture with the LCD 14 Auto Focus Lock 14 Setting the Flash 15 O...
Page 5: ...8 98SE 44 Installing DirectX 9 Windows 2000 46 Installing ArcSoft PhotoImpression all Windows users 47 Installing Adobe Acrobat Reader 5 1 all Windows users optional 48 CONNECTING THE CAMERA TO THE CO...
Page 6: ...and 4x AA Rechargeable Batteries CD ROM for Windows users only USB Mass Storage Driver ArcSoft PhotoImpression 2000 Adobe Acrobat Reader 5 1 Microsoft DirectX 9 View User s Guide Multilingual Visit Co...
Page 7: ...A batteries Do not force the AA batteries into the bottom row 3 Replace the battery door fig 1 5 4 Plug the charger into a standard AC power outlet fig 1 6 Check if the green LED indicator lights up I...
Page 8: ...ile plugging or unplugging the charger to or from AC outlet 3 Charge only the suggested type of rechargeable batteries Other types of batteries may burst causing personal injury and damage And do not...
Page 9: ...battery level is displayed on the LCD Note Remove the batteries from the camera if they will not be used for an extended period of time to prevent corrosion or battery leaks To extend battery life th...
Page 10: ...internal memory the camera uses Secure Digital SD memory cards to store images and video clips 1 Open the Battery Memory Card door Press the Battery Memory Card door slide the door down and lift it o...
Page 11: ...the first time the Language Date and Time menus will appear Setting the Language 1 Turn the camera on The Language Setup screen will appear on the LCD 2 Press the joystick to highlight the language yo...
Page 12: ...k to highlight the hour HH minutes MM or AM PM The selection will blink when it is highlighted 2 Press the joystick to change the selection in the blinking position until you reach the desired setting...
Page 13: ...urrent camera settings 1 Use the button to toggle the LCD mode The LCD mode changes each time the button is pressed as follows c Icons off d LCD off e LCD on with icons Note In order to save battery p...
Page 14: ...inking For information on Focus Lock please go to p 14 fig 1 1 5 Press the shutter button fully to capture the image fig 1 2 The camera will beep when the image is captured if sound is activated The c...
Page 15: ...1 1 2 Press the shutter button half way fig 1 2 When the shutter button is pressed half way the auto focus feature will be activated and the Auto Focus green LED will display the status of the auto f...
Page 16: ...od Night Mode A slow shutter speed is used in this mode to capture the lights in night scenes To prevent blurry pictures in low light situations hold the camera steady when pressing the Shutter button...
Page 17: ...lity may degrade slightly with digital zoom Note The digital zoom can only be monitored with the LCD and not through the optical viewfinder Activating Deactivating Digital Zoom The digital zoom featur...
Page 18: ...URN SET DIGITAL ZOOM OK Party Indoor Beach Snow Sunset Night Landscape RETURN SET SCENES SELECT OK S OFF S Fireworks Night Portrait RETURN SET SCENES SELECT OK Auto Sunny Fluorescent Tungsten RETURN S...
Page 19: ...E OPTIONS The capture mode menu has 7 features to choose from for taking pictures Capture Mode Option Description Single shot The camera will take 1 picture at a time Single shot with Self timer The c...
Page 20: ...link for 10 seconds and then the image will be captured Note The self timer is automatically deactivated once the image is taken To deactivate the self timer before taking a picture follow the steps a...
Page 21: ...ture in Macro Mode 1 Frame the subject in the LCD The minimum shooting distance can vary based on the zoom position In the wide angle position you can get as close as 0 1m 3 9 inches 2 Press the shutt...
Page 22: ...press the shutter button half way to activate the focus until the green AF LED stops blinking 4 Press the shutter button fully to capture the pictures The camera will capture images at approximately 3...
Page 23: ...te Resolution icon will be displayed according to the resolution you have selected For example if you selected resolution of 1600 x 1200 1600 will be shown on the left upper corner of the LCD 22 TAKIN...
Page 24: ...mal 8 1 Normal image quality can be used for general purpose pictures Economy 16 1 Economy image quality can be used for pictures that will be sent via e mail How to change the quality 1 When Quality...
Page 25: ...sufficient sunlight Fluorescent Use indoors with fluorescent or ambient light conditions Tungsten Use indoors with tungsten light conditions How to change the White Balance 1 When White Balance is hi...
Page 26: ...ing the Exposure in pictures that are too light will make the picture darker How to use EV Compensation 1 Press the joystick in the Main Menu until EV Compensation is highlighted 2 Press the joystick...
Page 27: ...mera to self timer mode 4 Press the shutter button Sunset This mode captures the deep hues and color variations in sunsets and sunrises Fireworks Use this mode to capture the burst of light from firew...
Page 28: ...ips until the memory card is full and the recording time remaining will be displayed on the upper right hand corner of the LCD monitor To stop recording 1 Press the Shutter button again to stop record...
Page 29: ...resents the current picture is the first shot and there are total 6 pictures or video clips 2 Press the joystick or to scroll through each file 3 The file type can be found in the upper left hand corn...
Page 30: ...While viewing a stored image JPG Press to use the Enlargement feature Press again to get different magnifications in the following order c 2x Enlargement d 4x Enlargement e 6x Enlargement f Normal Mo...
Page 31: ...ess MENU to display the main menu 4 Press the joystick to enter the Delete submenu 5 To exit the menu press the joystick 6 Press the MENU button to return to the Main Menu Are You Sure Delete One Dele...
Page 32: ...overed How to delete all files 1 Set the Mode Dial to the Review Mode 2 Press the joystick until Delete All is highlighted and press the joystick 3 The next screen will read Are You Sure press the joy...
Page 33: ...once on the LCD display 2 Press the joystick to highlight a picture or video clip When the joystick is pressed up in the top row of thumbnails the previous 9 files will be displayed When the joystick...
Page 34: ...UP T LCD Brightness Card Format Camera Info Adjust Date Adjust Time RETURN SELECT SETUP 1 Time Format Date Format RETURN SELECT SETUP D M 12 24 NTSC PAL RETURN SET TV OPTION OK OFF 30 SEC 60 SEC 90 SE...
Page 35: ...T 12 24 OK DD MM YYYY MM DD YYYY YYYY MM DD RETURN SET DATE FORMAT D M OK LCD BRIGHTNESS OK SET Yes No RETURN SET CARD FORMAT OK White Balance EV Compensatiion Setup RETURN SELECT CAMERA MODE Set Auto...
Page 36: ...er off option TV Option NTSC PAL Sets the mode the camera needs to adapt to your TV p 54 Speaker On Off Activates or deactivates the audio feature in the camera Note Audio is an optional feature avail...
Page 37: ...is highlighted 2 Press the joystick to enter the Language submenu 3 Press the joystick to highlight the desired language 4 Press to select the language All menu screens will be displayed in the new l...
Page 38: ...era is turned on Press the Shutter button slightly to turn the reminder off SETTING THE TIME 1 In the Setup menu press the joystick until Adjust Time is highlighted 2 Press the joystick to highlight t...
Page 39: ...lected ALL FILES will be deleted Note If MEMORY ERROR is displayed on the LCD screen this indicates that he internal memory or the memory card is corrupted Please format the memory to continue 1 Forma...
Page 40: ...cted the Default settings will be restored Please refer to the table below for the default settings OPTION DEFAULT STATUS Capture mode Single Shot Quality Fine Resolution 2048 X 1536 Digital Zoom ON S...
Page 41: ...mmended USB Port CD ROM Drive Macintosh Mac OS 9 0 9 1 9 2 9 3 and X or later Power PC based 32MB of RAM 640 x 480 display with Thousands of colors Millions of colors recommended Built In USB Port Ins...
Page 42: ...le the camera to become an external drive on your computer Microsoft DirectX 9 DirectX 9 enables the movie playback applications on your computer to playback video clips that are captured with the cam...
Page 43: ...lling the USB Installing Mass Storage Drivers DirectX 9 p 46 and DirectX 9 p 44 Installing ArcSoft PhotoImpression 2000 p 47 Installing Adobe Acrobat Reader 5 1 if needed p 48 Connecting the camera to...
Page 44: ...tion Windows 2000 Page 46 Windows Millennium Edition Page 47 Windows XP Home Edition Windows XP Professional Edition Windows XP Media Center Edition 4 Press to close the window If the My Computer icon...
Page 45: ...nstaller does not start automatically within 30 seconds after the CD ROM has been inserted click on My Computer either on the Desktop or in the Start Menu and locate the CD ROM Drive Double click on t...
Page 46: ...ALLATION GUIDE Step 8 Click Install Step 9 Install progress bar Step 10 The next screen will begin the DirectX setup Click Next Step 11 Click Next Step 12 Click Finish Your computer will automatically...
Page 47: ...r s CD ROM Drive NOTE If the installer does not start automatically within 30 seconds after the CD ROM has been inserted click on My Computer either on the Desktop or in the Start Menu and locate the...
Page 48: ...mputer s CD ROM Drive NOTE If the installer does not start automatically within 30 seconds after the CD ROM has been inserted click on My Computer either on the Desktop or in the Start Menu and locate...
Page 49: ...STALLATION GUIDE Step 9 Click Next Step 10 Make sure all two applications are checked and then click Next Step 11 Click Next Step 12 The screen will show the status of the installation Step 13 Click F...
Page 50: ...he CD ROM included in your camera s packaging into your computer s CD ROM Drive NOTE If the installer does not start automatically within 30 seconds after the CD ROM has been inserted click on My Comp...
Page 51: ...s Adobe Acrobat 5 1 automatically OR You may change the default folder by clicking Browse and selecting a different folder in your computer Click Next Step 9 Installation progress Step 10 Select Yes t...
Page 52: ...the on screen instructions to complete the installation DOWNLOADING PICTURES AND VIDEO CLIPS ONTO YOUR COMPUTER Note Windows 98 98SE users must install the camera driver first Page 44 Note Windows 20...
Page 53: ...Camera Suite and choosing PhotoImpression from the application list on your screen 3 When the Application opens 4 Click on the Camera Scanner button a 5 Click on the drop down list under Select Source...
Page 54: ...camera Windows ME 2000 XP 1 Turn the camera off 2 Click once on the Unplug or Eject Hardware icon on the right hand side of your task bar fig 1 1 3 Select Stop Concord Eye Q 3340z USB Mass Storage De...
Page 55: ...the joystick until TV is highlighted 6 Press the joystick to enter the TV submenu 7 Press the joystick to change the setting to NTSC or PAL 8 Press MENU to exit Note If the TV is not properly grounded...
Page 56: ...CR documentation to learn more about recording Reviewing pictures and video clips on your TV 1 In TV Mode slide the Mode Switch to 2 Press the joystick to scroll through the saved pictures and video c...
Page 57: ...rs on the inside of the battery door Replace batteries Close the battery compartment properly Press the reset button on the back of the camera with a pointed object such as a pen then power the camera...
Page 58: ...POSSIBLE SOLUTION Move the subject closer to the camera or move the camera closer to the subject Turn the flash On Change the subject s position Increase the exposure compensation See p 25 This is no...
Page 59: ...ton does not work The LCD display is dark The LCD screen looks milky and or scratched The LCD is not displaying anything Cannot playback stored video clips on the computer POSSIBLE SOLUTION Remove the...
Page 60: ...locate drivers Windows 98 98SE The camera does not recognize your SD Card POSSIBLE SOLUTION Reset the camera by pressing the reset button with a pointed object such as a pen Reboot the computer Check...
Page 61: ...era Info in camera p 33 Computer Make and Model FW Version Amount of memory FW Part Number Exact Error message received Date CD ROM Part Number Comment For Camera Support please contact Toll Free in t...
Page 62: ...ite balance with manual presets 16 MB non volatile memory SD memory card slot JPG EXIF Optical 3x Zoom viewfinder with 80 coverage Approximately 10 seconds with blinking red LED Flash off auto flash f...
Page 63: ...not swallow batteries or small camera accessories Keep the camera away from water and other liquids and never let it get wet Do not use outdoors when it is raining or snowing Should any form of liquid...
Page 64: ...on When using SD Memory Cards do not change the attributes read only etc of the files pictures JPEG or video clips AVI on the card Doing so may prevent the camera from working properly when deleting e...
Page 65: ...erence will not occur in a particular installation If this equipment does cause harmful interference to radio or television reception which can be determined by turning the equipment on and off the us...
Page 66: ...Visit Concord on the Internet www concord camera com Concord Eye Q 3340z User s Guide Copyright 2003 Concord Camera Corp...