background image

ITALIANO 

60 


Selezionare la nuova configurazione del disco rigido dalla sezione inferiore dell’elenco. 


Fare clic con il tasto destro sulla nuova configurazione del disco rigido dopo di che selezionare “

New 

Simple Volume

”. 


Sullo schermo apparirà il Programma di Formattazione Assistita. Fare clic su “

Next

” per continuare. 


Selezionare le dimensioni della nuova configurazione del disco rigido. Per default, vengono specificate 
le dimensioni massime. Se si desidera creare volumi molteplici sulla configurazione del disco rigido, 

ridurre le dimensioni a quelle richieste dal primo volume. Se invece si desidera creare un solo volume, 
mantenere le dimensioni massime. Fare clic su “

Next

” per continuare. 


Selezionare la lettera di unità che si desidera assegnare al nuovo volume. Per default verrà mostrata la 

prima lettera disponibile. Fare clic su “

Next

” per continuare. 


Selezionare le opzioni di formattazione. È possibile modificare il file system, cambiare l’etichetta del 

volume e selezionare l’opzione di formattazione veloce “

Perform a quick format

”. Fare clic su “

Next

” 

per continuare. 


Nota:

   Le partizioni con più di 32GB si possono formattare esclusivamente mediante il file system NTFS 

quando viene usato il software di Gestione disco di Windows. 


Apparirà un sunto dei comandi selezionati. Selezionare “

Finish

” per chiudere il Programma di 

Formattazione Assistita e iniziare con la procedura di formattazione della configurazione del disco 

rigido. 


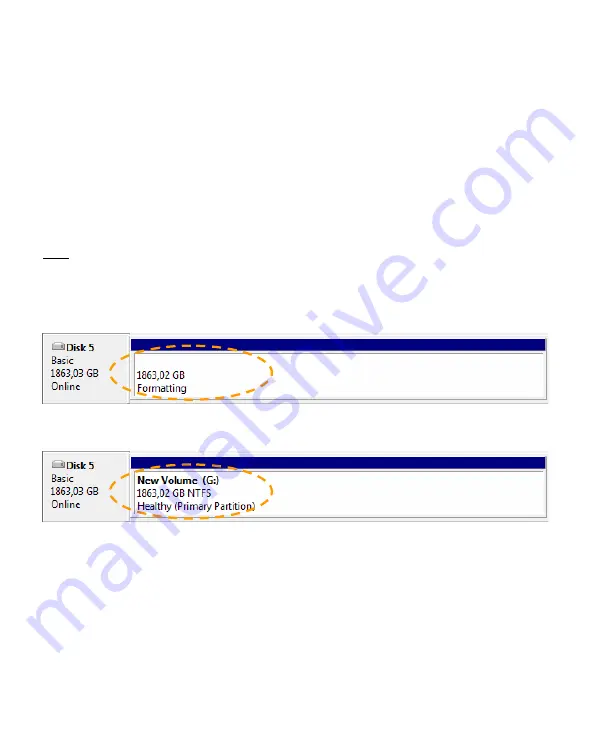
Dopo aver terminato il processo di formattazione, la configurazione del disco rigido verrà mostrata nel 

programma di Gestione disco come “

Healthy

”. 


Ora è possibile usare la configurazione del disco rigido formattata. 


Divertitevi usando il Box per hard disk con 2 baie di Conceptronic! 


Summary of Contents for CH3B2E

Page 1: ...vraag over dit product heeft die niet op onze website wordt beantwoord kunt u ons e mailen op support conceptronic net Ga voor meer informatie over Conceptronic producten naar de Conceptronic website www conceptronic net De hieronder beschreven software installatie kan enigszins afwijken afhankelijk van uw computer Dit hangt samen met de gebruikte versie van Windows 1 Inhoud verpakking U vindt de ...

Page 2: ...CH3B2E zijn tweekleurig blauw en rood en geven de status van de geplaatste harde schijven aan Wanneer de harddiskconfiguratie van de CH3B2E op JBOD staat ingesteld afzonderlijke harddisk s hebben de lampjes aan de voorkant van het apparaat de volgende betekenis Beschrijving Blauw Rood Harde schijf niet aangesloten of geen stroom Uit Uit Harde schijf aangesloten niet in gebruik Aan Uit Harde schijf...

Page 3: ...de schijf niet aangesloten of geen stroom Knippert Knippert Harde schijf aangesloten niet in gebruik Aan Uit Harde schijf aangesloten tijdens gebruik Aan Knippert aan Partitieherstel een fysieke partitie wordt opnieuw opgebouwd Knippert Aan Controle partitieherstel een fysieke partitie wordt geverifieerd Aan Knippert aan Storing Incorrect serienummer Een of meer gedeeltelijke schijfvolumes met pro...

Page 4: ...herkend en geïnstalleerd door de computer Installatie van stuurprogramma s is niet nodig De CH3B2E staat standaard ingesteld op JBOD configuratie met afzonderlijke harddisk s Als er 2 harde schijven in de CH3B2E zijn geplaatst ziet uw computer ze als 2 afzonderlijke schijfvolumes NB Wanneer u de CH3B2E via eSATA op uw computer heeft aangesloten is het mogelijk dat er maar 1 harddisklampje actief i...

Page 5: ...d verschijnt C Klik op Next Volgende om door te gaan D Accepteer de licentieovereenkomst door Ik accepteer te selecteren en klik op Volgende om verder te gaan E Wijzig de installatiemap met de knop Browse Bladeren of laat de standaard installatiemap staan Klik op Volgende om door te gaan F De installatiewizard is nu gereed om de programma s op uw computer te installeren Klik op Volgende om de inst...

Page 6: ...en op het pictogram Wanneer het programma is gestart ziet u het hoofdmenu met links een overzicht van de aangesloten CH3B2E eenheid eenheden en bijbehorende serienummer s Wanneer u links in het venster een eenheid selecteert ziet u aan de rechterkant de configuratie van deze eenheid In het voorbeeld in de bovenstaande afbeelding ziet u een JBOD configuratie afzonderlijke harddisks met 2 harde schi...

Page 7: ...werken als 1 schijf met de totale opslagruimte van beide harddisks bij elkaar SAFE33 De harde schijven in de eenheid werken gedeeltelijk als duplicaat van elkaar 33 mirror De resterende ruimte is bruikbaar als BIG schijfvolume SAFE50 De harde schijven in de eenheid werken gedeeltelijk als duplicaat van elkaar 50 mirror De resterende ruimte is bruikbaar als BIG schijfvolume FAST RAID 0 De harde sch...

Page 8: ...t In het hoofdmenu van het programma ziet u nu de nieuwe configuratie van uw eenheid In het bovenstaande voorbeeld ziet u een BIG configuratie met 2 harde schijven van 1 TB en een totale opslagcapaciteit van 2 TB 1863 GB Nadat u wijzigingen heeft aangebracht in de configuratie van uw eenheid raden we aan om het zojuist aangemaakte schijfvolume opnieuw te formatteren Zie hoofdstuk 6 voor formatteer...

Page 9: ...nstructies zijn gebaseerd op Windows Vista Wanneer u een andere Windows versie gebruikt kunnen de stappen afwijken Klik op de Start knop van Windows en selecteer Alle programma s Bureau accessoires Uitvoeren Geef de opdracht diskmgmt msc in zonder de aanhalingstekens en klik op OK om de opdracht uit te voeren Het venster Schijfbeheer verschijnt op uw scherm Selecteer uw nieuwe harddiskconfiguratie...

Page 10: ...schikbare letter getoond Klik op Volgende om door te gaan Selecteer uw formatteeropties U kunt het bestandssysteem en de volumenaam wijzigen en kiezen voor Snelformatteren Klik op Volgende om door te gaan NB Partities van meer dan 32 GB kunnen met Windows schijfbeheer alleen worden geformatteerd met het NTFS bestandssysteem Nu ziet u een overzicht van de gekozen opdrachten Selecteer Voltooien om h...

Page 11: ...ther questions about your product and you cannot find it at our website then you can contact us by e mail support conceptronic net For more information about Conceptronic products please visit the Conceptronic Web Site www conceptronic net The Software installation as described below may be slightly different from the installation on your computer This depends on the Windows version you are using ...

Page 12: ... The harddisk LEDs of the CH3B2E are 2 colored blue red and show the status of the harddisks in the unit When the harddisk configuration of the CH3B2E is set to JBOD single disk configuration the following LED modes can be seen on the front of the unit Description Blue LED Red LED HDD unplugged no power Off Off HDD plugged idle mode On Off HDD plugged activity mode On Flash On 1 2 3 8 7 6 5 4 ...

Page 13: ...ront of the unit Description Blue LED Red LED HDD unplugged no power Blink Blink HDD plugged idle mode On Off HDD plugged activity mode On Flash On Disk Rebuild a physical partition is being rebuilt Blink On Disk Rebuild Verify a physical partition is being verified On Flash On Error State Incorrect serial number One or more bad partial volumes Blink Blink ...

Page 14: ...automatically recognize and install the CH3B2E No driver installation is required The CH3B2E is configured to JBOD single disk configuration by default When there are 2 harddisks inserted in the CH3B2E they will be identified on your computer as 2 separate volumes Note When you have connected the CH3B2E to your computer with eSATA it is possible that the unit will only show 1 active harddisk LED T...

Page 15: ... Wizard will appear C Click Next to continue D Accept the License Agreement by selecting I Agree and click Next to continue E Modify the installation destination with the Browse button or keep the default installation destination Click Next to continue F The Setup Wizard is ready to install the software on your computer Click Next to start the installation The Setup Wizard will now install the dri...

Page 16: ... icon When the software is started the main software window is shown on your desktop and the connected CH3B2E unit s will be listed in the left part of the window indicated with the serial number of the unit When the unit is selected on the left side you can see the configuration of the unit on the right side The example in the image above shows a JBOD single disk configuration with 2 harddisks of...

Page 17: ...ide the unit are configured as 1 drive with a total storage capacity of both HDD s SAFE33 The harddisks inside the unit are partially configured as mirror configuration 33 The remaining capacity is configured as BIG volume SAFE50 The harddisks inside the unit are partially configured as mirror configuration 50 The remaining capacity is configured as BIG volume FAST RAID 0 The harddisks inside the ...

Page 18: ...e new configuration of your unit in the main software window The example in the image above shows BIG configuration with 2 harddisks of 1TB giving a total storage capacity of 2TB 1863GB When you have made changes to the configuration of your unit it is recommended to re format the created volume See chapter 6 for format instructions Note For more information about the functions and features of the...

Page 19: ...n your screen Select your new harddisk configuration from the bottom section of the list Right click your new harddisk configuration and select New Simple Volume The Format Wizard will appear on your screen Click Next to continue Select the size for your new harddisk configuration By default the maximum size is specified If you want to create multiple volumes on your harddisk configuration reduce ...

Page 20: ... see a summary of the selected commands Select Finish to close the Format Wizard and start formatting your harddisk configuration When the format is completed the harddisk configuration will be shown in the Disk Management as Healthy You can now use the formatted harddisk configuration Enjoy the use of your Conceptronic 2 Bay Harddisk Box ...

Page 21: ...obre su producto y no las encuentra en nuestro sitio web póngase en contacto con nosotros por correo electrónico apoyo conceptronic net Si desea información adicional sobre los productos de Conceptronic visite nuestro sitio web www conceptronic net La instalación del software que se describe aquí puede diferir ligeramente de la instalación en su ordenador en función de la versión de Windows que ut...

Page 22: ...a con dos LEDs de colores azul y rojo que muestran el estado de los discos duros de la unidad Cuando la configuración de disco duro del CH3B2E esté en posición JBOD configuración de disco individual se verán los modos siguientes de los LEDs en la parte frontal de la unidad Descripción LED azul LED rojo HDD desconectado sin alimentación Apagado Apagado HDD conectado modo inactivo Encendido Apagado ...

Page 23: ...sin alimentación Parpadeo Parpadeo HDD conectado modo inactivo Encendido Apagado HDD conectado modo activo Encendido Parpadeo encendido Reconstrucción del disco se está reconstruyendo una partición física Parpadeo Encendido Verificación de la reconstrucción del disco se está verificando una partición física Encendido Parpadeo encendido Estado de error Número de serie incorrecto Uno o diversos volú...

Page 24: ...2E y lo instalará No se necesitan instalar drivers El CH3B2E está configurado en posición JBOD configuración de disco individual de forma predeterminada En caso de que se hayan introducido 2 discos duros en el CH3B2E el ordenador los detectará como dos volúmenes independientes Nota Cuando haya conectado el CH3B2E a su ordenador con conexión eSATA es posible que la unidad muestre únicamente un LED ...

Page 25: ...para continuar D Acepte el Contrato de Licencia seleccionando la opción Acepto y haga clic en Siguiente para continuar E Modifique la ruta de destino de la instalación con el botón Explorar o conserve la ruta de destino predeterminada Haga clic en Siguiente para continuar F El Asistente de Configuración está listo para instalar el software en su ordenador Haga clic en Siguiente para iniciar la ins...

Page 26: ...ma Cuando inicie el software aparecerá en el escritorio la ventana principal y en la parte izquierda de ésta la lista de la unidad o unidades CH3B2E conectadas indicadas con el número de serie de cada una de ellas Si selecciona la unidad en la parte izquierda podrá ver su configuración en la parte derecha El ejemplo que ilustra la imagen anterior muestra una configuración JBOD disco individual con...

Page 27: ...idad de almacenamiento total equivalente a la de ambos discos duros SAFE33 Los discos duros de la unidad están configurados parcialmente con una configuración de replicación 33 La capacidad restante está configurada como volumen BIG SAFE50 Los discos duros de la unidad están configurados parcialmente con una configuración de replicación 50 La capacidad restante está configurada como volumen BIG FA...

Page 28: ...antalla principal del software El ejemplo que ilustra la imagen anterior muestra la configuración BIG con 2 discos duros de 1TB que alcanza una capacidad de almacenamiento total de 2TB 1863 GB Cuando se aplican cambios a la configuración de la unidad es recomendable re formatear el volumen creado Véase el apartado 6 para conocer las instrucciones sobre cómo formatear Nota Si desea obtener más info...

Page 29: ...siguientes Nota Las instrucciones siguientes para formatear el disco duro se basan en Windows Vista Si formatea el disco duro utilizando una versión diferente de Windows los pasos que deben seguirse pueden variar Haga clic en el botón Inicio y seleccione Todos los programas Accesorios y Ejecutar Introduzca el comando diskmgmt msc sin las comillas y haga clic en Aceptar para ejecutar el comando A c...

Page 30: ...unidad que desea asignar al nuevo volumen Por defecto aparecerá la primera letra disponible para la unidad Haga clic en Siguiente para continuar Seleccione las opciones de formato Si lo desea puede cambiar el sistema de archivos la etiqueta del volumen y Realizar un formato rápido Haga clic en Siguiente para continuar Nota Las particiones superiores a 32 GB sólo pueden formatearse con el sistema d...

Page 31: ...gen zur Verfügung Wenn Sie weitere Fragen zu Ihrem Produkt haben die Sie auf unserer Webseite nicht beantworten können senden Sie uns eine E Mail an support conceptronic net Detaillierte Informationen über Conceptronic Produkte finden Sie auf unserer Webseite www conceptronic net Möglicherweise weicht die Softwareinstallation auf Ihrem Computer von der im Folgenden beschriebenen etwas ab Dies häng...

Page 32: ...rben Blau Rot und zeigen den Status der Festplatten im Gerät an Wenn die Festplatten Konfiguration der CH3B2E auf JBOD Konfiguration für 1 Festplatte eingestellt ist haben die LED Anzeigen auf der Vorderseite des Geräts folgende Bedeutungen Beschreibung Blaue LED Rote LED Festplattenlaufwerk nicht angeschlossen kein Strom Aus Aus Festplattenlaufwerk angeschlossen Bereitschaftsmodus Ein Aus Festpla...

Page 33: ...hlossen kein Strom Blinkt Blinkt Festplattenlaufwerk angeschlossen Bereitschaftsmodus Ein Aus Festplattenlaufwerk angeschlossen aktiver Modus Ein Blinkt Ein Disk Rebuild Wiederaufbau der Festplatte eine physische Partition wird wieder aufgebaut Blinkt Ein Disk Rebuild Verify Überprüfung des Wiederaufbaus der Festplatte eine physische Partition wird überprüft Ein Blinkt Ein Fehler Status Falsche Se...

Page 34: ...er erkennt und installiert die CH3B2E automatisch Keine Treiberinstallation erforderlich Standardmäßig ist die CH3B2E auf JBOD 1 Festplatten Konfiguration eingestellt Wenn in der CH3B2E 2 Festplatten installiert sind werden Sie auf Ihrem Computer als 2 separate Volumen erkannt Hinweis Wenn Sie die CH3B2E mit eSATA an Ihren Computer angeschlossen haben zeigt das Gerät möglicherweise nur 1 aktive Fe...

Page 35: ... Lizenzvereinbarung indem Sie I Agree Akzeptieren auswählen und klicken Sie auf Next Weiter E Wenn Sie den Zielordner für die Installation ändern möchten klicken Sie auf die Schaltfläche Browse Durchsuchen Anderenfalls wird die Installation im vorgegebenen Zielordner gespeichert Klicken Sie auf Next Weiter F Jetzt ist der Einrichtungsassistent bereit die Software auf Ihrem Computer zu installieren...

Page 36: ... das entsprechende Symbol doppelklicken Daraufhin wird das Hauptfenster der Software in dem auf der linken Seite das angeschlossene CH3B2E Gerät mit der entsprechenden Seriennummer aufgeführt ist auf Ihrem Computer angezeigt Wenn Sie das Gerät auswählen erscheint auf der rechten Seite die Konfiguration des Geräts Obige Abbildung zeigt eine JBOD Konfiguration 1 Festplatten Konfiguration mit zwei 1T...

Page 37: ...erät werden als 1 Laufwerk mit der gesamten Kapazität beider Festplattenlaufwerke konfiguriert SAFE33 Teilweise 33 Spiegel Konfiguration der Festplatten im Gerät Die übrige Kapazität wird als BIG Volumen konfiguriert SAFE50 Teilweise 50 Spiegel Konfiguration der Festplatten im Gerät Die übrige Kapazität wird als BIG Volumen konfiguriert FAST RAID 0 Die Festplatten im Gerät werden als 1 Laufwerk mi...

Page 38: ...r Software wird jetzt die neue Konfiguration Ihres Geräts angezeigt Obige Abbildung zeigt eine BIG Konfiguration mit zwei 1TB Festplatten und einer Gesamtspeicherkapazität von 2 TB 1863GB Wir empfehlen Ihnen die erstellten Volumen neu zu formatieren wenn Sie Änderungen an der Konfiguration Ihres Geräts vorgenommen haben Kapitel 6 enthält Informationen über die Formatierung Hinweis Weitere Informat...

Page 39: ... Hinweis Die folgenden Anweisungen zur Formatierung beziehen Sie auf Windows Vista Wenn Sie ein anderes Windows Betriebssystem haben können die Schritte für die Formatierung von den hier beschriebenen abweichen Klicken Sie auf die Start Schaltfläche und wählen Sie Alle Programme Zubehör Ausführen Geben Sie den Befehl diskmgmt msc ohne Anführungs und Schlusszeichen ein und klicken Sie auf OK um den...

Page 40: ...ndardmäßig wird der erste freie Laufwerksbuchstabe zugeordnet Klicken Sie auf Next Weiter Wählen Sie die gewünschten Formatierungsoptionen Sie können das Dateisystem und die Datenträgerbezeichnung ändern sowie Perform a quick format Schnelle Formatierung auswählen Klicken Sie auf Next Weiter Hinweis Partitionen die größer sind als 32GB können bei Verwendung von Windows Disk Management Datenträgerv...

Page 41: ...jet de notre produit ou si vous ne trouvez pas l information dont vous avez besoin sur notre site web vous pouvez nous contacter par mail support conceptronic net Pour de plus amples informations sur les produits Conceptronic merci de visiter notre site web www conceptronic net L installation du logiciel décrite ci dessous peut être légèrement différente de l installation qui se fera sur votre ord...

Page 42: ...isques durs du CH3B2E sont de deux couleurs bleu et rouge et indiquent l état des disques durs de l unité Lorsque la configuration de disque dur du CH3B2E est fixée sur JBOD configuration de disques individuels le mode de fonctionnement des voyants de l unité est le suivant Description Voyant bleu Voyant rouge Disque dur éteint pas d alimentation Éteint Éteint Disque dur branché mode veille Allumé...

Page 43: ...yant rouge Disque dur éteint pas d alimentation Clignote Clignote Disque dur branché mode veille Allumé Éteint Disque dur branché en fonctionnement Allumé Clignote allumé Disk Rebuild partition physique en cours de création Clignote Allumé Disk Rebuild Verify partition physique en cours de vérification Allumé Clignote allumé État d erreur Numéro de série incorrect Erreur sur un ou plusieurs volume...

Page 44: ...ur reconnaîtra et installera automatiquement le CH3B2E Aucun driver n est à installer Le boîtier CH3B2E est configuré par défaut en mode JBOD configuration de disques individuels Si deux disques durs sont insérés dans le CH3B2E ils seront identifiés par votre ordinateur comme 2 unités distinctes Remarque lorsque vous aurez connecté le CH3B2E à votre ordinateur avec le câble eSATA il se peut que le...

Page 45: ...xt pour continuer D Acceptez les conditions de la Licence en cliquant sur I Agree et cliquez sur Next pour continuer E Sélectionnez le répertoire d installation de votre choix en cliquant sur la touche Browse ou conservez le répertoire de destination par défaut Cliquez sur Next pour continuer F L assistant de configuration est alors prêt à installer le logiciel sur votre ordinateur Cliquez sur Nex...

Page 46: ...ois le logiciel lancé la fenêtre principale de ce dernier apparaît sur votre bureau et la ou les unités du CH3B2E connectées apparaîtront dans une liste à gauche de la fenêtre identifiées par le numéro de série de l unité En sélectionnant l unité voulue dans la fenêtre de gauche vous pouvez visualiser la configuration de l unité correspondante dans celle de droite L exemple de l image ci dessus co...

Page 47: ...igurés comme 1 unité avec une capacité totale de stockage correspondant à celle des deux disques durs SAFE33 les disques durs à l intérieur de l unité sont partiellement configurés comme des disques identiques à 33 La capacité restante est configurée comme un GROS volume SAFE50 les disques durs à l intérieur de l unité sont partiellement configurés comme des disques identiques à 50 La capacité res...

Page 48: ...iser la nouvelle configuration de votre unité dans la fenêtre principale du logiciel L exemple de l image ci dessus montre une configuration BIG avec 2 disques durs de 1 TB pour une capacité totale de stockage de 2TB 1 863 GB Chaque fois que vous procédez à des changements dans la configuration de votre unité nous vous conseillons de re formater le volume créé Consulter le chapitre 6 pour les inst...

Page 49: ... disque dur merci de respecter les instructions ci dessous Remarque les instructions de formatage indiquées ci dessous correspondent au système d exploitation Windows Vista Si vous formatez depuis une autre version de Windows la procédure peut être différente Cliquez sur Démarrage et sélectionner Tous les programmes Accessoires Exécuter Saisissez la commande diskmgmt msc sans les guillemets et cli...

Page 50: ...uveau volume créé La première lettre d unité disponible par défaut est indiquée à l écran Cliquez sur Next pour continuer Sélectionnez vos options de formatage Vous pouvez modifier le système de fichiers le nom du volume et choisir l option Perform a quick format Effectuer un formatage rapide Cliquez sur Next pour continuer Remarque toute partition de plus de 32 GB ne peut être formatée qu avec le...

Page 51: ...stro sito web vi preghiamo di mettervi in contatto con noi attraverso l indirizzo di posta elettronica support conceptronic net Per ulteriori informazioni sui prodotti Conceptronic potete visitare il sito web Conceptronic www conceptronic net L installazione del software così come viene descritta qui di seguito potrebbe essere leggermente diversa da quella del computer utilizzato poiché ciò dipend...

Page 52: ...disk del CH3B2E hanno due colori diversi blu e rosso e mostrano lo stato dei dischi rigidi nell unità Quando la configurazione del disco rigido del CH3B2E è impostata su JBOD configurazione disco singolo è possibile visualizzare nella zona frontale dell unità le seguenti modalità di LED Descrizione LED blu LED rosso HDD non collegato senza alimentazione Spento Spento HDD collegato in stato inattiv...

Page 53: ...ne LED blu LED rosso HDD non collegato senza alimentazione Lampeggia Lampeggia HDD collegato in stato inattivo Acceso Spento HDD collegato attivo Acceso Lampeggia Acceso Disk Rebuild si sta ricostruendo una partizione fisica Lampeggia Acceso Disk Rebuild Verify si sta verificando una partizione fisica Acceso Lampeggia Acceso Stato errore Numero seriale non corretto Uno o più volumi parziali corrot...

Page 54: ...erà e installerà automaticamente il CH3B2E Non è necessaria nessuna installazione mediante driver Per default il CH3B2E è configurato su JBOD configurazione disco singolo Nel caso in cui esistano due dischi rigidi collegati nel CH3B2E il computer li identificherà come due volumi distinti Nota Dopo aver collegato il CH3B2E al computer mediante eSATA è possibile che l unità mostri esclusivamente un ...

Page 55: ...inuare D Accettare il Contratto di licenza selezionando I Agree dopo di che fare clic su Next per continuare E Modificare la cartella di destinazione del programma installato utilizzando l opzione Sfoglia o conservare quella che appare per default Fare clic su Next per continuare F Il Programma di Configurazione Assistita è pronto per installare il software sul computer Fare clic su Next per dare ...

Page 56: ... di sistema Dopo aver aperto il software apparirà la videata principale sul desktop e sulla sinistra verranno mostrate le unità collegate al CH3B2E indicate mediante il numero seriale dell unità Dopo aver selezionato l unità sul lato sinistro sulla destra apparirà la configurazione di quest ultima L esempio mostrato qui in alto fa riferimento a una configurazione JBOD disco singolo con due dischi ...

Page 57: ...nell unità sono configurati come 1 unità con una capacità di memoria totale corrispondente a entrambi i dischi rigidi SAFE33 I dischi rigidi contenuti nell unità sono configurati in parte come mirroring 33 mentre il resto della capacità è configurato come BIG SAFE50 I dischi rigidi contenuti nell unità sono configurati in parte come mirroring 50 mentre il resto della capacità è configurato come BI...

Page 58: ... la nuova configurazione dell unità nella videata principale del software L esempio riportato nell immagine qui in alto mostra una configurazione BIG con 2 dischi rigidi da 1TB con una capacità di memoria totale pari a 2TB 1863GB Dopo aver modificato la configurazione dell unità si consiglia di ri formattare il volume creato Vedi il Capitolo 6 per sapere come dare formato al volume Nota Per maggio...

Page 59: ...re formato al disco rigido Nota Le istruzioni di formattazione riportate in questa pagina prendono come riferimento Windows Vista Se viene usata una versione di Windows diversa per la formattazione i passi riportati qui di seguito potrebbero essere diversi Fare clic sul pulsante Start e selezionare Tutti i programmi Accessori Esegui Introdurre il comando diskmgmt msc senza le virgolette e fare cli...

Page 60: ...o volume Per default verrà mostrata la prima lettera disponibile Fare clic su Next per continuare Selezionare le opzioni di formattazione È possibile modificare il file system cambiare l etichetta del volume e selezionare l opzione di formattazione veloce Perform a quick format Fare clic su Next per continuare Nota Le partizioni con più di 32GB si possono formattare esclusivamente mediante il file...

Page 61: ...s Quando tiver outras questões sobre o seu produto e não encontrar resposta para elas na nossa página pode contactar nos por e mail apoyo conceptronic net Para mais informações sobre os produtos da Conceptronic visite a página web da Conceptronic em www conceptronic net A instalação do software tal como se descreve a seguir pode ser ligeiramente diferente da instalação no seu computador Depende da...

Page 62: ...de duas cores azul e vermelho e mostram o estado dos discos rígidos inseridos na unidade Quando a configuração do disco rígido do CH3B2E está em JBOD configuração para disco único as luzes indicadoras de modo acendem na frente da unidade da seguinte maneira Descrição Luz azul Luz vermelha Disco rígido desligado sem energia Desligado Desligado Disco rígido ligado em modo inactivo Ligado Desligado D...

Page 63: ...Disco rígido desligado sem energia A piscar A piscar Disco rígido ligado em modo inactivo Ligado Desligado Disco rígido ligado em modo activo Ligado A piscar ligado Disk Rebuild uma partição física está a ser reconstruída A piscar Ligado Disk Rebuild Verify uma partição física está a ser verificada Ligado A piscar ligado Estado de erro Número de série incorrecto Um ou mais volumes parciais em mau ...

Page 64: ...ecessária a instalação de qualquer controlador Por defeito o CH3B2E está configurado para JBOD configuração para disco único Quando existirem dois discos rígidos inseridos no CH3B2E eles serão identificados no seu computador como dois volumes separados Nota Quando tiver ligado o CH3B2E ao seu computador através da interface eSATA é possível que a unidade apenas mostre uma luz de disco rígido activ...

Page 65: ...iguração aparece C Clique em Next Seguinte para continuar D Aceite o Acordo de Licença seleccionando I Agree Concordo e clique em Next Seguinte para continuar E Mude o directório da instalação com o botão Browse Procurar ou mantenha o directório predefinido Clique em Next Seguinte para continuar F O Assistente de Configuração está pronto para instalar o software no seu computador Clique em Next Se...

Page 66: ...de tarefas Quando o software for iniciado aparece no seu ambiente de trabalho a janela principal do software e a s unidade s CH3B2E ligada s será ão listada s no lado esquerdo da janela indicada s com o número de série da unidade Quando seleccionar a unidade no lado esquerdo as configurações da unidade podem ser vistas no lado direito O exemplo da imagem acima mostra uma configuração JBOD disco ún...

Page 67: ...estão configurados como uma só unidade com a capacidade total dos dois discos rígidos SAFE33 Os discos rígidos dentro da unidade estão parcialmente configurados em configuração mirror 33 A capacidade restante é configurada como um volume BIG SAFE50 Os discos rígidos dentro da unidade estão parcialmente configurados em configuração mirror 50 A capacidade restante é configurada como um volume BIG FA...

Page 68: ...a unidade na janela principal do software O exemplo na imagem acima mostra a configuração BIG com 2 discos rígidos de 1 TB com um total de capacidade de armazenamento de 2 TB 1863 Gb Quando tiver feito alterações na configuração da sua unidade recomenda se re formatar o volume criado Consulte o capítulo 6 para obter instruções de formatação Nota Para mais informações acerca das funções e caracterí...

Page 69: ...ixo descritas para formatar o seu disco rígido Nota As instruções de formatação abaixo descritas baseiam se no Windows Vista Quando fizer a formatação numa versão diferente do Windows os passos podem variar Clique no botão Start Iniciar e seleccione All Programs Todos os programas Accessories Acessórios Run Executar Introduza o comando diskmgmt msc sem as aspas e clique em OK para executar o coman...

Page 70: ...ibuir ao novo volume Por defeito é mostrada a primeira letra de unidade disponível Clique em Next Seguinte para continuar Seleccione as suas opções de formatação Pode mudar o sistema de ficheiros mudar a etiqueta de volume e pedir uma Perform a quick format Realizar formatação rápida Clique em Next Seguinte para continuar Nota As partições com mais de 32 GB só podem ser formatadas com o sistema de...

Page 71: ... GYIK adatbázisa Ha a termékkel kapcsolatban további kérdése volna és arra választ honlapunkon nem talál e mailben is fordulhat hozzánk support conceptronic net A Conceptronic termékekkel kapcsolatos további tájékozódás végett látogasson el a Conceptronic honlapjára www conceptronic net A szoftvernek az alábbiakban ismertetett telepítése kicsit eltérhet az adott számítógépre történő telepítéstől M...

Page 72: ...a HD LED jei kétféle színűek kék és piros amelyek egyébként a merevlemezek állapotát jelzik az egységen belül Ha a CH3B2E merevlemez konfigurációja JBOD ra van beállítva egylemezes konfiguráció az alábbi LED módok láthatók az egység előlapján Leírás Kék LED Piros LED HDD kihúzva nincs tápellátás Nem világít Nem világít HDD bedugva üresjárati üzemmód Világít Nem világít HDD bedugva aktív üzemmód Vi...

Page 73: ...Kék LED Piros LED HDD kihúzva nincs áramellátás Villog Villog HDD bedugva üresjárati üzemmód Világít Nem világít HDD bedugva aktív üzemmód Világít Villog világít Disk Rebuild a fizikai partíció átépítés alatt Villog Világít Disk Rebuild Verify a fizikai partíció ellenőrzés alatt Világít Villog világít Hibaállapot Pontatlan sorozatszám Egy vagy több rossz részleges kötet Villog Villog ...

Page 74: ...an felismeri és telepíti a CH3B2E t Ehhez nincs szükség semmilyen illesztőprogram telepítésére A CH3B2E alapértelmezésben JBOD re egylemezes konfiguráció van konfigurálva Ha 2 merevlemezt tettek be a CH3B2E be akkor a számítógép azokat 2 külön kötetként fogja azonosítani Megjegyzés Ha a CH32BE eSATA segítségével csatlakozik a számítógéphez lehet hogy az egységen csak egy aktív HD LED látható Ezt a...

Page 75: ...tintson a Next re D Az I Agree kijelölésével fogadja el a licencszerződést majd a folytatáshoz kattintson a Next re E A Browse gomb segítségével módosítsa a telepítés célhelyét vagy tartsa meg az alapértelmezett telepítési célhelyet A folytatáshoz kattintson a Next re F A telepítővarázsló készen áll hogy a számítógépre telepítse a szoftvert A telepítés elindításához kattintson a Next re A telepítő...

Page 76: ...t Amikor a program elindult a fő programablak látható az Asztalon a csatlakoztatott CH3B2E egység ek pedig az ablak bal oldali részén listázódik listázódnak amelye ke t egyébként az egység sorozatszáma jelöl Amikor a bal oldalon kijelölték az egységet jobb oldalon az egység konfigurációja látható A fenti képen szereplő példa JBOD egylemezes konfigurációt mutat két egyenként 1 TB s merevlemezzel A ...

Page 77: ...ként konfigurálódnak amelyeknek a teljes tárkapacitása megegyezik a két HDD tárkapacitásával SAFE33 Az egység merevlemezei részben tükrös konfigurációban 33 konfigurálódnak A fennmaradó kapacitás BIG kötetként konfigurálódik SAFE50 Az egység merevlemezei részben tükrös konfigurációban 50 konfigurálódnak A fennmaradó kapacitás BIG kötetként konfigurálódik FAST RAID 0 Az egység merevlemezei egy megh...

Page 78: ...ciója a fő szoftverablakban látható A fenti képen szereplő példa BIG konfigurációt mutat két egyenként 1 TB s merevlemezzel amely így összesen 2 TB s tárkapacitást biztosít 1863 GB Ha megváltoztatta az adott egység konfigurációját ajánlatos az előállított kötetet újra formázni A formázási utasításokkal kapcsolatban lásd a 6 fejezetet Megjegyzés A Steelvine Manager szoftver funkcióival és jellemzői...

Page 79: ...apcsolatos alábbi utasításokat kövesse Megjegyzés Az alábbi formázási utasítások a Windows Vistára vonatkoznak ha más Windows verzióban történik a formázás az alábbi lépések esetében eltérés mutatkozhat Kattintson a Start gombra majd jelölje ki a következőket All Programs Accessories Run Írja be a diskmgmt msc parancsot idézőjel nélkül majd a parancs futtatásához kattintson az OK ra A képernyőn a ...

Page 80: ...i az új kötethez Alapértelmezésben az első szabad meghajtó betűjel jelenik meg A folytatáshoz kattintson a Next re Jelölje ki a formázási opciókat Megváltoztathatja az állományrendszert megváltoztathatja a kötetcímkét és választhatja a Perform a quick format ot A folytatáshoz kattintson a Next re Megjegyzés A 32 GB nél nagyobb partíciók csak az NTFS állományrendszerrel formázhatók ha Windows Disk ...

Page 81: ...eritabanını bulacaksınız Ürününüzle ilgili başka sorularınız varsa ve bunların yanıtlarını web sitemizde bulamıyorsanız bize e posta ile ulaşın support conceptronic net Conceptronic ürünleri ile ilgili daha fazla bilgi için lütfen Conceptronic Web Sitesini ziyaret edin www conceptronic net Aşağıda açıklanan yazılım yüklemesi bilgisayarınızdaki yüklemeden biraz daha farklı olabilir Bu durum kulland...

Page 82: ...E nin sabit disk LED leri 2 renklidir mavi ve kırmızı ve ünitede bulunan sabit disklerin durumunu gösterir CH3B2E nin sabit disk yapılandırması JBOD tek disk yapılandırması olarak yapıldığında ünitenin ön tarafında aşağıdaki LED modları görünebilir Tanım Mavi LED Kırmızı LED HDD takılı değil güç yok Kapalı Kapalı HDD takılı boşta Açık Kapalı HDD takılı işlem modu Açık Flaş Açık 1 2 3 8 7 6 5 4 ...

Page 83: ...i LED Kırmızı LED HDD takılı değil güç yok Yanıp Sönme Yanıp Sönme HDD takılı boşta Açık Kapalı HDD takılı işlem modu Açık Flaş Açık Disk Yeniden Kur fiziksel bir disk bölümü yeniden kuruluyor Yanıp Sönme Açık Disk Yeniden Kur Doğrula fiziksel bir disk bölümü doğrulanıyor Açık Flaş Açık Hata Durumu Yanlış seri numarası Bir ya da daha fazla kötü disk birimi Yanıp Sönme Yanıp Sönme ...

Page 84: ...algılanacak ve kurulumu yapılacaktır Sürücü kurulumu gerektirmez CH3B2E varsayılan olarak JBOD tek disk yapılandırması na ayarlanmıştır CH3B2E ye 2 adet sabit disk takıldığında bilgisayarınızda 2 ayrı birim olarak tanımlanacaktır Not CH3B2E yi bilgisayarınıza eSATA ile bağladığınızda ünite sadece 1 aktif sabit disk LED i gösterebilir Bunun nedeni eSATA denetleyicisinin 1 bağlantıda birden çok SATA...

Page 85: ...um Sihirbazı ekrana gelir C Devam etmek için Next İleri ye tıklayın D I Agree Kabul Ediyorum u seçerek Lisans Sözleşmesini kabul edin ve devam etmek için Next İleri ye tıklayın E Browse Göz at düğmesiyle kurulumun yapılacağı dizini değiştirin ya da varsayılan ayarları kullanın Devam etmek için Next İleri ye tıklayın F Kurulum Sihirbazı bilgisayarınıza yazılımı kurmak için hazırdır Kurulumu başlatm...

Page 86: ...imgeye çift tıklayabilirsiniz Yazılım açıldığında ana yazılım penceresi ekrana gelir ve pencerenin sol bölmesinde bağlı CH3B2E ünitesi üniteleri seri numarası ile birlikte listelenir Sol taraftaki ünite seçildiğinde ünitenin yapılandırmasını sağ tarafta görebilirsiniz Yukarıdaki örnek şekilde 1TB lık 2 sabit diskli bir JBOD tek disk yapılandırması gösterilmektedir Yapılandırmayı değiştirmek için y...

Page 87: ...her iki sabit diskin toplam depolama kapasitesine sahip 1 sürücü olarak yapılandırılır SAFE33 Ünitedeki sabit diskler ayna yapılandırma olarak kısmen yapılandırılır 33 Kalan kapasite BIG birim olarak yapılandırılır SAFE50 Ünitedeki sabit diskler ayna yapılandırma olarak kısmen yapılandırılır 50 Kalan kapasite BIG birim olarak yapılandırılır FAST RAID 0 Ünitedeki sabit diskler en küçük sabit disk b...

Page 88: ...ım penceresinde ünitenizin yeni yapılandırmasını görebilirsiniz Yukarıdaki şekilde gösterilen örnekte 1TB lık 2 sabit diskli BIG yapılandırması toplam 2TB 1863GB depolama kapasitesi vermektedir Ünite yapılandırmasında değişiklikler yaptığınızda oluşturulan birimin yeniden biçimlendirilmesi formatlanması önerilir Biçimlendirme talimatları için bkz bölüm 6 Not Steelvine Manager yazılımının fonksiyon...

Page 89: ...şağıdaki biçimlendirme talimatlarını izleyebilirsiniz Not Aşağıdaki biçimlendirme talimatları Windows Vista ya göre açıklanmıştır Windows un farklı sürümlerinde biçimlendirme yaparken aşağıdaki adımlar değişebilir Start Başlat düğmesine tıklayın ve All Programs Tüm Programlar Accessories Aksesuarlar Run Çalıştır ı seçin diskmgmt msc tırnak işareti olmadan komutunu girin ve komutu çalıştırmak için ...

Page 90: ...lan olarak mevcut ilk sürücü harfi gösterilir Devam etmek için Next İleri ye tıklayın Biçimlendirme seçeneklerinizi seçin Dosya sistemini birim etiketini değiştirebilir ve Perform a quick format ı seçerek hızlı biçimlendirme yapabilirsiniz Devam etmek için Next İleri ye tıklayın Not Windows Disk Yönetimini kullanırken 32GB tan büyük disk bölümleri sadece NTFS dosya sistemi ile biçimlendirilebilir ...

Reviews: