

IMPORTANT SAFETY
INSTRUCTIONS
When using electrical appliances, especially when
children are present, basic safety precautions
should always be followed, including the following:
READ ALL INSTRUCTIONS
BEFORE USING
KEEP AWAY FROM WATER
DANGER
—
any appliance is electri-
cally live, even when the switch is off.
To reduce the risk of death or injury by electric
shock:
1. Unplug this appliance before cleaning.
2. Do not place or store appliance where it can fall or
be pulled into a tub or sink.
3. Do not use while bathing or in a shower.
4. Do not place in, or drop into, water or other liquid.
5. Do not reach for an appliance that has fallen into
water. Unplug immediately.
6. Always unplug this appliance from electrical outlet
immediately after using.
DO NOT REACH
INTO THE WATER
WARNING
—
To reduce risk of burns,
electrocution, fire, or injury to persons:
1. This appliance should never be left unattended
when plugged in. Do not pull, twist, or wrap line cord
around appliance.
2. This appliance should not be used by, on, or near
children or individuals with certain disabilities.
3. Use this appliance only for its intended purpose as
described in this manual. Do not use attachments not
recommended by the manufacturer. Do not use an
extension cord to operate this appliance.
4. Never operate appliance if it has a damaged
cord or plug, or if it is not working properly, if it has
been dropped or damaged, or dropped into water.
Return appliance to a service center for examination
and repair.
5. Keep cord away from heated surfaces.
6. Never drop or insert any object into any opening on
this appliance.
7. Do not place appliance on any surface while it is
operating.
8. Do not use this appliance with a damaged or bro-
ken comb or with teeth missing from the blades, as
injury may occur. Before use, make certain blades are
aligned properly. (See “Care of your Clippers.”)
9. Do not operate outdoors or where aerosol
(spray) products are being used or oxygen is
being administered.
10. Never operate the appliance with the air openings
blocked or while on a soft surface, such as a bed or
couch, where the air openings may be blocked. Keep
the air openings free of lint, hair, and the like.
11. Always attach plug to appliance first, then to
outlet. To disconnect, turn all controls to “OFF”;
remove plug from outlet.
12. Avoid skin contact with moving blades.
13. Check for tangles or kinks in the cord. If the cord
does become tangled during use, turn unit off and
straighten cord before operating.
SAVE THESE
INSTRUCTIONS
OPERATING
INSTRUCTIONS
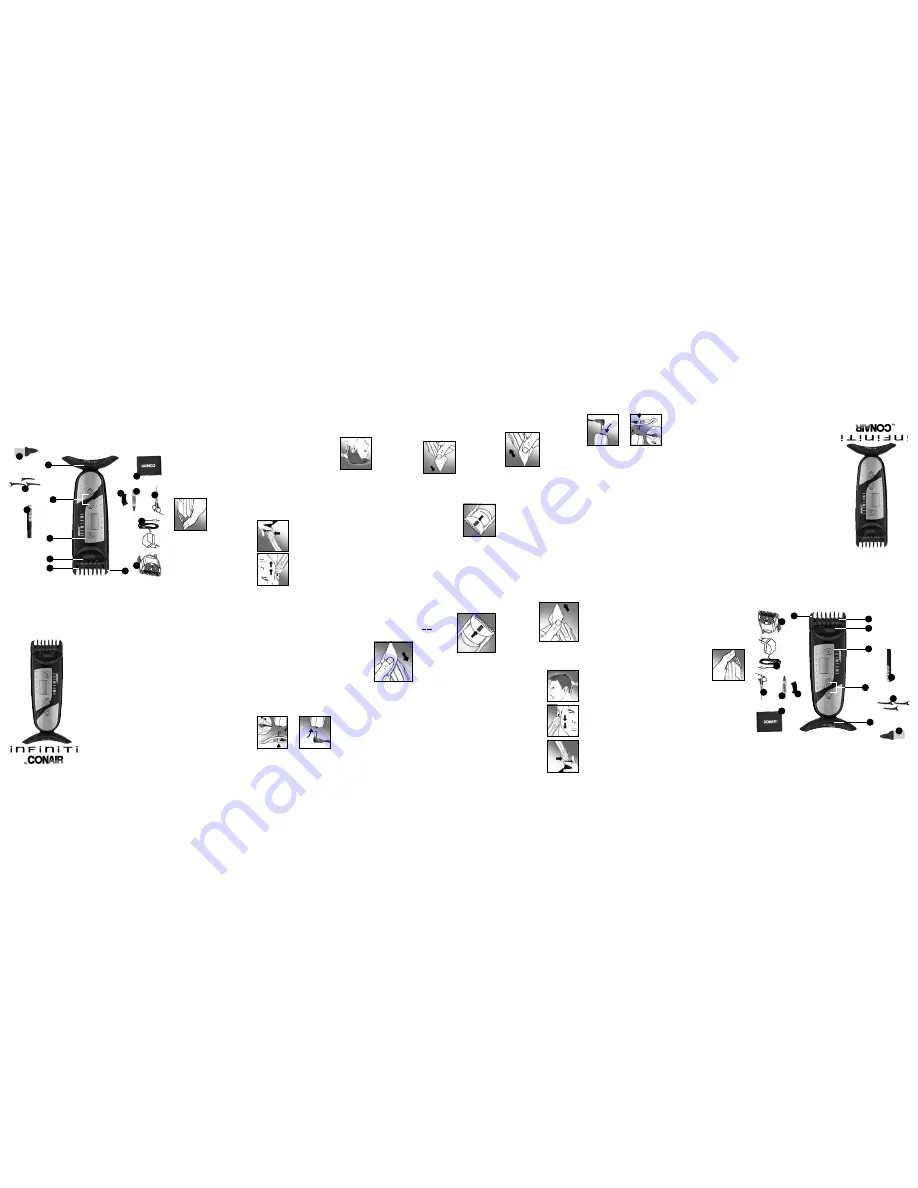
Your new Infiniti by Conair® Haircut Kit has everything
you need to achieve professional haircuts, at home.
It’s 100% stainless steel blade provides longer last-
ing performance and is sharpened using 3D etching
process for an exceptional cutting edge. Also included
are: 1 cutting guide for 28 various lengths (3 to 30mm,
in 1mm increments), 1 precision guide provides 5 dif-
ferent positions (.5 to 2.5mm), thinning system, on/off
button, LCD display for selected length, power level,
battery charge level, charging stand, adaptor cord,
scissors, comb, cleaning brush, lubricating oil, barber
cape, neck brush and 3 styling clips.
CHARGING THE CLIPPER
Before using the clipper for the first time, make sure
clipper is in the off position and charge for 2 hours.
The charging cord can be put in the stand. (Fig. 1)
1. Plug the adaptor into the AC outlet.
2. Place the clipper in the stand.
3. When fully charged, you will be able to use the
clipper for up to 45 minutes.
USING DIRECT PLUG-IN
Plug the end of the line cord into the clipper and plug
adaptor into an AC outlet. (Fig. 2) (If the battery is very
weak, wait about 1 minute, then turn on clipper).
USING THE COMB GUIDES
IMPORTANT: Always attach the comb guide BEFORE
turning the clipper on, and turn the clipper off to
change guides.
Your kit includes
two separate guide
combs.
1. cutting guide for
28 different lengths,
from 3mm-30mm in
1-mm increments.
2. precision cutting
guide for 5 different
lengths, from 0.5mm – 2.5mm.
The comb guide is very practical and guarantees an
even cut.
To attach a comb guide, first adjust the cutting guide
length to 3mm on the LCD display and push the guide
down until you hear a “click”. (Fig. 3)
STARTING AND USING
Push the ON/OFF button. The comb guide is automati-
cally put in its 3mm position.
USING THE 3mm-30mm COMB GUIDE
(comes on unit)
The cutting length can be set using the 2 buttons with
arrow pointing up/arrow pointing down. Pressing one
of these two buttons will stop the motor and move the
comb guide. Once the cutting length is selected, press
the ON/OFF button again to confirm the length and to
restart the motor.
USING THE 0.5mm-2.5mm
PRECISION CUTTING GUIDE
Adjusting the preci-
sion guide comb is a
manual operation. You
do not push the two
buttons and the LCD
is left to read 3mm.
To adjust the pre-
ci-
sion guide, you man-
ually move the slide
switch located on top
of the guide to your desired length.
SWITCH SETTINGS
SMART MOTOR TECHNOLOGY
Your Conair Infiniti haircutting unit provides you
with a choice of three different power settings. 1)
Pushing the “On” switch one time sets the unit into
the “low” mode for easy or light cutting situations. 2)
Pushing the “On” switch a second time sets the unit
into “high” mode for heavy or more difficult cutting
situations. 3) Pushing the “On” switch a third time
sets the unit into “Auto” mode for the exclusive SMT
(Smart Motor Technology) that automatically senses
when cutting especially “thick” areas of hair and will
increase power to easily cut through these tough
parts. The power level indicator shows the power
increase.
TO TURN THE CLIPPER OFF
Press the ON/OFF button for more than 2 seconds, the
unit will shut down completely and the comb guide
will return to its original position; or press the ON/OFF
button for less than 2 seconds, 4 position setting:
low/high/auto with smart motor technology/off-only
the mortor will turn off, the display will remain lit for
15 seconds. After 15 seconds you will still have 5 min-
utes to change the cutting length. After 5 minutes, the
clipper turns itself off and the cutting guide remains
in the position last used.
To remove the comb
guide, first adjust
the cutting guide
length to 3mm on
the LCD display and
push the guide up
using your thumbs
and holding it on
either side. (Fig. 4)
CUTTING
TECHNIQUES
AND ADVICE FROM THE EXPERTS
• Use the clipper on clean, dry hair.
• To familiarize yourself
with the clipper, begin with
the comb guide for a longer
cut, then, if you want a
shorter cut, lower the comb
guide. You will soon know
the lengths of each cutting
guide setting from 3mm
to 30mm.
• Always move the clip-
per against the direction
of hair growth. Begin at
the nape. Place the guide
on the scalp and move the
clipper toward the crown
of your head. Move your
clipper slowly, pointing the
teeth of the guide slightly
upward. Keep the clipper in
contact with your head at
all times. (Fig. 5)
• For the crown of the
head, move from front to
back, that is, from your
forehead to the crown of
your head.
• For the finishing touches, that is, around the nape
and sideburns, use the clipper without a comb guide.
Turn your clipper over and move it from top to bot-
tom. (Fig. 6)
• If you want a length greater than 30 mm, or if
you are experienced, you can create ‘comb’ or
‘finger’ cuts:
- Work without a comb guide.
- Take up a small section of hair with a comb or in
your fingers.
- Move the comb or your fingers along the section of
hair to the desired length.
- Cut your hair along the comb or your fingers.
- Remove the cut hair using a comb and check the
evenness of the cut regularly. (Fig. 7)
USING THE THINNING SYSTEM
Switch the clipper to the ‘THIN’ position. The thinning
guide is in front of the blades. This technique allows
you to thin out hair to make styling easier. The tech-
nique is particularly good for the crown of the head
where hair is usually thicker. To thin you hair, take a
section of hair (rest your little and ring fingers on your
scalp, using the middle and index fingers to set the
length), hold 1 to 2 cm below the cutting length. Then,
using the clipper cut the section of hair steeply and at
an angle to create a saw-toothed ‘edge’.
USER MAINTENANCE
CARE OF YOUR CLIPPERS
MAINTENANCE OF THE BLADE
Remove the cutting guide after each use. Cleaning
the clipper blades regularly will maintain their
optimal performance.
REMOVEABLE BLADES
To make cleaning easier,
the Infiniti™ by Conair
®
clipper blades can be
removed. Make sure the
clipper is turned off. Hold
the clipper with the blades
pointing up and remove
them by pressing the top of
the blade. (Fig. 8) Brush the blades using the cleaning
brush to remove any hair.
SELF-LUBRICATING BLADES
The blades of your clipper have a reservoir pad that
dispenses the amount of oil necessary for your clip-
per to operate properly, every time. It is nevertheless
recommended that you occasionally refill, when you
notice the clipper isn’t performing as well. Remove
the blades as described above. Carefully squeeze a
few drops of Conair oil onto the pad.
Then put the blades back on the clipper. Conair oil is
specially formulated for clippers, it will not evaporate
or slow the blades down. You can get new blades
when these are worn or damaged.
Instruction & Styling Guide
Model HC701
™
®
Advanced
Haircut
System
Fig.1
Fig.2
Fig.3
Fig.5
Fig.7
Fig.6
Fig.8
Fig.4
1. 1 comb guide for 28 various
lengths (3 to 30mm, in 1mm
increments)
2. 1 precision guide provides 5 dif-
ferent positions (0.5 to 2.5mm)
3. stainless steel blade with 3D
etching sharpening process
4. thinning system
5. on/off button
6. Up/down comb
guide controls
7. charging stand
8. adaptor
9. scissors
10. barber comb
11. cleaning brush
12. lubricating oil
13. barber cape
14. neck brush
15. 3 styling clips
9
8
2
7
6
1
5
4
3
15
13
12
14
10
11
MED
IDA
S D
E SE
GUR
IDA
D
IMP
ORT
ANT
ES
Cua
ndo
s
e
usa
n
apa
rat
os
elé
ctri
cos
, e
spe
cia
l-
men
te
en
la
pre
sen
cia
de
ni
ños
, s
iem
pre
se
de
ben
tom
ar p
rec
auc
ion
es
bás
ica
s d
e s
egu
rid
ad,
en
tre
la
s
cua
les
la
s s
igu
ien
tes
:
LEA
TO
DAS
LA
S
INS
TRU
CCI
ONE
S A
NTE
S
DE
USA
RLO
MAN
TEN
GA
EL
APA
RAT
O
ALE
JAD
O D
EL
AGU
A
PELIGRO
—
Cua
lqu
ier
el
ect
rod
om
ést
i-
co
per
man
ece
el
éct
rica
men
te
act
ivo
, in
clu
so
cua
ndo
el i
nte
rru
pto
r e
stá
ap
aga
do.
Pa
ra
red
ucir
el
rie
sgo
de
mue
rte
o
her
ida
po
r d
esc
arg
a:
1. Desconecte
el apara
to antes
de limpiarlo.
2. No
coloque ni
guarde el
apara
to donde
pueda
caer o
ser empujado
a una
bañera o
un la
vabo.
3. No
lo use
mientras se
está bañando
o tomando
una ducha.
4. No
coloque el
apara
to ni
lo deje
caer al
agua
u otro
líquido.
5. No
intente de
alcanzar un
apara
to que
ha caído
al agua.
Desconéctelo
inmediatamente.
6. Siempre
desconecte el
apara
to inmedia
tamente
después de
usarlo
NO
TRA
TE
DE
ALC
ANZ
AR
EL
APA
RAT
O E
N E
L A
GUA
ADVERTENCIA
—
Par
a r
edu
cir
el
rie
sgo
de
qu
em
adu
ras
, e
lec
tro
cuc
ión
, in
cen
dio
o
les
io-
nes
pe
rso
nal
es:
1. N
unc
a d
eje
es
te
apa
rat
o d
esa
ten
did
o m
ien
tra
s e
stá
con
ect
ado
. N
o ja
le,
do
ble
o
enr
olle
el
ca
ble
al
red
edo
r
del
ap
ara
to.
2. E
ste
ap
ara
to
no
deb
ería
se
r u
sad
o p
or,
sob
re
o c
erc
a
de
niñ
os
o p
ers
ona
s c
on
alg
una
di
sca
pac
ida
d.
3. U
se
est
e a
par
ato
ún
ica
men
te
con
el
pr
opó
sito
pa
ra
el c
ual
fu
e d
ise
ñad
o y
ta
l c
om
o s
e d
esc
rib
e e
n e
ste
man
ual
. S
ólo
u
se
acc
eso
rio
s r
eco
men
dad
os
por
e
l
fab
ric
ant
e.
4. N
unc
a u
tilic
e e
l a
par
ato
si
el
ca
ble
o
la
cla
vija
es
tán
dañ
ado
s, s
i n
o fu
nci
ona
co
rre
cta
men
te,
si
ha
ca
ído
, s
i
est
á d
aña
do
o si
ha
ca
ído
al
agu
a. L
lév
elo
a
un
cen
tro
de
serv
ici
o a
uto
riza
do
par
a q
ue
lo
exa
min
en
y lo
re
par
en.
5. M
ant
eng
a e
l c
abl
e a
lej
ado
de
su
per
fic
ies
ca
lie
nte
s.
6. N
unc
a d
eje
ca
er n
i in
ser
te
un
obj
eto
en
ni
ngu
na
de
las
ab
ertu
ras
.
7. N
o c
olo
que
el
ap
ara
to
en
nin
gun
a s
upe
rfic
ie
mie
ntra
s
est
á fu
nci
ona
ndo
.
8. N
o u
se
est
e a
par
ato
co
n u
n p
ein
e a
cce
sor
io
rot
o o
las
tim
ado
o
si l
e fa
lta
n d
ien
tes
a
la
cuc
hilla
. E
sto
po
dría
pro
voc
ar u
na
her
ida
. A
seg
úre
se
que
la
s c
uch
illa
s e
sté
n
cor
rec
tam
ent
e a
lin
ead
as
ant
es
de
usa
rlo
(v
éas
e la
se
c-
ció
n “
Ins
tru
cci
one
s d
e m
ant
eni
mie
nto
”).
9. N
o u
tilic
e e
ste
ap
ara
to
al a
ire
lib
re,
ni
do
nde
se
es
tán
usa
ndo
pr
odu
cto
s e
n a
ero
sol
(s
pra
y) o
do
nde
se
es
tá
adm
ini
stra
ndo
ox
íge
no.
10.
N
unc
a b
loq
uee
la
s a
ber
tur
as
de
aire
o
col
oqu
e e
l
apa
rat
o e
n u
na
sup
erfi
cie
bl
and
a, c
om
o u
na
cam
a o
un
sof
á, d
ond
e s
e p
ued
an
obs
tru
ir.
Man
ten
ga
las
ab
ertu
ras
lib
res
de
pe
lus
as,
cab
ello
s y
el
em
ent
os
sim
ila
res
.
11.
Si
em
pre
co
nec
te
el c
abl
e a
l a
par
ato
an
tes
de
co
nec
-
tar
lo
a la
to
ma
de
cor
rie
nte
. P
ara
de
sco
nec
tar
lo,
co
loq
ue
tod
os
los
aj
ust
es
en
la
pos
ici
ón
“Ap
aga
do”
(O
FF)
, lu
ego
des
enc
huf
e e
l c
abl
e.
12.
E
vite
q
ue
las
c
uch
illa
s t
oqu
en
la
pie
l c
uan
do
est
án
m
ovie
ndo
.
13.
S
iem
pre
a
seg
úre
se
que
e
l c
abl
e d
el
apar
ato
no
est
é e
nre
dad
o. S
i e
l c
abl
e s
e e
nre
da
o s
e e
nro
lla
m
ien
-
tra
s e
stá
us
and
o e
l ap
arat
o, ap
águe
lo
inm
edi
atam
ent
e
y e
nde
rec
e e
l c
abl
e a
nte
s d
e v
olv
erlo
a
usa
r.
GUARDE EST
AS
INSTRUCCIONES
INSTRUCCIONES
DE USO
Su
con
jun
to
de
pel
uqu
ería
In
fin
iti™
d
e
Con
air®
tie
ne
tod
o l
o q
ue
ust
ed
nec
esi
ta
par
a l
ogr
ar
cor
tes
de
cab
ello
pr
ofe
sio
nal
es
en
su
cas
a. L
as
cuc
hill
as
de
la
cor
tad
ora
so
n h
ech
as
100
% d
e a
cer
o i
nox
ida
ble
par
a m
ayo
r d
ura
bili
dad
y
se
afil
an
aut
om
átic
am
ent
e
por
m
edi
o d
e u
n p
roc
eso
de
gr
aba
do
trid
im
ens
ion
al
que
la
s d
eja
m
uy
taj
ant
es.
La
s c
ara
cte
rís
tic
as
de
la
cor
tad
ora
in
clu
yen
: u
n b
otó
n d
e e
nce
ndi
do/
apa
gad
o,
una
pa
nta
lla
di
gita
l q
ue
mue
stra
el
aj
ust
e d
e r
eco
rte
esc
ogi
do,
un
in
dic
ado
r d
e p
ote
nci
a y
un
in
dic
ado
r d
el
niv
el d
e c
arg
a. S
u c
onj
unt
o t
am
bié
n in
clu
ye
un
guí
a
que
lo
gra
28
po
sic
ion
es
de
rec
orte
(d
e 3
a
30
mm
, e
n
inc
rem
ent
os
de
1m
m),
un
guí
a d
e p
rec
isi
ón
que
lo
gra
5 la
rgo
s d
e re
cor
te
(de
0,
5 a
2,
5 m
m),
un
sis
tem
a d
e
ent
res
aca
r, u
na
bas
e d
e c
arg
a, u
n a
dap
tad
or,
tije
ras
,
un
pei
ne,
un
ce
pill
o d
e li
mpi
eza
, a
cei
te
lub
ric
ant
e, u
na
cap
a d
e b
arb
ero
, u
n
COM
O C
ARG
AR
LA
COR
TAD
ORA
Ant
es
de
usa
r s
u c
orta
dor
a p
or p
rim
era
ve
z, a
seg
úre
se
que
es
té
apa
gad
a (
OFF
) y
pó
nga
la
a c
arg
ar
dur
ant
e
una
s 2
h
ora
s. E
l c
abl
e d
el a
dap
tad
or
pue
de
con
ec-
tar
se
dire
cta
men
te
a la
ba
se
de
car
ga
(Fi
g.1
).
1. C
one
cte
el
ad
apt
ado
r a
un
a to
ma
de
cor
rie
nte
.
2. P
ong
a la
co
rta
dor
a e
n la
ba
se
de
car
ga.
3.
Se
pod
rá
usa
r l
a c
orta
dor
a s
in
cab
le
dur
ant
e 4
5
min
uto
s c
uan
do
est
é c
om
ple
tam
ent
e c
arg
ada
.
COM
O U
SAR
LA
CO
RTA
DOR
A C
ON
CAB
LE
Con
ect
e e
l c
abl
e d
el a
dap
tad
or d
ire
cta
men
te
a la
co
r-
tad
ora
y
con
ect
e e
l a
dap
tad
or a
un
a to
ma
de
cor
rie
nte
(Fi
g2)
. S
i la
ba
ter
ía
est
á m
uy
baj
a, e
spe
re
un
min
uto
ant
es
de
enc
end
er e
l a
par
ato
.
COM
O IN
STA
LAR
LO
S G
UÍA
S
IM
POR
TAN
TE:
S
iem
pre
in
sta
le
el
guí
a A
NTE
S
de
enc
end
er
el
apar
ato
y s
iem
pre
ap
ague
e
l ap
ara
-
to
ant
es
de
cam
bia
r e
l g
uía
. S
u c
onj
unt
o i
ncl
uye
dos
gu
ías
:
1.
Un
guí
a p
ara
lo
gra
r 2
8 l
arg
os
de
rec
orte
, d
esd
e
3m
m a
30
mm
en
in
cre
men
tos
de
1m
m.
2. U
n g
uía
p
ara
lo
gra
r 5
la
rgo
s d
e r
eco
rte
p
rec
iso
s,
des
de
0,5
mm
ha
sta
2,
5m
m.
Los
g
uía
s s
on
muy
c
onv
eni
ent
es,
p
ues
le
p
erm
ite
n
log
rar
re
cor
tes
un
ifo
rm
es.
Ant
es
de
ins
tal
ar
el
guí
a,
aju
ste
lo
la
rgo
d
el
rec
orte
has
ta
3m
m (
en
la
pan
tal
la
dig
ita
l),
lue
go
ens
arte
e
l
guí
a e
nci
ma
de
las
cu
chi
l-
las
, p
res
ion
and
o h
ast
a o
ír
un
clic
k (F
ig.
3).
OPE
RAC
IÓN
Opr
im
a e
l b
otó
n d
e e
nce
ndi
do/
apa
gad
o. E
l a
jus
te
de
lo
lar
go
del
re
cor
te
se
pon
drá
au
tom
átic
am
ent
e e
n la
pos
ici
ón
3m
m.
UTI
LIZ
AR
EL
GUÍ
A 3
mm
-30
mm
(in
teg
rad
o)
Se
pue
de
aju
sta
r lo
la
rgo
de
l re
cor
te
usa
ndo
el
bo
tón
con
fle
cha
s. O
prim
ir u
na
de
las
fle
cha
s a
pag
a e
l m
oto
r
y a
jus
ta
la
pos
ici
ón
del
g
uía
. D
esp
ués
d
e e
sco
ger
lo
lar
go
del
re
cor
te,
o
prim
a e
l b
otó
n d
e e
nce
ndi
do/
apa
gad
o o
tra
ve
z p
ara
co
nfir
mar
su
se
lec
ció
n y
vo
lve
r
a e
nce
nde
r e
l m
oto
r.
UTI
LIZ
AR
EL
GUÍ
A 0
,5M
M-2
,5M
M
PAR
A R
ECO
RTE
S P
REC
ISO
S
Est
e g
uía
se
aj
ust
a m
anu
al-
men
te.
De
je
3m
m e
n la
pa
n-
tal
la
y n
o u
tili
ce
los
bo
ton
es
con
f
lec
has
p
ara
c
am
bia
r
lo
lar
go
del
r
eco
rte
. P
ara
cam
bia
r lo
la
rgo
de
l re
cor
te,
mue
va
el
bot
ón
ubi
cad
o
sob
re
el g
uía
ha
sta
al
can
zar
la
pos
ici
ón
des
ead
a.
AJU
STE
AU
TOM
ÁTIC
O D
E P
OTE
NCI
A
SM
ART
M
OTO
R T
ECH
NOL
OGY
(S
MT)
Su
con
jun
to
de
pel
uqu
ería
I
nfin
iti
™
d
e
Con
air
®
le
per
mite
e
sco
ger
e
ntre
3
n
ive
les
d
e
pot
enc
ia:
1) Oprimir
el botón
de
enc
end
ido
un
a v
ez
act
iva
la
pot
enc
ia
baj
a,
ide
al
par
a
rec
orte
s
fác
ile
s
o
cua
ndo
s
e
cor
ta
poc
o
pel
o.
2)
Opr
im
ir
el
bot
ón
de
enc
end
ido
un
a s
egu
n-
da
vez
ac
tiv
a la
p
ote
nci
a
alta
, i
dea
l p
ara
r
eco
rte
s
difí
cile
s o
cu
and
o s
e c
orta
m
uch
o p
elo
. 3
) O
prim
ir
el
bot
ón
de
enc
end
ido
un
a t
erc
era
ve
z a
ctiv
a e
l a
jus
te
aut
om
átic
o d
e p
ote
nci
a S
MT.
La
exc
lus
iva
te
cno
log
ía
SM
T p
erc
ibe
cu
and
o la
co
rta
dor
a e
stá
ha
cie
ndo
fu
er-
za
par
a c
orta
r e
l p
elo
es
pes
o e
in
cre
men
ta
la
pot
enc
ia
del
m
oto
r a
uto
mát
ica
men
te
par
a fa
cili
tar
el
co
rta
do.
El
ind
ica
dor
de
po
ten
cia
in
dic
a e
l in
cre
men
to.
COM
O A
PAG
AR
LA
COR
TAD
ORA
Opr
im
a e
l b
otó
n d
e e
nce
ndi
do/
apa
gad
o d
ura
nte
m
ás
de
2
seg
und
os.
E
sto
a
pag
ará
c
om
ple
tam
ent
e
el
apa
rat
o y
la
po
sic
ión
de
l g
uía
re
gre
sar
á a
l in
ici
o.
Si
des
ea
apa
gar
la
c
orta
dor
a s
in
que
la
p
osi
ció
n
del
gu
ía
reg
res
e a
l in
ici
o (3
mm
), o
prim
a e
l b
otó
n d
e
enc
end
ido
/ap
aga
do
(bo
tón
c
on
4 p
osi
cio
nes
B
ajo
/
Alto
/Au
to
con
S
MT
y A
pag
ado
) d
ura
nte
m
eno
s d
e 2
seg
und
os.
La
pa
nta
lla
qu
eda
rá
enc
end
ida
du
ran
te
15
seg
und
os
y te
ndr
á 5
m
inu
tos
pa
ra
cam
bia
r e
l a
jus
te
de
lo
lar
go
del
re
cor
te.
D
esp
ués
d
e 5
m
inu
tos
, l
a
cor
tad
ora
se
a
pag
ará
co
mpl
eta
men
te
y e
l g
uía
p
er-
man
ece
rá
en
la
últi
ma
pos
ici
ón
esc
ogi
da.
Par
a r
em
ove
r e
l g
uía
, a
jus
te
lo
lar
go
del
re
cor
te
a
3m
m y
ja
le
el
guí
a h
aci
a a
rrib
a,
man
ten
ien
do
el
mis
mo
mie
ntra
s lo
em
puj
a c
on
el p
ulg
ar (
Fig
.4)
.
TÉC
NIC
AS
DE
REC
ORT
E Y
CON
SEJ
OS
DE
LOS
EX
PER
TOS
• U
tili
ce
la
cor
tad
ora
en
el
pe
lo
lim
pio
y
sec
o.
• U
tili
ce
un
aju
ste
d
e
rec
orte
m
ás
lar
go
que
e
l
des
ead
o
has
ta
fam
ilia
riz
ars
e
con
la
c
orta
dor
a.
Pod
rá
vol
ver
a
aco
rta
r s
u p
elo
de
spu
és,
es
cog
ien
do
un
aju
ste
m
eno
r. A
pre
nde
rá
muy
rá
pid
am
ent
e a
util
iza
r to
dos
lo
s a
jus
tes
, d
esd
e 3
mm
ha
sta
30
mm
.
• S
iem
pre
m
uev
a l
a c
or-
tad
ora
e
n
la
dire
cci
ón
del
cr
eci
mie
nto
de
l p
elo
.
Em
pie
ce
en
la
nuc
a.
Ponga
el guía
directa-
men
te
sob
re
el
cue
ro
cab
ellu
do
y
sub
a
la
cor
tad
ora
h
aci
a l
a c
oro
-
nill
a. M
uev
a la
co
rta
dor
a
len
tam
ent
e,
con
lo
s d
ien
tes
d
el
guí
a a
pun
tan
do
lig
era
men
te
hac
ia
arr
iba
. M
ant
eng
a la
co
rta
dor
a e
n
con
tac
to
per
man
ent
e c
on
la
cab
eza
(F
ig.
5).
• P
ara
c
orta
r l
a c
oro
nill
a,
mue
va
la
cor
tad
ora
de
sde
la
fre
nte
ha
sta
at
rás
.
• P
ara
re
aliz
ar
los
to
que
s
fin
ale
s e
n l
a n
uca
y
la
s
pat
illa
s,
util
ice
la
c
orta
-
dor
a s
in
guí
a.
Vol
tee
la
cor
tad
ora
y
m
uév
ala
d
e
arr
iba
po
r a
baj
o (F
ig.
6).
• S
i
des
ea
un
aju
ste
d
e
rec
orte
su
per
ior
a
30m
m
o s
i u
ste
d t
ien
e e
xpe
ri-
enc
ia,
p
ued
e
usa
r
una
téc
nic
a
de
rec
orte
c
on
pei
ne
o d
edo
s (F
ig.
7):
- T
rab
aje
si
n g
uía
.
- C
oja
un
a p
equ
eña
se
cci
ón
de
pel
o e
ntre
su
s d
edo
s
o c
on
un
pei
ne.
- D
esl
ice
lo
s d
edo
s o
el
pe
ine
ha
cia
la
s p
unt
as,
ha
sta
el n
ive
l d
ese
ado
.
- C
orte
el
ca
bel
lo
por
en
cim
a d
el p
ein
e o
de
lo
s d
edo
s.
- P
ein
e e
l c
abe
llo
a
med
ida
qu
e lo
co
rta
pa
ra
ase
gu-
rar
se
que
qu
edé
un
ifo
rm
e.
COM
O U
SAR
EL
SI
STE
MA
DE
ENT
RES
ACA
R
Esc
oja
la
p
osic
ión
“T
HIN
”. E
sto
p
ond
rá
en
mar
cha
el
guí
a d
e d
esg
ast
ar
ubi
cad
o f
ren
te
a l
as
cuc
hilla
s.
El
sist
em
a d
e e
ntre
sac
ar v
uel
ve
el p
elo
m
eno
s tu
pid
o, l
o
cua
l e
s p
arti
cul
arm
ent
e ú
til
cua
ndo
se
co
rta
el
pe
lo
en
la
cor
oni
lla
, d
ond
e s
iem
pre
es
m
ás
esp
eso
. C
oja
un
a
mec
ha
de
pel
o e
ntre
su
s d
edo
s ín
dic
e y
co
raz
ón
(ap
oy-
and
o e
l a
nul
ar y
el
m
eñi
que
en
la
ca
bez
a) y
de
slic
e lo
s
ded
os
hac
ia
las
pu
nta
s, h
ast
a d
eja
r 1
a
2 c
ent
ím
etro
s.
Cor
te
el
pel
o m
ant
eni
end
o l
a c
orta
dor
a a
u
n á
ngu
lo
em
pin
ado
pa
ra
log
rar
un
ef
ect
o d
e p
unt
as
den
tad
as.
INS
TRU
CCI
ONE
S D
E
MANT
ENI
MIE
NTO
CUI
DAD
O D
E S
U C
ORT
ADO
RA
LIM
PIE
ZA
DE
LAS
CU
CHI
LLA
S
Saq
ue
el g
uía
de
spu
és
de
cad
a u
so.
Li
mpi
e la
s c
uch
illa
s
reg
ula
rm
ent
e p
ara
as
egu
rar
un
de
sem
peñ
o ó
ptim
o.
CUC
HIL
LAS
EX
TRA
ÍBL
ES
Las
cu
chi
lla
s d
e la
co
rta
dor
a In
fin
iti
™
de
Co
nai
r
®
so
n
ext
raí
ble
s p
ara
fa
cili
tar
la
lim
pie
za.
A
nte
s d
e e
xtra
er
las
c
uch
illa
s,
ase
gúr
ese
que
la
cor
tad
ora
est
é
apa
gad
a.
Man
ten
ga
la
cor
tad
ora
co
n la
s c
uch
illa
s
apu
nta
ndo
h
aci
a a
rrib
a y
em
puj
e la
pa
rte
su
per
ior
de
las
cu
chi
lla
s h
ast
a s
aca
rla
s
(Fi
g.8
). L
im
pie
la
s m
ism
as
con
el
ce
pill
o d
e li
mpi
eza
pro
vis
to,
lu
ego
re
gré
sel
as
en
su
lug
ar.
CUC
HIL
LAS
AU
TOL
UBR
IFI
CAN
TES
Su
cor
tad
ora
es
tá
equ
ipa
da
de
un
tam
pón
lu
brif
ica
nte
inc
orp
ora
do
que
lu
bric
a l
as
cuc
hill
as
per
man
ent
e-
men
te
par
a
ase
gur
ar
un
des
em
peñ
o
ópt
im
o.
Se
aco
nse
ja
rel
len
ar
el
tam
pón
c
uan
do
sea
n
ece
sar
io.
Cua
ndo
le
pa
rec
e q
ue
la
cor
tad
ora
no
es
tá
fun
cio
na-
ndo
de
m
ane
ra
ópt
im
a, s
aqu
e la
s c
uch
illa
s c
om
o s
e
ind
icó
an
ter
ior
men
te
y p
ong
a u
nas
cu
ant
as
got
as
del
ace
ite
lu
bric
ant
e d
e C
ona
ir s
obr
e e
l ta
mpó
n. R
egr
ese
las
cu
chi
lla
s e
n s
u lu
gar
.
El a
cei
te
lub
ric
ant
e d
e C
ona
ir
fue
es
pec
ial
men
te
dis
-
eña
do
par
a la
s c
orta
dor
as
de
pel
o. N
o s
e e
vap
ora
rá
o
red
uci
rá
la
vel
oci
dad
de
la
s c
uch
illa
s.
Cua
ndo
se
a n
ece
sar
io
cam
biar
la
s c
uch
illa
s, p
ida
cu
chi
l-
las
de
re
pue
sto
us
and
o e
l fo
rm
ular
io
de
ped
ido
ad
jun
to.
Ins
tru
cci
one
s &
G
uía
de
R
eco
rte
Mod
elo
H
C701
™
®
Sistema de
Recorte de P
elo
Avanzado
Fig
.1
Fig
.2
Fig
.5
Fig
.7
Fig
.6
Fig
.8
Fig
.4
1. G
uía
pa
ra
log
rar
28
la
rgo
s d
e
rec
orte
(d
e 3
a
30m
m, e
n in
cre
-
men
tos
de
1m
m)
2. G
uía
de
pr
eci
sió
n c
on
5 p
osic
ion
es
(de
0,
5 a
2,
5m
m)
3. C
uch
illa
de
ac
ero
in
oxid
abl
e c
on
pro
ces
o d
e g
rab
ado
tri
dim
ens
ion
al
4. S
ist
em
a d
e e
ntre
sac
ar
5. B
otó
n d
e e
nce
ndi
do/
apa
gad
o
6. B
oto
nes
de
aj
ust
e d
e lo
lar
go
del
re
cor
te
7. B
ase
de
ca
rga
8. A
dap
tad
or
9. T
ije
ras
10.
Pe
ine
de
ba
rbe
ro
11.
Ce
pillo
de
lim
pie
za
12.
Ac
eite
lu
bric
ant
e
13.
Ca
pa
de
bar
ber
o
14.
Ce
pillo
pa
ra
el c
uel
lo
15.
3
pin
zas
9
8
2
7
6
1
5
4
3
15
13
12
14
10
11
Fig
.3


