Comtrol DeviceMaster Primo Hardware Installation Download Page 6

DeviceMaster Primo Hardware Installation

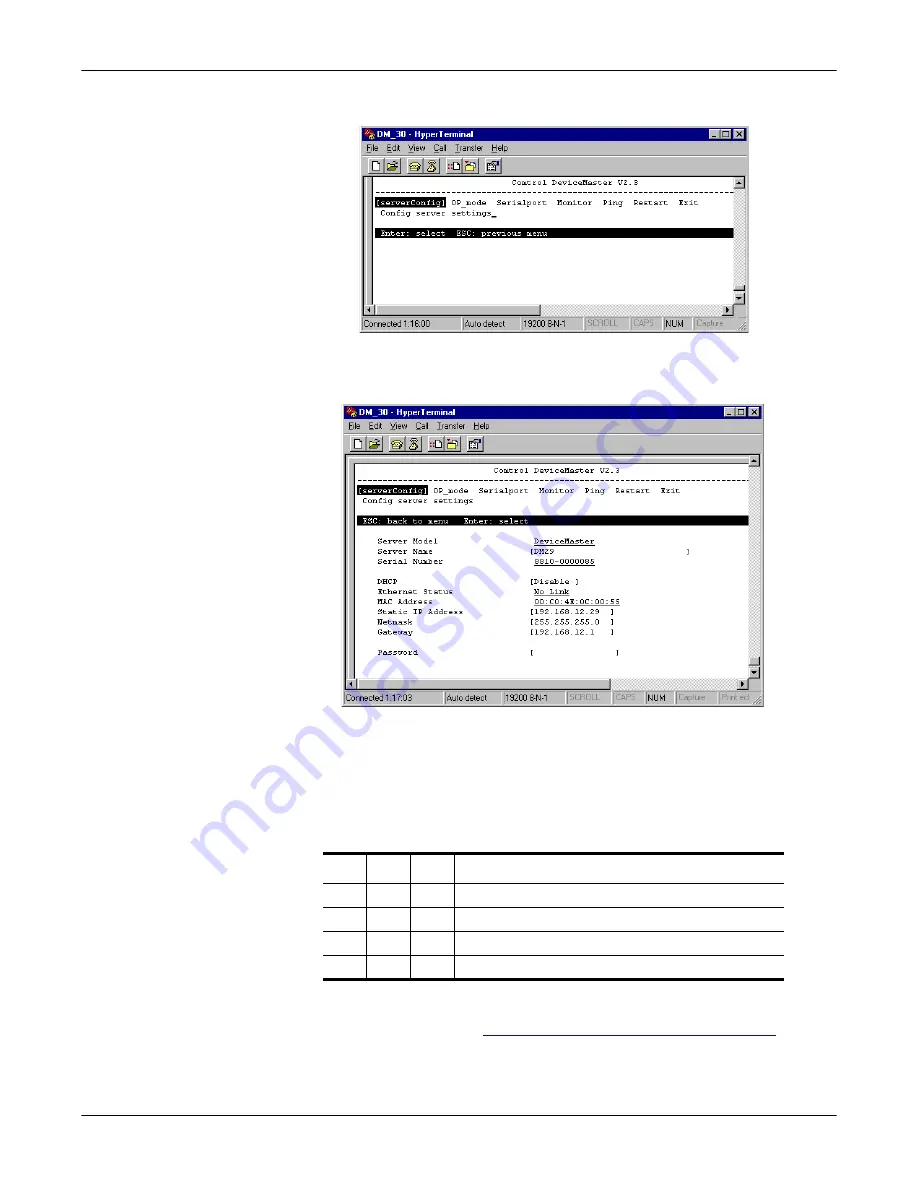
Serial Console Method

j.

Select 

[serverConfig]

 from the menu. 

k. Press the 

Enter

 key. Hyperterminal displays various parameters that are 

required to configure the DeviceMaster Primo. The parameters are 
enclosed in square brackets. 

l.

If you want to set the IP address of the server, use the keyboard arrow 
keys to position the cursor over the first digit of the IP address. Type in the 
correct IP address and then press the 

Enter

 key to accept this value. Press 

the 

ESC

 key to return to the main menu. HyperTerminal displays the 

previous main menu.

m. Using the arrow keys, select 

Restart

 from the menu.

6.

Set the DIP switch for your serial device using the following table:

7.

Disconnect the null-modem cable from the PC COM port.

8.

Connect the appropriate serial cable between the DB9 serial port on the Primo 
and your serial device. See 

Building RS-232 Straight-Through Cables

 on Page 

9, if you need to build a cable.

SW1 SW2 SW3

Interface Mode

OFF OFF OFF RS-232 Data Comm

OFF ON

RS-422

ON

OFF RS-485 by RTS (Ready to Send)

ON

ON

RS-485 by ADDC (Automatic Data Detection 

Summary of Contents for DeviceMaster Primo

Page 1: ...add on single port serial board to your PC server but with one major advantage the TCP IP network Since the host communicates with the COM port on the DeviceMaster Primo over a TCP IP network you are able to control your asynchronous serial device from virtually any location Although it connects through the virtual link of the Ethernet network the port on the DeviceMaster Primo is recognized as a ...

Page 2: ...ing a telnet session The default IP address for the DeviceMaster Primo is 192 168 127 254 1 Connect the cross over Ethernet cable supplied with the Primo between the 10 100 Base T jack and the host PC NIC Note You may need to temporarily change the IP address on the host PC so that they are on the same subnet 2 Set DIP switch SW1 to OFF down to establish a Telnet connection 3 Plug the power adapte...

Page 3: ...nning Note To ensure proper operation on the Terminal menu select Preferences and then make sure the VT100 Arrows option is selected e Use the keyboard arrow keys to select serverConfig and then press the Enter key The next telnet window appears f Use the keyboard arrow keys to position the cursor over the first digit of the IP address Type the correct IP address and then press the Enter key to ac...

Page 4: ...2 Set SW1 to ON up SW2 or SW3 can be set to any position 3 Plug the power adapter DC plug into the jack labeled DC IN 4 Plug the power adapter into an electrical outlet Note There is no on off switch The Primo automatically turns on when plugged into the outlet The PWR LED on the Primo top panel will glow to indicate that it is receiving power 5 Start a terminal emulator such as the latest version...

Page 5: ... that you are using Select the OK button The Properties dialog box appears f Select the following parameters g Select the OK button The HyperTerminal main window appears h At the Console terminal type command line type 1 for ansi vt100 parameter i Press the Enter key HyperTerminal displays a configuration menu Bits per second 19200 Data bits 8 Parity None Stop bits 1 Flow Control None ...

Page 6: ... press the Enter key to accept this value Press the ESC key to return to the main menu HyperTerminal displays the previous main menu m Using the arrow keys select Restart from the menu 6 Set the DIP switch for your serial device using the following table 7 Disconnect the null modem cable from the PC COM port 8 Connect the appropriate serial cable between the DB9 serial port on the Primo and your s...

Page 7: ...ll glow to indicate that it is receiving power 4 Connect a straight through Ethernet cable between the 10 100 Base T jack and the network hub Note The Link LED will light when the Primo is properly connected to a live Ethernet device or network Orange indicates a 10 Mbps Ethernet connection and green indicates a 100 Mbps Ethernet connection 5 Set the DIP switch using the following table to set the...

Page 8: ...DB9 male pinout data Building Additional DB9 Loopback Plugs Loopback connectors are DB9 female serial port plugs with pins wired together as shown that are used in conjunction with application software to test serial ports Note Comtrol includes the Test Terminal WCOM32 program on the CD for Windows 98 and Windows NT drivers See the on line help for WCOM32 for information about using these applicat...

Page 9: ...aight Through Cables Use the following figure if you need to build an RS 232 straight through cable Straight through cables are used to connect modems and other DCE devices TxD RxD RTS CTS DSR GND DCD DTR Signal RxD TxD CTS RTS DTR GND DCD DSR Signal DB9 2 3 8 7 4 5 1 6 Pins DeviceMaster Primo RI 9 RI DB9 3 2 7 8 6 5 1 4 Pins 9 DB25 3 2 4 7 8 6 Pins 20 5 22 Primo RXDA TXDA Signal 3 2 Pins TXDB 1 R...

Page 10: ...ironmental conditions LED Name LED Function PWR Red indicates that the power is on Link Orange indicates a 10 Mbps Ethernet connection Green indicates a 100 Mbps Ethernet connection Ready Green indicates the Primo is ready SW1 SW2 SW3 Interface Mode ON RS 232 Console OFF OFF OFF RS 232 Data Comm OFF ON RS 422 ON OFF RS 485 by RTS ON ON RS 485 by ADDC Environmental Conditions Value Operating temper...

Page 11: ...arth 2kV EN61000 4 6 1995 EN61000 4 8 1993 3A m at 50Hz EN61000 4 11 1994 Yes Safety EN60950 UL CUL TUV Yes Yes Topic Specification External power supply adapter if provided Input line frequency Input line voltage Output voltage Output current Note Any power source that meets the output voltage and current requirements can be used See illustration at left 60 Hz 100 120VAC 12 VDC 400 mA minimum Pro...

Page 12: ...er tools with insulated handles Technical Support If you need technical support contact Comtrol using one of the following methods Trademark Notices Comtrol is a trademark of Comtrol Corporation DeviceMaster is a registered trademark of Comtrol Corporation Windows MS DOS and Microsoft are registered trademarks of Microsoft Corporation Other product names mentioned herein may be trademarks and or r...

Reviews: