background image

6HS 

&RPSXSULQW3DJH0DVWHUF8VHU*XLGH

7URXEOHVKRRWLQJ

'HVFULSWLRQ

&DXVH

$FWLRQ

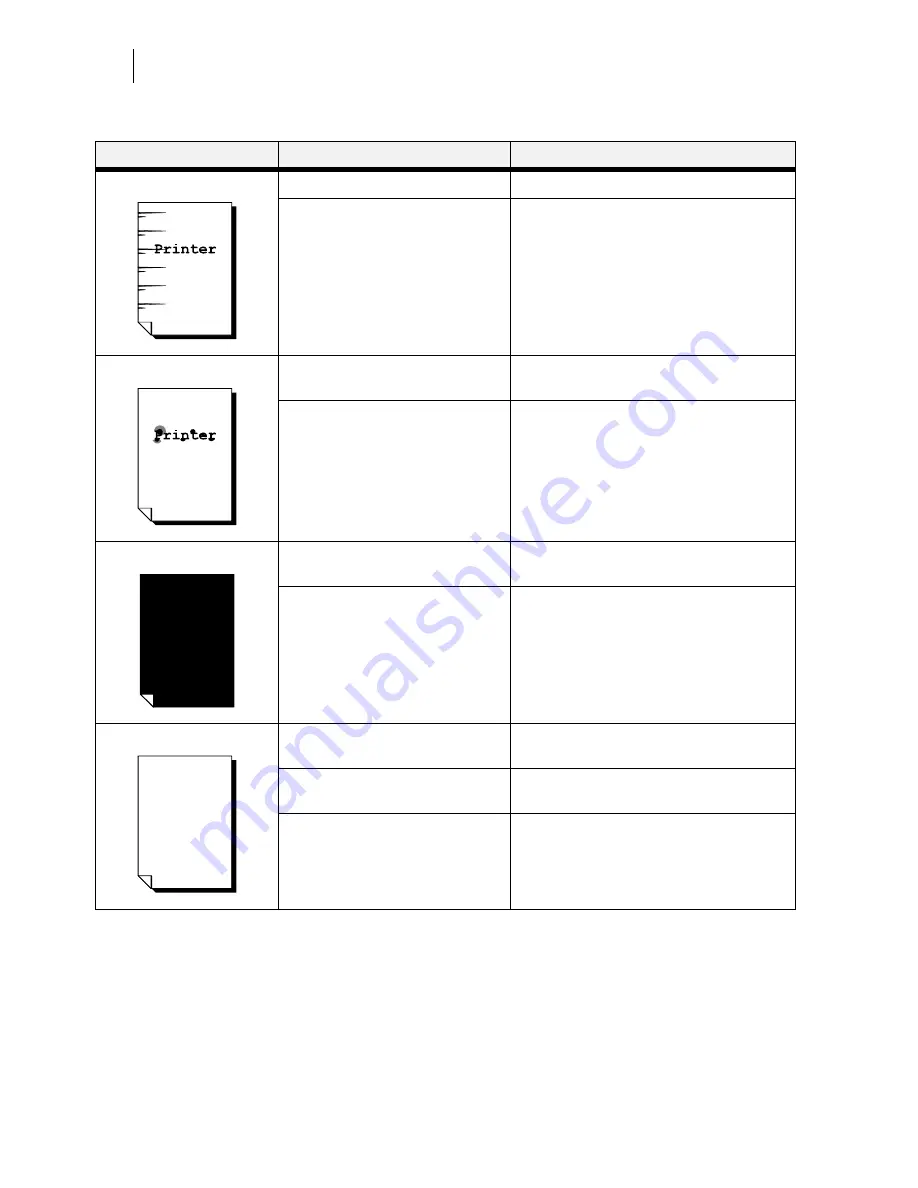
5HFXUULQJVPXGJHV

'LUWLQWKHSDSHUSDWK

3ULQWVHYHUDOEODQNVKHHWV

7KHGUXPFDUWULGJHWUDQVIHUUROOHURU

IXVHUXQLWLVROGRUGDPDJHG

&KHFNWKHFRQGLWLRQRIWKHGUXPFDUWULGJH

WUDQVIHUUROOHUDQGIXVHUXQLWDQGUHSODFHDV

QHFHVVDU\

6HH³'UXP&DUWULGJH³RQSDJH

RU

6HH³7UDQVIHU5ROOHU&DUWULGJH³RQSDJH

RU

6HH³)XVHU8QLW³RQSDJH

,QNVPHDUVZKHQUXEEHG

7KHSDSHULVGDPS

5HSODFHWKHSDSHU

6HH³3DSHU+DQGOLQJ³RQSDJH

7KHSDSHULVRXWVLGHWKHUHFRPPHQGHG

VSHFLILFDWLRQUDQJH

5HSODFHWKHSDSHUZLWKDUHFRPPHQGVL]HDQG

W\SHDQGFRQILUPWKDW\RXUSULQWHUGULYHUVHWWLQJV

DUHFRUUHFW

6HH³3DSHU+DQGOLQJ³RQSDJH

%ODFNSDJHV

7KHGUXPFDUWULGJHLVROGRUGDPDJHG

5HSODFHWKHGUXPFDUWULGJH

6HH³'UXP&DUWULGJH³RQSDJH

7KHKLJKYROWDJHVXSSO\LVGHIHFWLYH

&RQWDFW\RXU&RPSXSULQWGHDOHURUD&RPSXSULQW

&XVWRPHU6HUYLFH&HQWHUIRUDVVLVWDQFH

%ODQNSDJHV

7ZRRUPRUHVKHHWVPD\EHIHHGLQJDW

RQFH

5HPRYHWKHSDSHUVWDFNIURPWKHWUD\IDQLWDQG

UHLQVHUWLW

7KHGUXPFDUWULGJHLVROGRUGDPDJHG

5HSODFHWKHGUXPFDUWULGJH

6HH³'UXP&DUWULGJH³RQSDJH

7KHKLJKYROWDJHVXSSO\LVGHIHFWLYH

&RQWDFW\RXU&RPSXSULQWGHDOHURUD&RPSXSULQW

&XVWRPHU6HUYLFH&HQWHUIRUDVVLVWDQFH

Summary of Contents for PageMaster 1600c

Page 1: ...6HS RPSXSULQW 3DJH0DVWHU F 8VHU XLGH...

Page 2: ...UG 3 3 3 3 8 DVHU HW HZOHWW 3DFNDUG R 0 3 7RNHQ 5LQJ QWHUQDWLRQDO XVLQHVV 0DFKLQHV RUSRUDWLRQ QWHO QWHO RUSRUDWLRQ 0LFURVRIW 06 26 LQGRZV 0LFURVRIW RUSRUDWLRQ 1RYHOO DQG 1HW DUH 1RYHOO QF 7KH 1 5 67 5...

Page 3: ...WHU 2ULHQWDWLRQ ERXW WKH 3ULQWHU HDWXUHV YDLODEOH RQILJXUDWLRQ 6DIHW 3UHFDXWLRQV RQYHQWLRQV QVWDOOLQJ DQG 5HORFDWLQJ RXU 3ULQWHU 2WKHU 3UHFDXWLRQV 3UHFDXWLRQV IRU 3RZHU DQG DUWK RQQHFWLRQV DXWLRQV 2WK...

Page 4: ...QWHU 2Q 6HOHFWLQJ D LVSOD DQJXDJH GMXVWLQJ RORU 5HJLVWUDWLRQ GMXVWLQJ 3ULQWHU OLJQPHQW 6HWWLQJV QVWDOOLQJ 3ULQWHU ULYHUV DQG RFDWLQJ 8VHU RFXPHQWDWLRQ QVWDOOLQJ 3ULQWHU ULYHUV DQG RWKHU 6RIWZDUH IRU 8...

Page 5: ...OHPV 3ULQW 4XDOLW 3UREOHPV 3DSHU 7UDQVSRUW 3UREOHPV 2WKHU SUREOHPV OHDQLQJ WKH HQVLW 6HQVRU 6ROYLQJ 3ULQWHU 3RZHU RQ 3UREOHPV RQWURO 3DQHO 0HVVDJHV WKHUQHW 1HWZRUN QWHUIDFH 7URXEOHVKRRWLQJ 3RZHU 8S 7U...

Page 6: ...HSODFLQJ WKH UXP DUWULGJH 7UDQVIHU 5ROOHU DUWULGJH 7UDQVIHU 5ROOHU DUWULGJH DQGOLQJ 3UHFDXWLRQV 5HSODFLQJ WKH 7UDQVIHU 5ROOHU DUWULGJH XVHU 8QLW 5HSODFLQJ WKH XVHU 8QLW 3DSHU HHG 5ROOHU 5HSODFLQJ WKH...

Page 7: ...HQX 3 0HQX 6 VWHP 0HQX 4XDOLW 0HQX RORU 0HQX XQFWLRQV 0HQX 6 0HQX 6 0HQX KDSWHU 8VLQJ 5 0 00V 6 00 DQG 3RZHU RQ LOHV QVWDOOLQJ 5 0 0HPRU 006 QVWDOOLQJ D 6 00 0RGXOH 8VLQJ WKH 3RZHU 2Q LOHV HDWXUH 3RZH...

Page 8: ...QWLQJ RQW 6XPPDULHV 3ULQWLQJ D RQW 6XPPDU 3RVW6FULSW RQW 6XPPDU 3RVW6FULSW RQW 6XPPDU FRQW G 3RVW6FULSW RQW 6XPPDU FRQW G 3RVW6FULSW RQW 6XPPDU FRQW G 3 RQW 6XPPDU 3 RQW 6XPPDU FRQW G SSHQGL UHTXHQWO...

Page 9: ...6HS 3UHIDFH Q WKLV KDSWHU Welcome on page 2 About this Manual on page 2 About the Printer on page 3 Safety Precautions on page 4...

Page 10: ...and preservations of the printer In order to avoid serious injury or accident all users should read this chapter KDSWHU 8QSDFNLQJ DQG QVWDOOLQJ WKH 3ULQWHU This chapter describes how to select an app...

Page 11: ...found in the Ethernet Network Reference Manual on the Compuprint PageMaster 1600c Electronic Library CD ROM 3ULQWHU 2ULHQWDWLRQ Throughout this guide the four sides of the printer are referred to as...

Page 12: ...00c printer available in the following configuration 6WDQGDUG RQILJXUDWLRQ Memory 128 MB Resolutions 600 x 600 dpi and 1200 x 1200 dpi Paper Input One 500 sheet A4 letter paper tray and one 100 sheet...

Page 13: ...such as curtains that may catch fire Place the printer on a level and sturdy surface that can withstand a good weight If tilted the printer may fall and cause injuries Because the printer weighs 34 5...

Page 14: ...cause excessive internal heat and fire The accompanying diagram shows the minimum clearances required for normal operation consumables replacement and maintenance to ensure your printer operates at pe...

Page 15: ...prevent trays or consumables from falling out do not tilt the printer more than 10 degrees in any direction When moving the printer remove the toner cartridges Do not reuse toner cartridges once you...

Page 16: ...z Gas pipes which can be ignited and explode z Telephone line earth wires or lightning rods which can draw an excessive electric current if hit by lightning z Water faucets or pipes whose electrical c...

Page 17: ...XWLRQV Do not place any liquid containers such as vases or coffee cups on the printer Liquids spilt on the printer constitue a fire and electrical shock hazard Do not place any metal parts such as sta...

Page 18: ...ys or solvents in or around the printer as this can result in fire When removing paper jams make sure no pieces of paper are left inside the printer as this can cause fire If the paper is wrapped arou...

Page 19: ...EOHV Never throw a toner cartridge into an open flame It can cause an explosion and injuries Never throw a transfer roller cartridge into an open flame It can cause an explosion and injuries Never thr...

Page 20: ...an water Consult a physi cian if necessary z If you get toner on your skin wash it with soap and water and rinse well z If you inhale toner leave the area of exposure immediately and gargle with plent...

Page 21: ...r on page 1 7 Installation Procedure on page 1 8 Turning the Printer On on page 1 24 Selecting a Display Language on page 1 25 Adjusting Color Registration on page 1 26 Installing Printer Drivers and...

Page 22: ...GHQ WHPSHUDWXUH IOXFWXDWLRQV R QRW PRYH WKH SULQWHU IURP D FRRO GU ORFDWLRQ WR D ZDUP KXPLG ORFDWLRQ 6XGGHQ WHPSHUDWXUH IOXFWXDWLRQV FDQ FDXVH ZDWHU GURSOHWV FRQGHQVDWLRQ WR IRUP LQVLGH WKH SULQWHU DQ...

Page 23: ...to install the printer in a location that respects the minimum clearances indicated in the illustrations below 7RS 9LHZ URQW 9LHZ 87 21 7R DYRLG REVWUXFWLRQ RI WKH YHQWLODWLRQ JULOOV RQ WKH EDFN DQG...

Page 24: ...ng the printer confirm that all the items listed below are accounted for 127 HHS WKH ER DQG SDFNDJLQJ LQ FDVH RX QHHG WR WUDQVSRUW WKH SULQWHU RYHU ORQJ GLVWDQFHV LQ WKH IXWXUH 127 RU LQIRUPDWLRQ DERX...

Page 25: ...6HS RPSXSULQW 3DJH0DVWHU F 8VHU XLGH FFHVVRULHV UXP FDUWULGJH 7RQHU FDUWULGJHV ODFN HOORZ 0DJHQWD DQ 3RZHU RUG...

Page 26: ...6HS RPSXSULQW 3DJH0DVWHU F 8VHU XLGH FFHVVRULHV 7UD FRYHU 127 7KH WUD FRYHU GRHV QRW FRPH VWDQGDUG ZLWK WKH SULQWHU RPSXSULQW 3DJH0DVWHU F QVWDOODWLRQ XLGH RPSXSULQW 3DJH0DVWHU F OHFWURQLF LEUDU 520...

Page 27: ...y direction 87 21 W OHDVW WZR SHRSOH VKRXOG FDUU WKH SULQWHU HFDXVH WKH SULQWHU ZHLJKV NJ ZLWK WKH WUD DQG FRQVXPDEOHV LQVWDOOHG DW OHDVW WZR SHRSOH VKRXOG FDUU LW 7R OLIW WKH SULQWHU IDFH WKH IURQW D...

Page 28: ...VXUH RX UHPRYH DOO WKH VSDFHUV EHIRUH XVLQJ WKH SULQWHU I RX SXUFKDVHG WKH RSWLRQDO LJK DSDFLW HHGHU VKHOYHV LQVWDOO LW ILUVW RU GHWDLOV RQ LQVWDOOLQJ RSWLRQDO DFFHVVRULHV 6HH KDSWHU 2SWLRQV DQG WKH O...

Page 29: ...acer is installed in the paper tray to protect it from shock and vibrations during shipping Remove the spacer before using the printer Follow the procedure below to remove the spacer from the paper tr...

Page 30: ...1 Gently pull out the paper tray until it stops 2 Hold the tray with both hands lift the front up slightly and pull it completely out of the printer 127 3ODFH WKH WUD RQ D IODW VXUIDFH 3 Remove the ta...

Page 31: ...LQ FDVH RX QHHG WR WUDQVSRUW WKH SULQWHU RYHU ORQJ GLVWDQFHV LQ WKH IXWXUH 4 Holding the paper tray with both hands align it with the opening in the printer and gently insert it 5 Push the paper tray...

Page 32: ...DJH0DVWHU F 8VHU XLGH 7UDQVSRUWLQJ WKH 3ULQWHU QVWDOOLQJ WKH UXP DUWULGJH Follow the procedure below to install the drum cartridge 1 Push up button A 1 and fully open the front cover 2 2 Open the pape...

Page 33: ...kage and pull hard on each the 8 seals to remove them Pull the seals completely out 127 HHS WKH DOXPLQXP SDFNDJH RI WKH GUXP FDUWULGJH LQ FDVH RX QHHG WR WUDQVSRUW WKH SULQWHU RYHU ORQJ GLVWDQFHV LQ W...

Page 34: ...UROO VXUIDFH 6FUDWFKHV RU RLO IURP RXU KDQGV RQ WKH GUXP GHWHULRUDWHV SULQW TXDOLW 0DNH VXUH RX UHPRYH WKH SURWHFWLYH VKHHW QVWDOOLQJ WKH GUXP FDUWULGJH ZLWKRXW UHPRYLQJ WKH SURWHFWLYH VKHHW GHWHULRUD...

Page 35: ...WKH VORWV FDQ GDPDJH WKH FDUWULGJH R QRW DOORZ WKH VXUIDFH RI WKH WUDQVIHU UROOHU WR FRPH LQWR FRQWDFW ZLWK DQ WKLQJ 7 Close the paper outlet cover 8 Close the front cover QVWDOOLQJ WKH 7RQHU DUWULGJ...

Page 36: ...S RPSXSULQW 3DJH0DVWHU F 8VHU XLGH 7UDQVSRUWLQJ WKH 3ULQWHU 1 Remove the top cover 2 Select the new toner cartridge whose color matches the label on the insertion point and remove it from its packagin...

Page 37: ...shown in the illustration to distribute the toner evenly 4 Align the toner cartridge with the corresponding insertion point in the printer and insert it as shown in the illustration 5 Grip the levers...

Page 38: ...QVSRUWLQJ WKH 3ULQWHU 6 Pull the toner seal straight up to remove it 127 3XOO WKH WRQHU VHDO VWUDLJKW XS 3XOOLQJ WKH WRQHU VHDO GLDJRQDOO PD WHDU WKH VHDO 7 Repeat steps 2 6 to install the remaining t...

Page 39: ...ocedure below to load paper into the paper tray 127 6HH 3DSHU DQGOLQJ RQ SDJH IRU LQIRUPDWLRQ DERXW WKH W SHV RI SDSHU VXLWDEOH IRU SULQWLQJ 6HH RDGLQJ 3DSHU LQ WKH 0XOWL 3XUSRVH 7UD RQ SDJH IRU PRUH...

Page 40: ...rinter 127 3ODFH WKH WUD RQ D IODW VXUIDFH 3 Move the end and side paper guides to their outermost positions Gently lift the end paper guide to move it 4 Grip the end paper guide with your fingers and...

Page 41: ...DOO WKH ZD WR LWV RXWHUPRVW SRVLWLRQ DJDLQ WKHQ UHDOLJQ LW ZLWK WKH DSSURSULDWH SDSHU VL H PDUN 5 Align the four corners of the paper stack and insert the paper print side up under the tab 127 R QRW...

Page 42: ...n it with the opening in the printer and gently insert it 8 Push the paper tray completely back into the printer 127 R QRW XVH H FHVVLYH IRUFH RQ WKH SDSHU WUD 127 7KHUH LV DQ LQGLFDWRU QH W WR WKH SD...

Page 43: ...the procedure below to connect the power cord 51 1 RQQHFW WKH SRZHU SOXJ WR DQ RXWOHW ZLWK WKH VDPH YROWDJH DV WKH SULQWHU 9 DQG UDWHG IRU DW OHDVW 1R RWKHU GHYLFHV VKRXOG EH SOXJJHG WR WKLV RXWOHW D...

Page 44: ...urn the printer on 127 7KH SULQWHU PRWRUV UXQ IRU RU PLQXWHV ZKHQ RX ILUVW WXUQ WKH SRZHU RQ The top line of the LCD display reads Loading followed by asterisks progressing across the bottom line Foll...

Page 45: ...default language from English to one of the other four available selections 1 From the Ready status press MENU the control panel display will read Menu Paper Menu 2 Press PREVIOUS or NEXT until the d...

Page 46: ...re that proper image positioning is achieved relative to the printed page 2 Alignment of cyan magenta and yellow inks to ensure color accuracy The following steps comprise the alignment procedure 1 Us...

Page 47: ...WV IRU 0 DQG LQNV LQ DQG 3 PRGHV 7KH QDPH RI WKH VHWWLQJ ZLOO UHIOHFW WKH FXUUHQW VHWWLQJ RI WKH 48 7 5 62 87 21 PHQX 127 7KHUH DUH GLIIHUHQW KRUL RQWDO DOLJQPHQW DGMXVWPHQWV IRU LQN IRU HDFK SDSHU VR...

Page 48: ...UP WKLV SURFHGXUH RQH WLPH ZKHQ WKH SULQWHU LV LQVWDOOHG QVWDOOLQJ 3ULQWHU ULYHUV DQG RFDWLQJ 8VHU RFXPHQWDWLRQ QVWDOOLQJ 3ULQWHU ULYHUV DQG RWKHU 6RIWZDUH IRU 81 DQG LQGRZV To install printer drivers...

Page 49: ...s for MacOS refer to the following folder on the Electronic Library CD ROM Compuprint Printer Driver folder The Printer Driver folder contains the AdobePS driver installation kit and PPD file for the...

Page 50: ...mary follow these steps 1 From the Ready status press MENU the control panel display will read Menu Paper Menu 2 Press PREVIOUS or NEXT until the display reads Menu Functions 3 Press SELECT the displa...

Page 51: ...6HS RPSXSULQW 3DJH0DVWHU F 8VHU XLGH 3ULQWLQJ D RQILJXUDWLRQ 6XPPDU...

Page 52: ...will read Menu Paper Menu 2 Press PREVIOUS or NEXT until the display reads Menu Functions 3 Press SELECT the display will read Functions Reset Printer 4 Press NEXT or PREVIOUS until the display reads...

Page 53: ...3ULQWHU 2II Remember to turn off the printer at the end of day or when the printer will not be used for an extended period of time 127 KHQ WKH SULQWHU LV WXUQHG RII DOO SULQW GDWD VWLOO LQ PHPRU ZLOO...

Page 54: ...6HS RPSXSULQW 3DJH0DVWHU F 8VHU XLGH 7XUQLQJ WKH 3ULQWHU 2II...

Page 55: ...bout this Chapter on page 2 2 Names and Functions of the Printer s Parts on page 2 2 Selecting Print Media on page 2 6 Loading Paper on page 2 11 Cleaning on page 2 21 Storing the Printer on page 2 22...

Page 56: ...PDQXDOO WR ORDG LWHPV VXFK DV SRVWFDUGV DQG HQYHORSHV URQW RYHU 2SHQ WR FOHDU SDSHU MDPV UHSODFH WKH GUXP FDUWULGJH WUDQVIHU UROOHU FDUWULGJH DQG IXVHU XQLW RQWURO 3DQHO 8VH WKH EXWWRQV DQG GLVSOD WR...

Page 57: ...ULQW 3DJH0DVWHU F 8VHU XLGH 1DPHV DQG XQFWLRQV RI WKH 3ULQWHU V 3DUWV RQWURO 3DQHO POWER POWER SAVER STATUS MENU NEXT PREVIOUS RETURN SELECT READY START STOP ACTIVE FAULT CANCEL Display LED Indicators...

Page 58: ...RUG KHUH KDXVW ULOOH OORZV LQWHUQDO KHDW WR GLVVLSDWH 0DNH VXUH WKH JULOOH LV QHYHU REVWUXFWHG 7RQHU DUWULGJHV 7KH EODFN HOORZ PDJHQWD DQG F DQ WRQHU FDUWULGJHV DUH LQVHUWHG KHUH 7RS RYHU IDFH GRZQ WU...

Page 59: ...QHU UXP DUWULGJH RQVLVWV RI WKH OLJKW VHQVLWLYH GUXP WKH GHYHORSHU DQG WKH WUDQVIHU UROOHU PDJHV DUH LQLWLDOO FUHDWHG DV DQ HOHFWULFDO FKDUJH RQ WKH VXUIDFH RI WKLV GUXP 3DSHU 2XWOHW RYHU 2SHQ WR UHSO...

Page 60: ...LHV RU SRVWFDUGV 6SHFLDOW 3DSHU In addition to plain paper you can use the following types of specialty paper Transparency sheets for monochrome printing only Label sheets uncut Envelopes Postcards Ca...

Page 61: ...ter performance and print quality meet your expectations 3DSHU 6RXUFH 0HWHU HLJKW 3DSHU 7 SH DQG HHG LUHFWLRQ 3DSHU 6L HV FFRPPRGDWHG 8QLYHUVDO 3DSHU 7UD PDLQ WUD DQG RSWLRQDO VKHHW SDSHU IHHGHU R QRW...

Page 62: ...RU PRQRFKURPH SULQWLQJ RQO DUGERDUG 7KLFN 7KLFN 7KLFN 8S WR VKHHWV RU D PP VWDFN PP SRUWUDLW PP SRUWUDLW PP SRUWUDLW HFXWLYH PP SRUWUDLW HWWHU PP SRUWUDLW HJDO PP SRUWUDLW HJDO PP SRUWUDLW 3RVWFDUGV Q...

Page 63: ...Paper that is too thick or too thin Paper already printed using another printer or copier Folded creased or torn paper Damp or wet paper Undulated or warped paper Sheets adhered by static electricity...

Page 64: ...r Label film transparent colorless 6WRULQJ 3DSHU Failure to store paper properly can cause paper jams deteriorate print quality and or damage to the printer Store paper under the following conditions...

Page 65: ...stcards in the multi purpose tray Loading envelopes in the multi purpose tray 127 RU LQIRUPDWLRQ DERXW VXLWDEOH SDSHU W SHV UHIHU WR 3DSHU DQGOLQJ RQ SDJH RDGLQJ 3DSHU LQ WKH 3DSHU 7UD Follow the proc...

Page 66: ...outermost positions Gently lift the end paper guide to move it 127 RX GR QRW QHHG WR PRYH WKH SDSHU JXLGHV LI RX DUH UHILOOLQJ WKH WUD ZLWK SDSHU RI WKH VDPH VL H 4 Grip the end paper guide with your...

Page 67: ...XLGH DOO WKH ZD WR LWV RXWHUPRVW SRVLWLRQ DJDLQ WKHQ UHDOLJQ LW ZLWK WKH DSSURSULDWH SDSHU VL H PDUN 7R VHW SDSHU XVH WKH SURYLGHG VSDFHU 5HPRYH WKH VSDFHU IURP WKH WUD 6HW WKH HQG JXLGH LQWR WKH DSSU...

Page 68: ...DSHU VWDFN FDQ FDXVH D SDSHU MDP RZHYHU LI WKH SDSHU JXLGHV DUH WRR ORRVH WKH SDSHU PD WZLVW DV LW IHHGV WKURXJK WKH SULQWHU 7 Hold the paper tray with both hands align it with the opening in the prin...

Page 69: ...HU LQ WKH 0XOWL 3XUSRVH 7UD Follow the procedure below to load paper into the multi purpose tray 127 7R DYRLG SDSHU MDPV GR QRW ORDG SDSHU RI GLIIHUHQW VL HV LQWR WKH WUD DW WKH VDPH WLPH DQG GR QRW U...

Page 70: ...heets 127 DQQLQJ WKH VWDFN KHOSV SUHYHQW SDSHU MDPV FDXVHG ZKHQ PRUH WKDQ RQH VKHHW IHHGV DW WKH VDPH WLPH 127 R QRW IDQ SODLQ SDSHU EHIRUH ORDGLQJ I WKH SDSHU LV SRRUO FXW DQG WKH HGJHV DUH QRW FOHDQ...

Page 71: ...ge of the paper stack can warp the paper and cause paper jams Load the paper so that it is straight in the tray 127 I WKH SDSHU LV QRW ORDGHG FRUUHFWO WKH SULQWLQJ SRVLWLRQ PD VKLIW DQG FDXVH LQFRUUHF...

Page 72: ...time 2 Insert the transparency sheets into the multi purpose tray until they lightly touch the feeding slot 127 R QRW XVH IXOO FRORU WUDQVSDUHQF VKHHWV 7KH FDQ MDP LQ WKH SULQWHU DQG GDPDJH WKH IXVHU...

Page 73: ...RVWFDUGV RDGLQJ QYHORSHV LQ WKH 0XOWL 3XUSRVH 7UD Feed envelopes from the Multi Purpose Tray Open the envelope flaps before feeding and load them as illustrated below 127 R QRW XVH HQYHORSHV WKDW KDYH...

Page 74: ...6HS RPSXSULQW 3DJH0DVWHU F 8VHU XLGH 6HOHFWLQJ 3ULQW 0HGLD DUJHU WKDQ LQ PP DUJHU WKDQ LQ PP...

Page 75: ...the printer at least once a month to keep it in good working condition and to maintain print quality 127 1HYHU VSUD GHWHUJHQW GLUHFWO RQWR WKH SULQWHU URSOHWV RI GHWHUJHQW FDQ HQWHU WKH SULQWHU DQG FD...

Page 76: ...right side of the printer press 2 on the power switch to turn off the printer 2 Disconnect the power cord interface cable and any other cables 51 1 7R SUHYHQW HOHFWULF VKRFN QHYHU WRXFK WKH SRZHU SOXJ...

Page 77: ...XLGH 6HOHFWLQJ 3ULQW 0HGLD 3 Remove any remaining paper from the paper tray and store it in a dry dust free place 127 I WKH SDSHU SURYHV GLIILFXOW WR UHPRYH SXOO WKH WUD FRPSOHWHO RXW RI WKH SULQWHU...

Page 78: ...LJK DSDFLW HHGHU VKHOYHV LV LQVWDOOHG UHPRYH LW EHIRUH WUDQVSRUWLQJ WKH SULQWHU I WKH LJK DSDFLW HHGHU LV QRW UHPRYHG LW PD IDOO UHVXOWLQJ LQ GDPDJH RU LQMXU 7R UHPRYH WKH LJK DSDFLW HHGHU UHIHU WR F...

Page 79: ...h to turn off the printer 2 Disconnect the power cord interface cable and any other cables 51 1 7R SUHYHQW HOHFWULF VKRFN QHYHU WRXFK WKH SRZHU SOXJ ZLWK ZHW KDQGV 87 21 KHQ UHPRYLQJ WKH SRZHU FRUG PD...

Page 80: ...WLQJ 3ULQW 0HGLD 3 Gently pull out the paper tray until it stops 4 Hold the tray with both hands lift the front up slightly and pull it completely out of the printer 5 Remove the paper from the paper...

Page 81: ...FWLQJ 3ULQW 0HGLD 6 Insert the cardboard spacer in the tray as illustrated on the left 7 Hold the paper tray with both hands align it with the opening in the printer and gently insert it 8 Push the pa...

Page 82: ...6HS RPSXSULQW 3DJH0DVWHU F 8VHU XLGH 6HOHFWLQJ 3ULQW 0HGLD 9 Remove the tray cover 10 Push up button A 1 and fully open the front cover 2 11 Open the paper outlet cover...

Page 83: ...127 R QRW WRXFK WKH WUDQVIHU UROOHU EODFN FRORUHG SDUW ROG WKH GUXP FDUWULGJH E WKH KDQGOH RQ WRS RI WKH FDUWULGJH WR SUHYHQW WKH FDUWULGJH IURP IDOOLQJ 127 UDS WKH GUXP FDUWULGJH LQ LWV DOXPLQXP SDF...

Page 84: ...GLD 14 Close the front cover 15 To protect the printer from damage pack it in a box before transporting it 127 IWHU PRYLQJ WKH SULQWHU WR WKH QHZ ORFDWLRQ RX QHHG WR UHDGMXVW WKH FRORU UHJLVWUDWLRQ RU...

Page 85: ...UREOHPV Q WKLV KDSWHU About this Chapter on page 3 2 Troubleshooting on page 3 2 Solving Printer Power on Problems on page 3 11 Control Panel LCD Messages on page 3 12 Ethernet Network Interface Troub...

Page 86: ...PRGLILFDWLRQV WR WKH HTXLSPHQW DV WKLV PD UHVXOW LQ ILUH 87 21 7XUQ RII WKH SULQWHU DQG GLVFRQQHFW WKH SRZHU FRUG IURP WKH RXWOHW EHIRUH SHU IRUPLQJ PDLQWHQDQFH RQ WKH SULQWHU DLOXUH WR WXUQ RII WKH S...

Page 87: ...HFWLYH RQWDFW RXU RPSXSULQW GHDOHU RU D RPSXSULQW XVWRPHU 6HUYLFH HQWHU IRU DVVLVWDQFH 6WUD EODFN GRWV RU ZKLWH DUHDV GURS RXWV 7KH SDSHU LV RXWVLGH WKH UHFRPPHQGHG VSHFLILFDWLRQ UDQJH 5HSODFH WKH SDS...

Page 88: ...WKH UHFRPPHQGHG VSHFLILFDWLRQ UDQJH 5HSODFH WKH SDSHU ZLWK D UHFRPPHQG VL H DQG W SH DQG FRQILUP WKDW RXU SULQWHU GULYHU VHWWLQJV DUH FRUUHFW 6HH 3DSHU DQGOLQJ RQ SDJH ODFN SDJHV 7KH GUXP FDUWULGJH LV...

Page 89: ...DFH WKH SDSHU 7KH SDSHU LV RXWVLGH WKH UHFRPPHQGHG VSHFLILFDWLRQ UDQJH 5HSODFH WKH SDSHU ZLWK D UHFRPPHQG VL H DQG W SH DQG FRQILUP WKDW RXU SULQWHU GULYHU VHWWLQJV DUH FRUUHFW 6HH 3DSHU DQGOLQJ RQ SD...

Page 90: ...DFH WKH SDSHU 6HH 3DSHU DQGOLQJ RQ SDJH 7KH SDSHU LV RXWVLGH WKH UHFRPPHQGHG VSHFLILFDWLRQ UDQJH 5HSODFH WKH SDSHU ZLWK D UHFRPPHQG VL H DQG W SH 6HH 3DSHU DQGOLQJ RQ SDJH 7KH WUDQVIHU UROOHU RU IXVHU...

Page 91: ...D 6HH RDGLQJ 3DSHU RQ SDJH HVFULSWLRQ DXVH FWLRQ HVFULSWLRQ DXVH FWLRQ 3DSHU GRHV QRW IHHG 3DSHU MDPV 6HYHUDO VKHHWV IHHG DW RQFH 3DSHU GRHV QRW IHHG VWUDLJKW 7KH SDSHU LV QRW ORDGHG FRUUHFWO 5HORDG W...

Page 92: ...WLRQ 8QXVXDO QRLVHV 7KH SULQWHU LV QRW OHYHO 5HSRVLWLRQ WKH SULQWHU RQ D IODW VWDEOH VXUIDFH 6HH 6DIHW 3UHFDXWLRQV RQ SDJH 7KH SDSHU WUD LV QRW LQVHUWHG SURSHUO 3XVK WKH SDSHU WUD FRPSOHWHO LQWR WKH S...

Page 93: ...f the transfer roller and gently lift it out of the printer 127 LIW WKH UROOHU FDUHIXOO WR SUHYHQW ZDVWH WRQHU IURP VSLOOLQJ RXW 4 Gently wipe the density sensor window with a clean dry cloth or cotto...

Page 94: ...nds of the transfer roller cartridge into the u shaped bearings inside the printer 6 To lock the transfer roller cartridge into the printer push down on the base of the tabs until you hear a click 7 C...

Page 95: ...SRZHU FRUG IURP WKH RXWOHW WR SUHYHQW WKH ULVN RI HOHFWULF VKRFN 6 5 37 21 3266 86 5 48 5 7 21 1R SRZHU 3RZHU VZLWFK QRW WXUQHG RQ 6ZLWFK LV QRW VHW WR KHFN SRZHU VZLWFK 6HH KDSWHU 8QSDFNLQJ DQG QVWDO...

Page 96: ...VHU 8QLW BAD PHD TYPE REPLACE PHD DG GUXP FDUWULGJH 5HSODFH UXP FDUWULGJH MEDIA MISMATCH CLEAR PAPER QFRUUHFW SDSHU LQ WUD KHFN SDSHU W SH LQ WUD FEED JAM CHECK TRAY 3DSHU MDP LQ WUD OHDU SDSHU MDP LQ...

Page 97: ...SE CLOVER URQW FRYHU LV RSHQ ORVH IURQW FRYHU LOAD PAPER TRAY1 LOAD PAPER TRAY2 LOAD PAPER TRAY3 7KHUH LV DQ HPSW SDSHU WUD 3XW SDSHU LQ HPSW SDSHU WUD DFFRUGLQJ WR UHTXHVWHG VL H DQG PHGLD W SH TRAY...

Page 98: ...1RWH ZKLFK LV EOLQNLQJ DQG LWV FRORU WKHQ FRQWDFW RXU GHDOHU RU 7HFKQLFDO 6XSSRUW 7KH QHWZRUN LQWHUIDFH ERRWV EXW GRHV QRW WU WR ORDG WKH ODVK 520 FRGH ULHIO SUHVV WKH 7HVW EXWWRQ RQ WKH QHWZRUN LQWH...

Page 99: ...I DQ HQWU GRHV QRW DSSHDU UHIHU WR WKH DSSURSULDWH KRVW VHFWLRQ LQ WKLV SSHQGL 8VH WKH 0RQLWRU 3RUW Q RXQWHUV FRPPDQG WR YHULI WKDW WKH FRXQWHU LV LQFUHPHQWLQJ ZLWK HDFK MRE I LW LV QRW YHULI WKH FRQ...

Page 100: ...QG KDUGZDUH DGGUHVV PXVW EH LQ WKLV ILOH IRU WKH KRVW WR DQVZHU D 5 53 UHTXHVW 7KH QHWZRUN LQWHUIDFH V QDPH DQG 3 DGGUHVV LQ WKH HWF KRVWV ILOH 7KH QHWZRUN LQWHUIDFH V QDPH DQG 3 DGGUHVV PXVW EH LQ WK...

Page 101: ...purchase or Technical Support When you report a problem please provide the following information Your name and your company name address and phone number Printer model number Printer serial number Sof...

Page 102: ...6HS RPSXSULQW 3DJH0DVWHU F 8VHU XLGH WKHUQHW 1HWZRUN QWHUIDFH 7URXEOHVKRRWLQJ...

Page 103: ...6HS KDSWHU 3DSHU DPV Q WKLV KDSWHU About this Chapter on page 4 2 Clearing Paper Jams on page 4 2...

Page 104: ...P LQ WKH SDSHU WUD 3DSHU MDP EHWZHHQ WKH GUXP FDUWULGJH DQG IXVHU XQLW 3DSHU MDP LQ WKH LJK DSDF LW HHGHU VKHOYHV 3DSHU MDP LQ WKH SDSHU URWDWRU 87 21 0DNH VXUH WR UHPRYH DOO WKH SDSHU VFUDSV IURP WKH...

Page 105: ...W SDSHU RU LQIRUPDWLRQ DERXW SDSHU UHIHU WR 3DSHU DQGOLQJ RQ SDJH 3DSHU DPV LQ WKH 0XOWL 3XUSRVH 7UD Follow the procedure below to remove paper jammed in the multi purpose tray 87 21 I VPRNH FRPHV RXW...

Page 106: ...tray 2 Push up button A and fully open the front cover Confirm that there are no scraps of paper remaining inside the printer 3 Close the front cover 3DSHU DPV LQ WKH 3DSHU 7UD Follow the procedure be...

Page 107: ...SXSULQW 3DJH0DVWHU F 8VHU XLGH OHDULQJ 3DSHU DPV 2 Remove all the jammed and or creased paper from the tray 3 If there is jammed paper remaining inside the printer pull it out carefully to avoid teari...

Page 108: ...ver Confirm that there are no scraps of paper remaining inside the printer 5 Close the front cover 6 Hold the paper tray with both hands align it with the opening in the printer and gently insert it 7...

Page 109: ...e and in the fuser Select the appropriate procedure according to the location of the jammed paper 3DSHU MDPV DURXQG WKH GUXP FDUWULGJH Follow the procedure below to remove paper jammed around the drum...

Page 110: ...remove the jammed paper If the paper is torn remove any scraps of paper remaining inside the printer 127 XULQJ RSHUDWLRQ WKH IXVHU XQLW KHDWHU EHFRPHV YHU KRW 7R SUHYHQW EXUQV GR QRW WRXFK LW ZLWK RXU...

Page 111: ...LWK ORQJ SDSHU If paper longer than 355 6 mm becomes jammed in the printer cut the paper as necessary and remove the paper from the location where it is jammed using the appropriate procedure If the f...

Page 112: ...ont cover 2 Remove the jammed paper If the paper is torn remove any scraps of paper remaining inside the printer 3 Close the front cover 3DSHU DPV LQ WKH LJK DSDFLW HHGHU VKHOYHV Follow the procedure...

Page 113: ...WKH SULQWHU SUHYHQWLQJ RX IURP RSHQLQJ WKHP RRN IRU WKH MDPPHG SDSHU VHTXHQWLDOO VWDUWLQJ ZLWK WKH ORZHVW WUD 2 Remove all jammed and or creased paper from the tray 3 Pull the jammed paper out careful...

Page 114: ...6HS RPSXSULQW 3DJH0DVWHU F 8VHU XLGH OHDULQJ 3DSHU DPV 5 Close the front cover 6 Close all open paper trays...

Page 115: ...KLV KDSWHU About this Chapter on page 5 2 Consumables Overview on page 5 2 Toner Cartridges on page 5 4 Drum Cartridge on page 5 8 Transfer Roller Cartridge on page 5 13 Fuser Unit on page 5 16 Paper...

Page 116: ...age confirm that you have a replacement toner cartridge available Replace toner cartridges as soon as the message prompting you to do so appears The printer stops operating if you do not replace the t...

Page 117: ...he transfer roller cartridge as soon as the message prompting you to do so appears The printer stops operating if you do not replace the transfer roller cartridge when required 127 RU PRUH LQIRUPDWLRQ...

Page 118: ...inting about 6 000 A4 sheets at the default print density with 5 coverage per color DQGOLQJ 3UHFDXWLRQV Never use a vacuum cleaner to clean toner Static electricity could build up and damage sen sors...

Page 119: ...s and dispose of them as non burnable waste 6WRUDJH 3UHFDXWLRQV Store toner cartridges away from direct sunlight under the following conditions Ambient temperature range 0 to 35 C Humidity range 15 to...

Page 120: ...ridge that you want to replace and pull them up 3 Pull out the toner cartridge 127 3XW WKH WRQHU FDUWULGJH RQ D SLHFH RI SDSHU WR SUHYHQW WRQHU IURP VWDLQLQJ WKH IORRU RU IXUQLWXUH 4 Select the new to...

Page 121: ...imes as illustrated to distribute the toner evenly 6 Align the toner cartridge with the corresponding insertion point in the printer and insert it as illustrated 7 Grip the levers at each end of the t...

Page 122: ...acing the drum cartridge UXP DUWULGJH DQGOLQJ 3UHFDXWLRQV The drum cartridge consists of a light sensitive drum a developer and a transfer roller The drum cartridge is capable of printing about 30 000...

Page 123: ...tridge and deteriorate print quality Avoid tilting or shaking the drum cartridge when removing it as toner may spill inside the printer and cause damage To ensure good print quality keep the drum cart...

Page 124: ...XSULQW 3DJH0DVWHU F 8VHU XLGH UXP DUWULGJH 1 Push up button A and fully open the front cover 2 Open the paper outlet cover 3 Grip the handle on top of the drum cartridge and gently lift it out of the...

Page 125: ...of its package and pull hard on each the 8 seals to remove them Pull the seals completely out 127 HHS WKH DOXPLQXP SDFNDJH RI WKH GUXP FDUWULGJH LQ FDVH RX QHHG WR WUDQVSRUW WKH SULQWHU RYHU ORQJ GLV...

Page 126: ...FWLYH VKHHW GHWHULRUDWHV SULQW TXDOLW 5HPRYH WKH SURWHFWLYH VKHHW ZLWK WKH GUXP FDUWULGJH LQ D KRUL RQWDO SRVLWLRQ 7 Hold the drum cartridge by the handle align its 4 shafts with the slots indicated b...

Page 127: ...H DYHUDJH QXPEHU RI SDJHV LQGLFDWHG DERYH LV DFWXDOO SULQWHG DQGOLQJ 3UHFDXWLRQV Avoid removing the transfer roller cartridge before it is time to replace it Replace the transfer roller as soon as the...

Page 128: ...nside the printer and cause damage Do not remove the transfer roller from the printer before it is time to replace it as toner may spill inside the printer and cause damage 5HSODFLQJ WKH 7UDQVIHU 5ROO...

Page 129: ...ently lift the cartridge out of the printer 127 LIW WKH UROOHU FDUHIXOO WR SUHYHQW ZDVWH WRQHU IURP VSLOOLQJ RXW 3 Unpack a new transfer roller cartridge and insert the stubs on both ends of the trans...

Page 130: ...Q WXUQ WKH SULQWHU RII IRU DW OHDVW PLQXWHV EHIRUH UHSODFLQJ WKH IXVHU XQLW 87 21 7R SUHYHQW EXUQV QHYHU WRXFK WKH DUHD PDUNHG 87 21 27 IXVHU DUHD 7R DYRLG LQMXU RU EXUQV GR QRW XVH H FHVVLYH IRUFH WR...

Page 131: ...6HS RPSXSULQW 3DJH0DVWHU F 8VHU XLGH XVHU 8QLW 1 Push up button A and fully open the front cover 2 Open the paper outlet cover 1 1 2...

Page 132: ...6HS RPSXSULQW 3DJH0DVWHU F 8VHU XLGH XVHU 8QLW 3 Close the front cover 4 Press button B and open the upper part of the front cover 5 Move the slide switches at both ends of the fuser unit forward...

Page 133: ...vers at both ends of the fuser unit 7 Grip the levers and gently lift the fuser unit out of the printer 8 Unpack a new fuser unit lift up the levers at both ends grip the fuser unit by the levers alig...

Page 134: ...3DJH0DVWHU F 8VHU XLGH XVHU 8QLW 9 Completely push down the levers at both ends of the fuser unit 10 Move the slide switches at both ends of the fuser unit all the way to the back 11 Close the paper...

Page 135: ...bes the procedure for replacing the paper feed roller 5HSODFLQJ WKH 3DSHU HHG 5ROOHU Follow the procedure below to replace the paper feed roller 87 21 7R SUHYHQW HOHFWULF VKRFN DOZD V WXUQ RII WKH SUL...

Page 136: ...XLGH 3DSHU HHG 5ROOHU 1 Pull the paper tray out of the printer until it stops 2 Hold the tray with both hands lift the front slightly and remove it from the printer 3 Push the tabs of the paper feed...

Page 137: ...e clip at the end of the paper feed roller and remove the paper feed roller 5 Align the new paper feed roller axis with the shaft in the paper tray as illustrated and slide the shaft through the rolle...

Page 138: ...HU F 8VHU XLGH 3DSHU HHG 5ROOHU 6 Close the paper feed roller cover 7 Hold the paper tray with both hands align it with the opening in the printer and gently insert it 8 Push the paper tray completely...

Page 139: ...6HS RPSXSULQW 3DJH0DVWHU F 8VHU XLGH 3DSHU HHG 5ROOHU 127 R QRW XVH H FHVVLYH IRUFH RQ WKH SDSHU WUD...

Page 140: ...6HS RPSXSULQW 3DJH0DVWHU F 8VHU XLGH 3DSHU HHG 5ROOHU...

Page 141: ...6HS KDSWHU 2SWLRQV Q WKLV KDSWHU About this Chapter on page 6 2 Options Overview on page 6 2 High Capacity Feeder 2 Shelves on page 6 2...

Page 142: ...JK DSDFLW HHGHU 6KHOYHV This option allows you to attach an additional 2 trays to the printer Each tray of the module holds up to 500 sheets of paper When installed the trays become the printer s tray...

Page 143: ...f the High Capacity Feeder until it stops 2 Hold the tray with both hands lift up the front slightly and remove it from the High Capac ity Feeder 87 21 7R SUHYHQW HOHFWULF VKRFN WXUQ RII WKH SULQWHU E...

Page 144: ...e from the cardboard spacer in the tray and remove the spacer 127 HHS WKH VSDFHU LQ FDVH RX QHHG WR WUDQVSRUW WKH SULQWHU RYHU ORQJ GLVWDQFHV LQ WKH IXWXUH 4 Remove the lower tray from the High Capaci...

Page 145: ...pacity Feeder 87 21 DLOXUH WR ORFN GRZQ WKH EUDNHV FDQ FDXVH WKH SULQWHU WR PRYH XQH SHFWHGO UHVXOW LQJ LQ LQMXU 87 21 HFDXVH WKH SULQWHU ZHLJKV OEV NJ IXOO DVVHPEOHG PDNH VXUH WKDW DW OHDVW WZR SHRSO...

Page 146: ...UHIXO QRW WR SLQFK RXU ILQJHUV ZKHQ ORZHULQJ WKH SULQWHU RQWR WKH LJK DSDFLW HHGHU VKHOYHV 7 Pull the printer s paper tray out until it stops 8 Hold the tray with both hands lift the front slightly an...

Page 147: ...t the 4 screws provided into the 4 holes inside the printer and tighten them with a coin to secure the printer to the High Capacity Feeder 2 shelves 127 0DNH VXUH WKH VFUHZV DUH ILUPO WLJKWHQHG 11 Ins...

Page 148: ...WKH VDPH PDQQHU 12 Insert the High Capacity Feeder s lower paper tray in to the High Capacity Feeder 2 shelves 13 Push the paper tray until it stops 127 R QRW XVH H FHVVLYH IRUFH RQ WKH SDSHU WUD 14...

Page 149: ...ter s paper tray out until it stops 2 Hold the tray with both hands lift the front slightly and remove it from the printer 87 21 7R SUHYHQW HOHFWULF VKRFN WXUQ RII WKH SULQWHU EHIRUH GLVFRQQHFWLQJ RSW...

Page 150: ...VHU XLGH LJK DSDFLW HHGHU 6KHOYHV 3 Remove the tray cover from the printer 4 Using a coin remove the 4 screws inside the printer 5 Hold the paper tray with both hands align it with the opening in the...

Page 151: ...DFLW HHGHU 6KHOYHV 6 Push the paper tray completely back into the printer 127 R QRW XVH H FHVVLYH IRUFH RQ WKH SDSHU WUD 7 Replace the printer s tray cover 8 Gently lift the printer off the High Capac...

Page 152: ...PDNH VXUH WKDW DW OHDVW WZR SHRSOH FDUU LW 7R OLIW WKH SULQWHU IDFH WKH IURQW DQG EDFN RI WKH SULQWHU DQG JULS WKH UHFHVVHG DUHDV DW WKH ERW WRP OHIW DQG ULJKW ZLWK ERWK KDQGV 1HYHU WU WR OLIW WKH SUL...

Page 153: ...on page 7 2 Navigating the Control Panel Menus on page 7 5 Menu Structure on page 7 7 Paper Menu on page 7 9 Interface Menu on page 7 12 PS Menu on page 7 15 PCL Menu on page 7 16 System Menu on page...

Page 154: ...s the display indicators and pushbuttons that allow you to view and change the printer settings The figure below shows the control panel features LJXUH RQWURO 3DQHO LVSOD The LCD display shows status...

Page 155: ...LED indicators 2 25 1 2 1 21 1 1 1 UHHQ 3ULQWHU LV 127 5 3ULQWHU LV 5 1 UHHQ 3ULQWHU LV 3ULQWHU LV 7 9 SURFHVVLQJ D MRE 3ULQWHU LV 7 1 D SDUWLDO MRE KDV EHHQ SULQWHG DQG WKH SULQWHU LV ZDLWLQJ IRU DG...

Page 156: ...QWHU RU WR H LW WKH PHQX V VWHP 0 18 3XVK WKLV EXWWRQ WR HQWHU WKH PHQX V VWHP 1 7 3XVK WKLV EXWWRQ WR PRYH WR WKH QH W PHQX VXEPHQX RU VHWWLQJ ZLWKLQ WKH VDPH OHYHO RI WKH PHQX VWUXFWXUH 6 7 3XVK WKL...

Page 157: ...button If you press the NEXT button repeatedly the second line of the display cycles through the main menus in the following order Paper Menu Interface Menu PS Menu PCL Menu System Menu Quality Menu...

Page 158: ...button on the control panel 2 Press the NEXT button until the text Paper Menu is shown on the second line of the display 3 Press the SELECT button to enter the paper menu 4 Press the NEXT button until...

Page 159: ...6HWXS QWHUSUHWHU RUPDW 0RGH HOD 2XW ORVH 1HWZRUN 6HWXS QWHUSUHWHU RUPDW 1HWZRUN KDQQHO 1HWZRUN GGUHVV 3 GGUHVV 6XEQHW 0DVN HIDXOW 5RXWHU 3 DQQHU 3 1HWZDUH UDPH HOD 2XW ORVH 86 6HWXS QWHUSUHWHU RUPDW H...

Page 160: ...tion to the main menus listed above the printer also provides a status menu that allows you to view the current printer settings Push the STATUS button to enter the Status Menu 6WDWXV 0 0HGLD 6L H 0HG...

Page 161: ...86 WR LQFUHDVH RU GHFUHDVH WKH QXPEHU RI FRSLHV SULQWHG 3UHVV 6 7 WR VDYH WKLV VHWWLQJ XSOH 7KLV VXEPHQX DOORZV RX WR WXUQ WKH GXSOH SULQW IXQFWLRQ RQ RU RII 1RWH 7R SULQW DW GSL LQ GXSOH PRGH LW LV Q...

Page 162: ...KLFN 2WKHU 3UHVV 1 7 RU 35 9 286 WR VFUROO WKURXJK WKH OLVW RI DYDLODEOH VRXUFHV RI SDSHU 3UHVV 6 7 WR FKRRVH D WUD 3UHVV 1 7 RU 35 9 286 WR WRJJOH EHWZHHQ 0 6 DQG 0 7 3 3UHVV 6 7 WR FKRRVH HLWKHU 3UH...

Page 163: ...KDOI VSHHG LQ WKLV PRGH RZ RZ LJK 3UHVV 1 7 RU 35 9 286 WR WRJJOH EHWZHHQ 2 DQG 3UHVV 6 7 WR VDYH WKLV VHWWLQJ XWR 5HVL H 7KLV PHQX LV XVHG WR FDXVH WKH SULQWHU WR SULQW RQ SDSHU WKDW LV WKH FORVHVW L...

Page 164: ...interface settings 6XEPHQXV HIDXOW 6HWWLQJ YDLODEOH 6HWWLQJV 3URFHGXUH IRU KDQJLQJ 6HWWLQJ 3RUW 7KLV VXEPHQX DOORZV RX WR HQDEOH WKH W SH RI LQWHUIDFH 3DUDOOHO 2Q 1HWZRUN DUG 2Q 86 2Q 3DUDOOHO 2Q 2II...

Page 165: ...ORVH 2II QWHUSUHWHU XWR 6ZLWFK 3 3RVW6FULSW RUPDW 5DZ 1RUPDO LQDU 1HWZRUN KDQQHO 1HWZDUH 7 SSOH7DON 7 3 3 1HWZRUN GGUHVV 3 GGUHVV XVHU VSHFLILHG 6XEQHW 0DVN XVHU VSHFLILHG HIDXOW 5RXWHU XVHU VSHFLILH...

Page 166: ...2II QWHUSUHWHU XWR 6ZLWFK 3 3RVW6FULSW RUPDW 5DZ 1RUPDO LQDU HOD 2XW ORVH 2II 2Q 3UHVV 1 7 RU 35 9 286 WR VFUROO WKURXJK WKH 17 535 7 5 250 7 DQG 287 26 VXEPHQXV 3UHVV 6 7 WR FKRRVH D VXEPHQX 3UHVV 1...

Page 167: ...owing table to access and change the PostScript settings 6XEPHQXV HIDXOW 6HWWLQJ YDLODEOH 6HWWLQJV 3URFHGXUH IRU KDQJLQJ 6HWWLQJV 3ULQW 36 UURUV 7KLV VXEPHQX DOORZV RX WR FKRRVH WR HLWKHU SULQW RU QRW...

Page 168: ...ng table to access and change the PCL settings 6XEPHQXV HIDXOW 6HWWLQJ YDLODEOH 6HWWLQJV 3URFHGXUH IRU KDQJLQJ 6HWWLQJ 2ULHQWDWLRQ 7KLV VXEPHQX DOORZV RX WR FKRRVH WKH RULHQWDWLRQ RI WKH SDJH 3RUWUDLW...

Page 169: ...Q 21 DQG 2 3UHVV 6 7 WR VDYH WKLV VHWWLQJ LQHV 3HU 3DJH 7KLV VXEPHQX DOORZV RX WR FKDQJH WKH QXPEHU RI OLQHV SHU SDJH 3UHVV 1 7 RU 35 9 286 WR LQFUHDVH RU GHFUHDVH WKH OLQHV SHU SDJH 3UHVV 6 7 WR VDYH...

Page 170: ...HVV 1 7 RU 35 9 286 WR WRJJOH EHWZHHQ WKH 1250 DQG 3 1 VHWWLQJV 3UHVV 6 7 WR VDYH WKLV VHWWLQJ 3DUDPHWHU 9DOXHV 3DSHU 6RXUFH 0 3DSHU 6L H HFXWLYH 3DSHU 6RXUFH 0 7UD 7UD RSWLRQDO WUD 7UD RSWLRQDO WUD X...

Page 171: ...XWVFK HUPDQ WDOLDQR WDOLDQ VSDQRO 6SDQLVK 3UHVV 1 7 RU 35 9 286 WR VFUROO WKURXJK WKH DYDLODEOH ODQJXDJHV QJOLVK UHQFK UDQFDLV HUPDQ HXWVFK WDOLDQ WDOLDQR RU 6SDQLVK VSDQRO 3UHVV 6 7 WR FKRRVH DQG VHW...

Page 172: ...LV VHWWLQJ 7RQHU 2XW 7KLV VXEPHQX DOORZV RX WR VSHFLI ZKHWKHU WKH SULQWHU VKRXOG VWRS RU FRQWLQXH ZKHQ RXW RI WRQHU 6WRS 6WRS RQWLQXH 3UHVV 1 7 RU 35 9 286 WR WRJJOH EHWZHHQ 6723 DQG 217 18 3UHVV 6 7...

Page 173: ...owing table to access and change the system settings 6XEPHQXV HIDXOW 6HWWLQJ YDLODEOH 6HWWLQJV 3URFHGXUH IRU KDQJLQJ 6HWWLQJ 5HVROXWLRQ 7KLV VXEPHQX DOORZV RX WR VHW WKH UHVROXWLRQ GSL GSL GSL GSL 3UH...

Page 174: ...he control panel 2 Press the NEXT button until the text Color Menu is shown on the second line of the display 3 Press the SELECT button to enter the system menu 4 Press the NEXT button to move through...

Page 175: ...FRORU VHWWLQJV HSHQGLQJ RQ WKH W SH RI SULQWLQJ RX GR WKLV VHWWLQJ VKRXOG EH VHW WR DQ DSSURSULDWH YDOXH 3KRWRJUDSKLF 3KRWRJUDSKLF 7KLV VHWWLQJ ZLOO SULQW WKH PRVW UHDOLVWLF SKRWRJUDSKLF LPDJHV 3UHVHQ...

Page 176: ...EH GLIIHUHQW WKDQ ZKDW RX VHH RQ RXU VFUHHQ 2Q LWK WKLV VHWWLQJ VHW WR 2Q WKH 5 FRORUV DUH SURFHVVHG E WKH SULQWHU V LQWHUQDO RORU 0DWFKLQJ V VWHP EHIRUH EHLQJ SODFHG RQ WKH SDJH 7KH 5HQGHULQJ QWHQW P...

Page 177: ...RU 9 GMXVW WR DGMXVW HOORZ LQN YHUWLFDO DOLJQPHQW IRU RU GSL UHVROXWLRQV 9 GMXVW RU 9 GMXVW WR DGMXVW F DQ LQN YHUWLFDO DOLJQPHQW IRU RU GSL UHVROXWLRQV 0 GMXVW WR DGMXVW PDJHQWD LQN KRUL RQWDO DOLJQ...

Page 178: ...DQG XVDJH LQVWUXFWLRQV The FLASH Menu provides access to the printer settings that are related to the optional FLASH DIMM Use the following procedure to enter the FLASH Menu 1 Press the MENU button o...

Page 179: ...Format Disk and Disk Summary 5 Press the SELECT button to enter a submenu 6XEPHQXV 3URFHGXUH IRU KDQJLQJ 6HWWLQJ 3ULQW 7KLV VHOHFWLRQ ZLOO UHDG WKH VHOHFWHG ILOH IURP 6 DQG SULQW LW DV LI LW ZHUH EHL...

Page 180: ...O GHOHWH WKH VHOHFWHG GLVN ILOH RU GLUHFWRU IURP WKH KDUG GLVN 7R GHOHWH DQ HQWLUH GLUHFWRU RX PXVW ILUVW GHOHWH DOO WKH ILOHV ZLWKLQ WKDW GLUHFWRU 3UHVV 1 7 RU 35 9 286 WR VFUROO WKURXJK WKH ILOHV 3U...

Page 181: ...8VLQJ 5 0 00V 6 00 DQG 3RZHU RQ LOHV Q WKLV KDSWHU About this Chapter on page 8 2 Installing DRAM Memory DIMMS on page 8 2 Installing a FLASH DIMM Module on page 8 5 Using the Power On Files Feature o...

Page 182: ...s the procedures for installation of DRAM memory DIMMs and FLASH DIMM modules Downloading software to the FLASH DIMM module is also discussed in this chapter QVWDOOLQJ 5 0 0HPRU 006 1 Ensure that the...

Page 183: ...e until loose and gently pull con troller assembly towards you to remove from printer 4 Carefully insert a DRAM DIMM which is compatible with your printer into any available DRAM DIMM slot as shown be...

Page 184: ...WDOOLQJ 5 0 0HPRU 006 5 Reinstall the controller assembly Once firmly in place push and hand tighten the thumb screws in a clockwise direction 6 Connect the power cord to the wall outlet 7 Turn the pr...

Page 185: ...6 00 0RGXOH 1 Ensure that the printer power switch is set to the OFF O position 2 Disconnect the power cord from the wall outlet 3 Turn thumbscrews on controller assembly counterclockwise until loose...

Page 186: ...When properly seated gently push down on the DIMM until the white braces close onto the ends of the DIMM 127 7R UHPRYH WKH 6 00 SXOO WKH ZKLWH EUDFHV DZD IURP WKH HQGV RI WKH 00 XQWLO WKH 00 VQDSV RXW...

Page 187: ...page 7 23 and DISK Menu on page 7 24 Power on files can contain either PCL or PostScript language content Examples of power on files include soft fonts and macro overlay definitions The FLASH DIMM can...

Page 188: ...6HS RPSXSULQW 3DJH0DVWHU F 8VHU XLGH 8VLQJ WKH 3RZHU 2Q LOHV HDWXUH Contact the technical support team at your point of purchase for additional information regarding loading and using power on files...

Page 189: ...6HS RPSXSULQW 3DJH0DVWHU F 8VHU XLGH 8VLQJ WKH 3RZHU 2Q LOHV HDWXUH...

Page 190: ...6HS RPSXSULQW 3DJH0DVWHU F 8VHU XLGH 8VLQJ WKH 3RZHU 2Q LOHV HDWXUH...

Page 191: ...6HS SSHQGL 6DIHW 1RWHV DQG 5HJXODWRU RPSOLDQFH Q WKLV KDSWHU About this Appendix on page A 2 Safety Notes on page A 2 Regulatory Compliance on page A 2...

Page 192: ...printer and contact your point of purchase The fuser becomes very hot in normal operation If a paper jam has occurred turn the power off and wait at least 10 minutes before removing the drum cartridge...

Page 193: ...d must be 10 feet 3 meters or less This equipment generates uses and can radiate radio frequency energy If the equipment is not installed and used in accordance with the instructions it may cause harm...

Page 194: ...6HS RPSXSULQW 3DJH0DVWHU F 8VHU XLGH 5HJXODWRU RPSOLDQFH...

Page 195: ...6HS SSHQGL 3ULQWLQJ RQW 6XPPDULHV Q WKLV KDSWHU About this Appendix on page B 2 Printing a Font Summary on page B 2 PostScript Font Summary on page B 3 PCL Font Summary on page B 7...

Page 196: ...steps 1 From the Ready status press MENU the control panel display will read Menu Paper Menu 2 Press PREVIOUS or NEXT until the display reads Menu Functions 3 Press SELECT the display will read Functi...

Page 197: ...6HS RPSXSULQW 3DJH0DVWHU F 8VHU XLGH 3RVW6FULSW RQW 6XPPDU 3RVW6FULSW RQW 6XPPDU...

Page 198: ...6HS RPSXSULQW 3DJH0DVWHU F 8VHU XLGH 3RVW6FULSW RQW 6XPPDU FRQW G 3RVW6FULSW RQW 6XPPDU FRQW G...

Page 199: ...6HS RPSXSULQW 3DJH0DVWHU F 8VHU XLGH 3RVW6FULSW RQW 6XPPDU FRQW G 3RVW6FULSW RQW 6XPPDU FRQW G...

Page 200: ...6HS RPSXSULQW 3DJH0DVWHU F 8VHU XLGH 3RVW6FULSW RQW 6XPPDU FRQW G 3RVW6FULSW RQW 6XPPDU FRQW G...

Page 201: ...6HS RPSXSULQW 3DJH0DVWHU F 8VHU XLGH 3RVW6FULSW RQW 6XPPDU FRQW G 3 RQW 6XPPDU...

Page 202: ...6HS RPSXSULQW 3DJH0DVWHU F 8VHU XLGH 3 RQW 6XPPDU FRQW G 3 RQW 6XPPDU FRQW G...

Page 203: ...6HS RPSXSULQW 3DJH0DVWHU F 8VHU XLGH 3 RQW 6XPPDU FRQW G...

Page 204: ...6HS RPSXSULQW 3DJH0DVWHU F 8VHU XLGH 3 RQW 6XPPDU FRQW G...

Page 205: ...6HS SSHQGL UHTXHQWO 8VHG WKHUQHW RPPDQGV Q WKLV KDSWHU About this Appendix on page C 2 Server Commands on page C 3 Protocol Commands on page C 6...

Page 206: ...the NIC is referred to as the Server Commands are divided into Server general Port and Protocol sections Within each sec tion commands are listed alphabetically Commands may require privileged user st...

Page 207: ...267 LSDGGUHVV 6SHFLILHV WKH 7 3 3 KRVW IURP ZKLFK WKH 6HUYHU UHTXHVWV LWV UXQ WLPH FRGH 1 6 59 5 2 1 3 66 25 6HWV D QHZ SDVVZRUG WKDW ZLOO EH UHTXLUHG EHIRUH LQFRPLQJ ORJLQV DUH DFFHSWHG RX ZLOO EH S...

Page 208: ...QDEOHG WKH 6HUYHU ZLOO QRW SURFHVV GDWD SDVVHG WKURXJK WKH VHUYLFH 7KLV FKDUDFWHULVWLF VKRXOG EH HQDEOHG ZKHQ SULQWLQJ 3 GDWD 2 VWULQJ DXVHV WKH 6HUYHU WR VHQG DQ HQG RI MRE VWULQJ WR WKH DWWDFKHG GHY...

Page 209: ...ORFDO VHUYLFHV VHUYLFH 5HPRYHV WKH GHILQLWLRQ RI WKH VSHFLILHG VHUYLFH 6 7 35 9 QWHUV SULYLOHJHG PRGH SURYLGHG WKH XVHU HQWHUV WKH SURSHU SULYLOHJHG SDVVZRUG ZKHQ SURPSWHG 6 2 _021 725 48 8 LVSOD V W...

Page 210: ...WLRQ DWWHPSWV 1 35272 7 RSWLRQ 1_ 6 QDEOHV RU LVDEOHV WKH 7 SURWRFRO IRU WKH 6HUYHU 1 35272 1 7 5 RSWLRQ 1_ 6 QDEOHV RU LVDEOHV WKH 1HW DUH 3 SURWRFRO IRU WKH 6HUYHU 6 217 7 VWULQJ RQILJXUHV WKH 1HW D...

Page 211: ...HU RQ SDJH 385 35272 1 7 5 66 RSWLRQ 5HPRYHV DOO HQWULHV IURP WKH 1HW DUH DFFHVV OLVW VHUYHU 5HPRYHV HQWULHV IURP WKH 1HW DUH DFFHVV OLVW WKDW DUH UHODWHG WR WKH VSHFLILHG ILOH VHUYHU 6 2 _021 725 SUR...

Page 212: ...6HS RPSXSULQW 3DJH0DVWHU F 8VHU XLGH 3URWRFRO RPPDQGV...

Reviews: