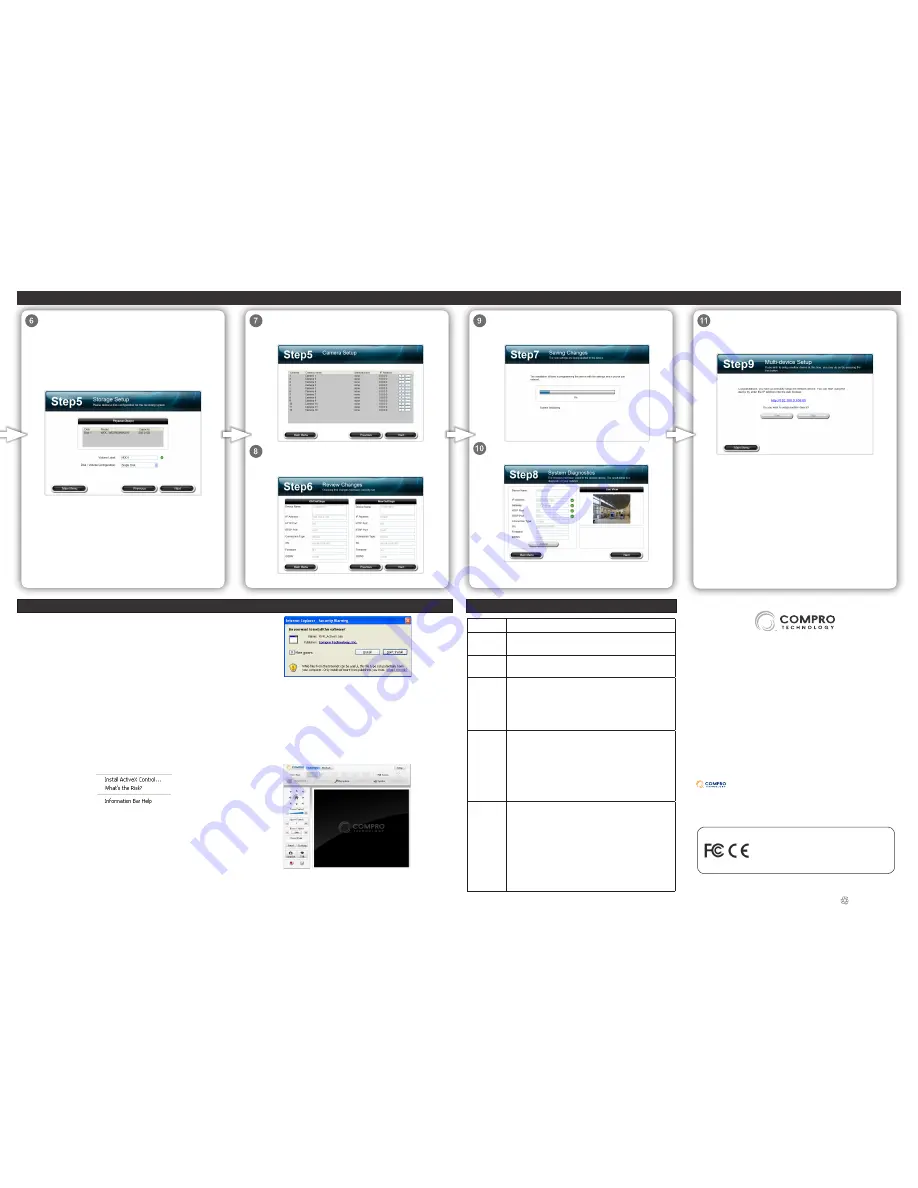
Set up your camera channels by clicking the plus sign icon
to launch Camera setup wizard. Click the minus sign icon to
remove a camera from the list.
Here it displays the old and new settings. When ready, click
[Next] to continue. Click [Previous] if you wish to change
settings you've made so far.
Select your volume configuration and enter the volume
name. You can also choose to create a RAID-0, RAID-1, or
JBOD disk volume provided that you have installed more
than one hard disk drive. When ready, click [Next], and then a
confirmation dialog box appears. Click [Yes] to proceed. (The
volume will be formatted later). Choose "Unassign" for "volume
configuration" if you wish to set up your storage device later via
the web interface.
Note:
When creating a RAID-1 or RAID-0 disk volume, make
sure you use two individual disks of identical or similar capacity.
Otherwise, you won't be able to use all the available space on
your hard disk drive (that has more capacity than the other one).
The iWizard will load the new settings into your device.
Please wait patiently and DO NOT interrupt the process. (The
disk formatting process may take a while).
The iWizard runs system diagnosis based on your network
settings and will alert you for inappropriate settings.
You can click the link on the screen to directly access your
device on your web browser. If you want to set up another
device from scratch, click [Yes]. Click [No] to proceed with the
next step to install ComproView.
Compro Technical Support Information
Before you request technical support, please check the troubleshooting
section in the user manual. You may fill out the online form (www.
comprousa.com/feedback/) or directly email to [email protected].
Compro Technology, Inc.
www.comprosecurity.com | Tel. +886 2 2918 0169 | Fax +886 2 2915 2389
3F, No.12, Alley 6, Lane 45, Pao Shin Road, Hsintien District, New Taipei City
231, Taiwan, R.O.C.
© 2011 Compro Technology, Inc. All rights reserved.
No part of this document may be copied or reproduced in any form or by
any means without the prior written consent of Compro Technology, Inc.
Compro Technology reserves the right to make revisions to this publication
without obligation to notify any person or entity of any such changes.
Compro Technology is the registered logo of Compro
Technology, Inc. All other company and product names mentioned in this
document are registered trademarks of the respective companies.
P/N: 3GA0310716
This device complies with Part 15 of the FCC Rules.
Operation is subject to the following two conditions:
(1) This device may not cause harmful interference, and
(2) This device must accept any interference received,
including interference that may cause undesired operation.
Accessing the NVR via Internet Explorer
Now you can log in to your NVR on Internet Explorer. To do so, first you
need to know the current IP address of your NVR, assuming the NVR
and your PC have been connected to your LAN network or the Internet.
Compro recommends using the iWizard tool to scan for your NVR on
the network. The IP address is revealed in the search result.
Having determined the NVR’s IP address, you may now:
1. Open the Internet Explorer on your Windows system.
2. Enter the NVR's IP address in the address bar. (e.g. 192.168.0.100)
3. An "Enter Network Password" window that requests the user name
and password will appear; enter your user name and password (both
are "admin" by default) and hit OK.’
4. After valid user name and password are entered, Internet Explorer
will prompt the installation of NVR software from 'Compro
Technology, Inc.’
5. Click on the warning message and choose to install the ActiveX.
6. And then the reconfirmation dialog will appear on the screen. Please
press [Install] to install the program.
7. Meanwhile, the Windows Security Alert dialog box may pop up.
Please click [Unblock] to unblock it from firewall.
8. Afterwards, Internet Explorer may pop up a Security Warning dialog
box asking "Do you want to run this ActiveX control." Please hit [Run]
twice to run both the "Compro NVR LiveView ActiveX" and "Compro
NVR Remote Playback ActiveX."
9. Now you have successfully logged in and can start monitoring and
managing your NVR on the Internet Explorer.
LED
Indication
Power
(Green)
•
Green
– NVR is powered on.
LAN 1
(Not used)
•
N/A
LAN 2
(Green/
Red)
•
Green
– Successfully obtained IP address via DHCP
mode.
•
Red
– NVR is unable to obtain IP address; when using
static IP or PPPoE, it indicates a failure in network
connection test.
USB
(Green/
Red)
•
Green
– Successfully mounted a USB storage device;
this indicator starts blinking when the NVR is backing
up data; when data backup completes, the indicator
goes off.
•
Red
– Failed to mount a USB storage device; Data
backup failed (due to insufficient disk space or
otherwise).
HDD A/B
(Green/
Red/Blue)
Link / ERR:
•
Green
– HDD is installed and mounted successfully.
•
Red
– HDD is installed but unsuccessfully mounted
(possiblly caused by an unformatted disk or
unsupported disk format).
Act:
•
Blue
– This indicator flashes in blue when the HDD is
being accessed.
LED Status Indicators
Initial Software Setup


