Getting Started
Thank you for purchasing the Compaq iPAQ Connection Point CP-2E. The
Connection Point is designed to easily connect your PC's to the Internet and
each other using fast Ethernet technology. You can share a single Cable or DSL
Internet connection throughout your home or small office. You may also share
files, printers, music, images and play head-to-head games while protected
behind the Connection Point's built-in firewall.
This Quick Setup Guide will lead you through initial installation and setup of
your Connection Point. The guide assumes you will be installing Connection
Point between your Cable or DSL Modem and a PC with an Ethernet adapter.
Please ensure you have the following before continuing with this Guide:
>
External Cable or DSL Modem with an RJ45 Ethernet port
>
Ethernet Adapter properly installed in your PC
>
CD Drive on your PC
>
Microsoft Windows 98 or higher
>
Web Browser: Internet Explorer 4.0 or higher, Netscape Navigator 6.0 or
higher or MSN Explorer
Connection Point items:
>
iPAQ Connection Point CP-2E
>
Power Adapter
>
10 ft Ethernet Cable
>
Utility CD including User Guide
>
Limited Warranty Information
Note:
If you are running Internet sharing software on this PC, it must be
removed now in order for Connection Point to operate properly.
Consult your Internet connection sharing software's documentation
for removal.
Hardware Installation
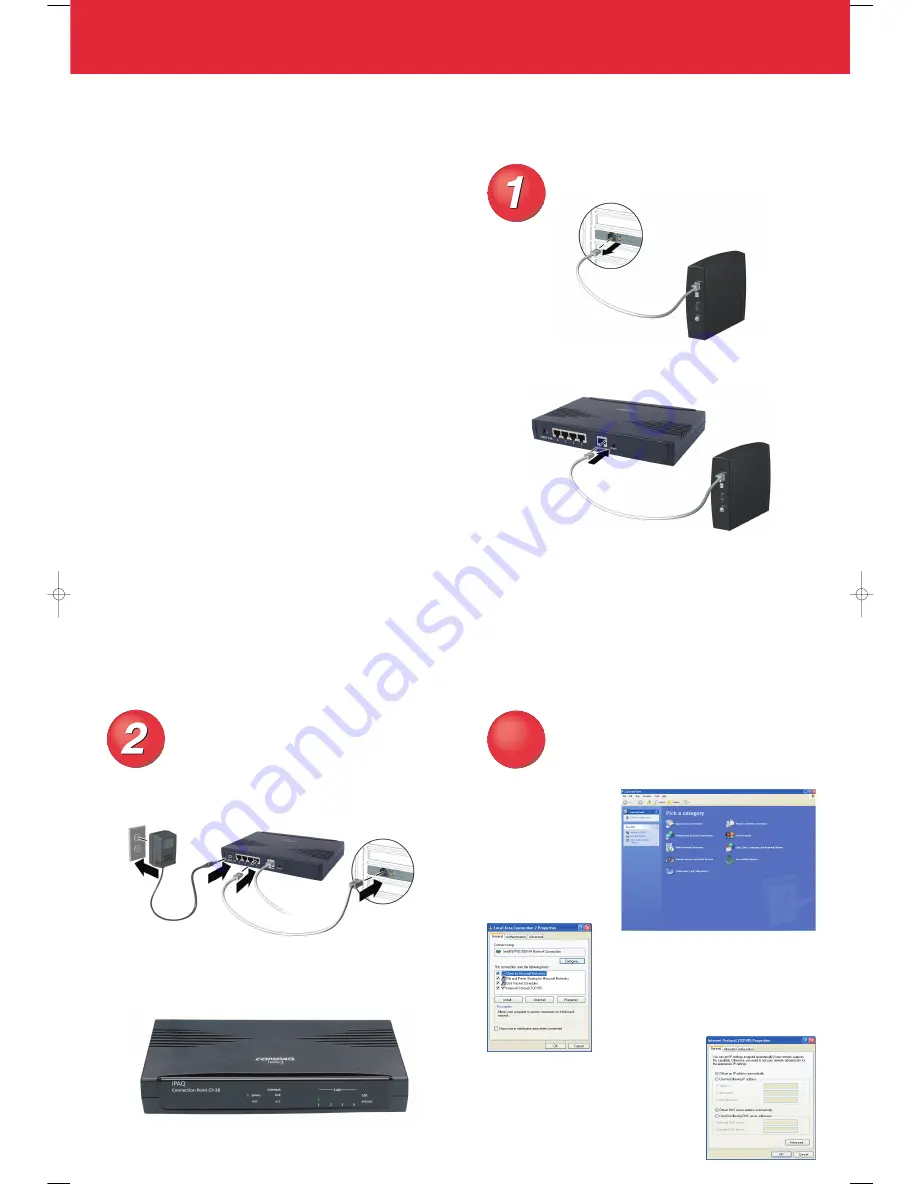
Install Hardware
Power down Cable or DSL modem. Disconnect existing
Ethernet cable from PC.
Connect to the CP-2E port labeled "Internet".
Power on Cable or DSL Modem.
Cable or
DSL modem
Hardware Installation
Install Hardware
Connect one end of the supplied Ethernet cable to
the CP-2E port labeled "1" and the other end to the
existing Ethernet port on your PC.
Plug in Connection Point power adapter.
The Power LED and LAN 1 Link light on the front panel should turn on
immediately. Other LED's may turn on as well.
PC Client Setup
Windows XP Setup
3a
3a
Windows XP automatically configures itself to connect to
CP-2E. If you are having problems connecting to the network,
verify the client setup by following the steps below:
From the taskbar, select
Start > Control Panel
. Double-click
the
Network Connections
icon. Double-click the icon for the
individual connection you wish to configure. Click
Properties
.
Select
Internet Protocol
(TCP/IP)
from the list.
Components checked are
used by this connection.
Click Properties
.
Click the
Obtain an IP address automatically
radio button. Click the
Obtain DNS server
address automatically
radio button. Click
OK
.
The Network Connection Properties window
is displayed. Click OK.
287446-001QSU Paladin.qxd 4/17/2002 3:50 PM Page 1


