3-4
I
PAQ C
ONNECTION
P
OINT
I
NSTALLATION
I
PAQ C
ONNECTION
P
OINT
U
SER
G
UIDE
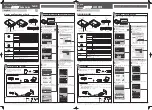
Using the Wall-Mount Bracket
To mount your iPAQ Connection Point on a wall, complete the
following steps:
1. Choose the location for mounting your iPAQ Connection
Point.
2. Attach the bracket to the wall using screws (not included) that
are appropriate for the type of wall. You should secure at least
one of the screws to a stud.
3. Snap the unit into the bracket, inserting the tab located near
the back of the unit first.
4. To remove the unit from the bracket, press the tab on the
underside of the bracket near the front of the unit, and lift the
unit off the bracket.
Location of the Unit
(continued)
Your iPAQ Connection
Point comes complete with
a wall-mount bracket, so
you can place the unit in
any out-of-the-way
location.
Summary of Contents for iPAQ Connection Point CP-1
Page 2: ......
Page 6: ...CONTENTS iv IPAQ CONNECTION POINT USER GUIDE ...
Page 30: ...3 6 IPAQ CONNECTION POINT INSTALLATION IPAQ CONNECTION POINT USER GUIDE ...
Page 34: ...4 4 NEED SOME HELP IPAQ CONNECTION POINT USER GUIDE ...
Page 38: ...5 4 TELECOM NETWORK APPROVALS IPAQ CONNECTION POINT USER GUIDE ...
Page 48: ...GLOSSARY 10 IPAQ CONNECTION POINT USER GUIDE ...


