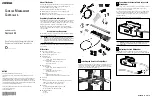


10000 Series Rack
To accommodate the double doors of a 106XX rack, unbolt the locking
mechanism from the crossbar and reposition in the left hole pair as shown
1
. (For the 9000 series rack, use the right hole pair.)
Align the standard brackets (257664-001) on the rear door lock assembly
and secure with the screws. Position the rear door lock assembly as shown.
Insert the self-tapping screws
3
to secure the rear door lock mechanism
2
to the rack.
Installing the Rear Door Lock Latch
Align the latch with the lock mechanism. For 91XX and 9842 series
racks, use latch assembly (257663-002). For 106XX series racks, use latch
assembly 257663-003. Insert the screws with the backing plate
1
through
the holes in the rear door of the rack. On the inside of the door, place the
rear door lock latch
2
over the screws, securing with the hardware
provided in this assembly
3
.
Connecting to the CMC
Power off the CMC, then connect the I
2
C cable from the CMC to one of the
I
2
C ports on the door lock control unit
1
. Connect the cable from the CMC
lock port 1 or 2, to the lock port on the door lock control unit. The cables can
be routed through the rack and then attached by using tie wraps.
91XX Series Rack with Extension Kit
Align the extension brackets (257664-002) on the rear door lock
mechanism and secure with the screws. Position the rear door lock
assembly as shown, so that the assembly extends towards the rear door.
Insert the self-tapping plate screws
2
to secure the rear door lock
mechanism
1
to the rack.
9842 Series Rack
Attach long spacers
1
to the rear rails using the cage nuts. Insert screws
4
and washers
3
to secure the door lock assembly
2
to the long spacers
1
.
9842 Series Rack - Front and Rear Doors Reversed
Insert the screws
1
to secure the short spacers
2
and the rear door lock
assembly
3
to the front rails as shown, using screws, washers and nuts
4
.
Installing the Front Door Lock Mechanism
Connect the front door lock assembly to the side of the front frame.
Installing the Front Door Lock Latch
Align the latch with the lock mechanism. Insert the screws with the
backing plate
1
through the holes in the front door of the rack. On the
inside of the door, place the front door lock latch
2
over the screws and
secure with the hardware provided with this assembly
3
. For 91XX and
106XX series racks, use latch assembly 257662-002. For the 9842 series
rack, use latch assembly 257662-003.
Installing the Rear Door Lock Mechanism
91XX Series Rack
Align the standard brackets (257664-001) on the rear door lock assembly
and secure with the screws. Position the rear door lock assembly as shown.
Insert the self-tapping screws
2
to secure the rear door lock mechanism
1
to the rack.
Set the address switch to 1 or 2 on the door lock control unit to match the
lock port that is connected to the CMC.
Connecting the Concealed Door
Release Cable
The concealed door release button
2
is designed to release the door locks
manually if this feature is activated in the Compaq Intelligent Rack
Manager Lite software. Connect the concealed door release cable
assembly
1
to the door lock control unit unlock port. Route the cable
through the rack and locate the push button
2
in a concealed location.
(This is a suggested location.)
Connecting the Power Cord
Connect the country-specific power cord to the socket on the door
lock control unit.
Continued on next page
4
1
2
3
6
7
8
10
5
1
2
2
2
2
1
1
3
4
1
4
3
2
1
1
2
2
3
4
4
3
3
2
1
1
1
3
2
9
1
2


