


Community ENTASYS Installation/Operation Manual — Page 22
ACCESSORIES
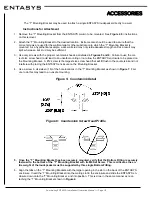
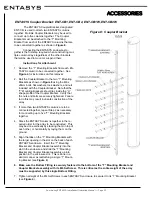
10. When the enclosure is in position, the eight M6 nuts between the Pan Bracket and the wall may be loosened
and the array rotated in the Pan Bracket to the final desired aiming position. Once the array is aimed as de-
sired, the eight M6 nuts must be securely tightened to keep the array in position and have a safe mounting.
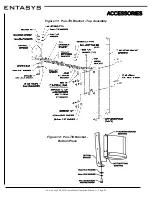
11. If multiple ENTASYS columns are to be mounted in an array with the Pan Bracket, first connect the individ-
ual T-Bar Mounting Brackets using the appropriate number of ENTASYS Coupler Brackets and perform Step
#6 by attaching the entire T-Bar Mounting Bracket and Pan Bracket assembly to the wall. Slide the individ-
ual ENTASYS enclosures down onto the T-Bar Mounting Bracket as described in Step #8, starting with the
lowermost enclosure.
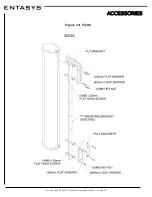
Make sure the Bottom Fitting is securely fastened to the bottom of the T-Bar
Mounting Bracket and Coupler Bracket assembly with its M6 Set Screw. This is critical as the entire
weight of the array must be supported by this single Bottom Fitting.
The upper enclosures will not rest
on the Bottom Fitting, but instead will rest on the ENTASYS enclosure directly below it.
Figure 9: Pan Bracket


