background image

860636329 

Instruction Sheet 


www.commscope.com 


Page 6 of 8 


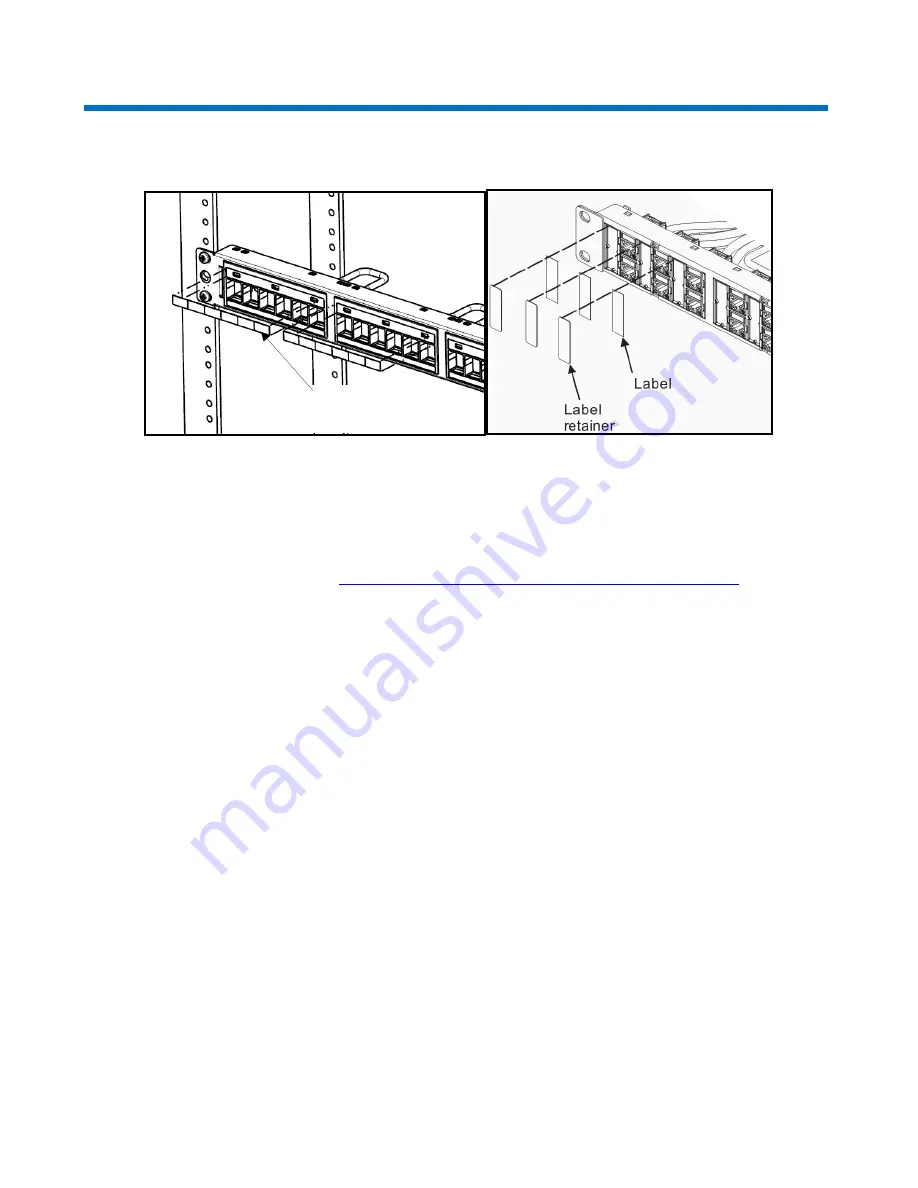
Step 4 – Attaching Information Labels 


1.  Enter information on the white information labels provided. Note that mounting surfaces should be cleaned 

prior to attaching labels. Remove protective backing from labels and attach as shown in figure 1. 

2.  Print port designations on label sheets provided. Insert labels and label retainers as shown in figure 2. 

3.  To print a designation label, go t

http://www.commscope.com/Resources/Labeling-Templates

 and scroll 

down to 

Panels

 and select the proper label template. 

Note: 

 Labeling website has two options for printing labels; letter size and A4 size. 


DDM  Information 

Label (4 places) 

Figure 1 

Figure 2 

Summary of Contents for CPP-UDDM-SL-1U-24

Page 1: ...le Panel SL STP 2U 48 port 760237048 CPPA SDDM SL 1U 24 CommScope Angled Discrete Distribution Module Panel SL STP 1U 24 port 760237049 CPPA SDDM SL 2U 48 CommScope Angled Discrete Distribution Module Panel SL STP 2U 48 port 760237050 CPPR SDDM SL 1U 24 CommScope Recessed Angled Discrete Distribution Module Panel SL STP 1U 24 port 760237051 CPPR SDDM SL 2U 48 CommScope Recessed Angled Discrete Dis...

Page 2: ...e Panel Cat 6A STP 1U 48 port Note sample product images shown below DDM Flat UTP Panel CPP UDDM SL 1U 24 DDM Angled Panel CPPA UDDM SL 1U 24 How to Contact Us To find out moreabout CommScope products visit us on the web at www commscope com For technical assistance Within the United States contact your local account representative or technical support at 1 800 344 0223 Outside the United States c...

Page 3: ... washer 1 1 1 1 1 1 Instruction sheet 4 8 4 8 Trough Cable Mgmt WARNING Important Safety Instructions When using this product the following basic safety precautions should be followed to reduce the risk of fire electric shock and injury to persons 1 Never install communications wiring in wet locations unless it is designed for wet locations 2 Never install this product during a lightning storm The...

Page 4: ...lation of Panel Step 1 Mount Panel to Rack 1 Mount panel to rack Step 2 Assemble and Install Rear Cable Manager 1 Attach cable bar as shown and insert four hook and loop straps to cable bar Slots on cable troughs Hook and loop straps Cable troughs installed Cable bar ...

Page 5: ...ute cabling as shown Note Secure cables using the hook and loop straps provided 3 For shielded panels only use one of two grounding lug connections provided on rear of panel and hex nut with lock washer to ground the panel per approved local practices For HD Angled Panel 760245361 use both ground lug connections provided on the rear of the panel and hex nut with lock washer to ground the panel per...

Page 6: ...ve backing from labels and attach as shown in figure 1 2 Print port designations on label sheets provided Insert labels and label retainers as shown in figure 2 3 To print a designation label go to http www commscope com Resources Labeling Templates and scroll down to Panels and select the proper label template Note Labeling website has two options for printing labels letter size and A4 size DDM I...

Page 7: ... 2 9mm dia max flat blade screwdriver into the slot above the jack and rotate to release the latch 2 Remove jack from rear of panel 3 Note cable management bar may need to be removed to enable access to the release slot on some jack positions 12 Port Jack Removal 6 Port Jack Removal M Series Jack Removal ...

Page 8: ...s the globe certified in accordance with international standards including ISO 9001 TL 9000 and ISO 14001 Further information regarding CommScope s commitment can be found at www commscope com About Us Corporate Responsibility and Sustainability 2 Contact information Visit our website or contact your local CommScope representative for more information For technical assistance customer service or t...

Reviews: