14
15
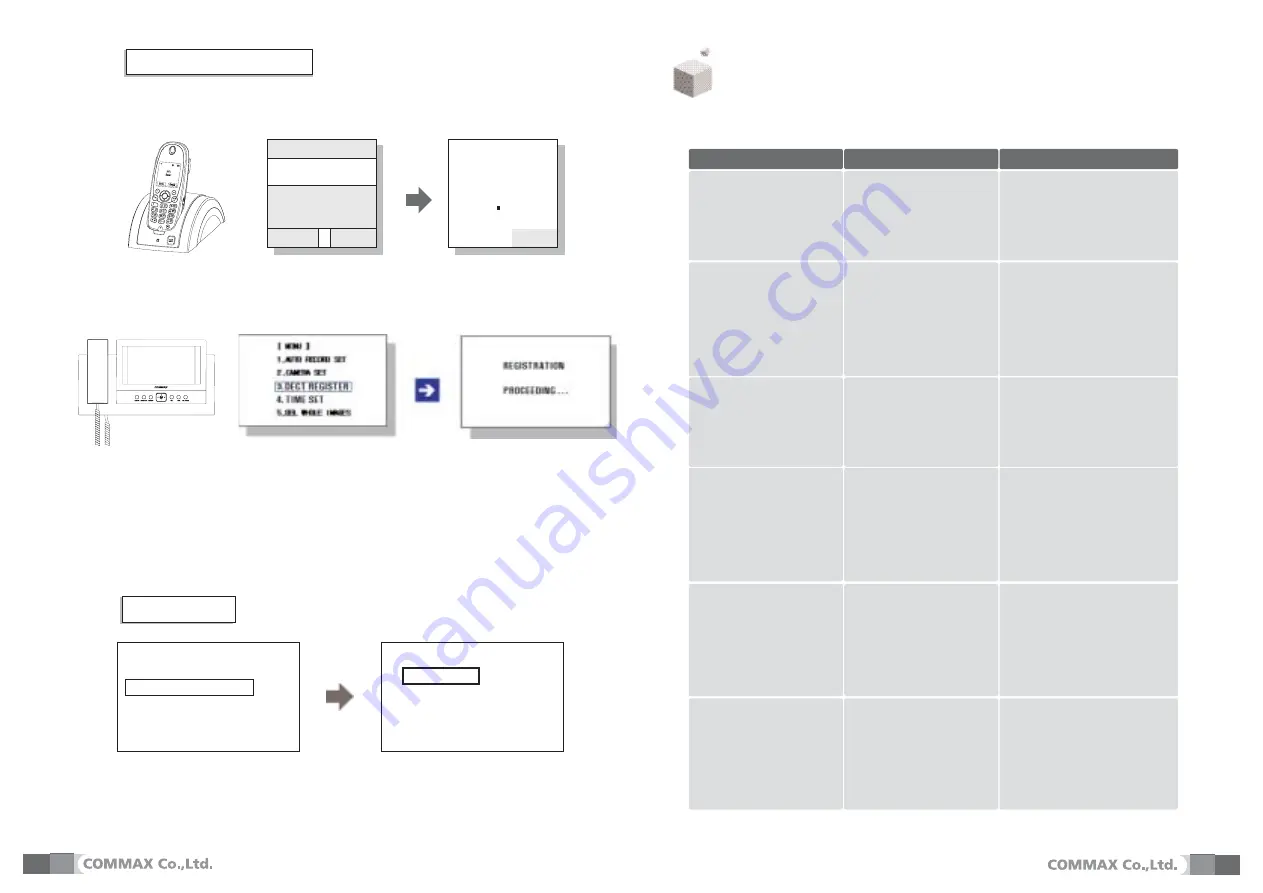
6. DECT Phone Registration
Registering...
Before usage of any wireless phone, each phone must be registered with
the DECT base unit.
Menu >> Handset Set >> Register >> Base # ID >> Enter PIN
(Personal Identification Number: 4-digits) then press the OK button.
The phone will then be registered in the body of the DECT base.
Next, program the registration mode from the body.
♠
Phone Successfully Registered
When the registration of a phone is complete, a
beep
will sound and the numbers
1-6 will appear. At this time, register any desired number 1-6 to the phone.
(*Any previously registered number will not appear on screen.)
One DECT base is capable of registering up to 6 wireless phones.
The registration may take anywhere from 60 seconds to process.
If the phone fails to register, wait 1 minute before trying to register it again.
By pressing the MENU button, choose
DECT Register
and press ENTER to register any phone.
Registering a Wireless Phone
Men
Base
Redia
Exit
7. Camera setup
♠
CDV-72BE is connectable up to 4 camera units.
Press [MENU]button
[MENU]
1. AUTO RECORD SE
2. CAMERA SET
3. DECT RESISTER
4. TIME SET
5. DEL WHOLE IMAGES
[CAMERA SETUP]
1. CAMERA 1 ENABLE
2. CAMERA 2 ENABLE
3. CAMERA 3 ENABLE
4. CAMERA 4 DISABLE
Select [CAMERA SET] menu using [UP
] / [DOWN
] buttons and press [ENT
] button
Set up the camera’ s status using [LEFT
]/[RIGHT
] buttons.
Press [ENT
] button and [MENU]button to go back to standby mode
The default vale is set to use all four cameras
+).& ,#))-$("
If you think that the product has trouble, please first check below contents before you ask a repair.
The power supply is
not on.
All works are stopped
Troubles
1.The power supply
code is missing or not.
2.The power supply switch
(down) is off or not.
Check Point
1. Please connect the
power supply cord
2. Please turn on the power
supply switch (down)
pushing to the right.
A Call operation is not
performed.
(Door, function)
1.The wiring between other
units is connected correctly
in good order or not.
2. The wiring is missing or not.
3. A Room id is set or not.
1. Please refer to connection
related page and manage.
2. Please connect correctly
to the terminal.
3. Please refer to Room id
setting related page.
The product does not
produce the sound.
(Call volume, Talk volume)
1. A sound volume lies
in minimum or not.
1. Please adjust the sound
volume properly turning
to the right, as you want.
The screen is dark.
The screen is strange.
1. There is a strong re-
flected light behind the
visitor or not.
2. The screen control is
adjusted correctly.
1. Please change the angle
of camera lens.
2. Please initialize the
screen control.
(Refer to setting related page)
We can see the visitor
image but no voice.
1. The connector on the
handset is properly
inserted to the product?
1.Please put the
connector properly again.
No stored image found
1. Auto recording is
assigned?
1.Please set the status of
“AUTO RECORD“
as “YES”
Actions


