background image

12

- When the function is active (red), the corresponding function is activated. (You can turn off it 

by click.) 

- CCTV1 is recorded in case of sensor 1 emergency, and CCTV2 is automatically recorded in case 

of sensor 2. 

(If there is no SD card, it will be replaced with steel cut image. If CCTV is not connected to the 

sensor, it will not be recorded.)

2) During Security mode :

  Indicates the security sensor being executed. 

  End the security function.   

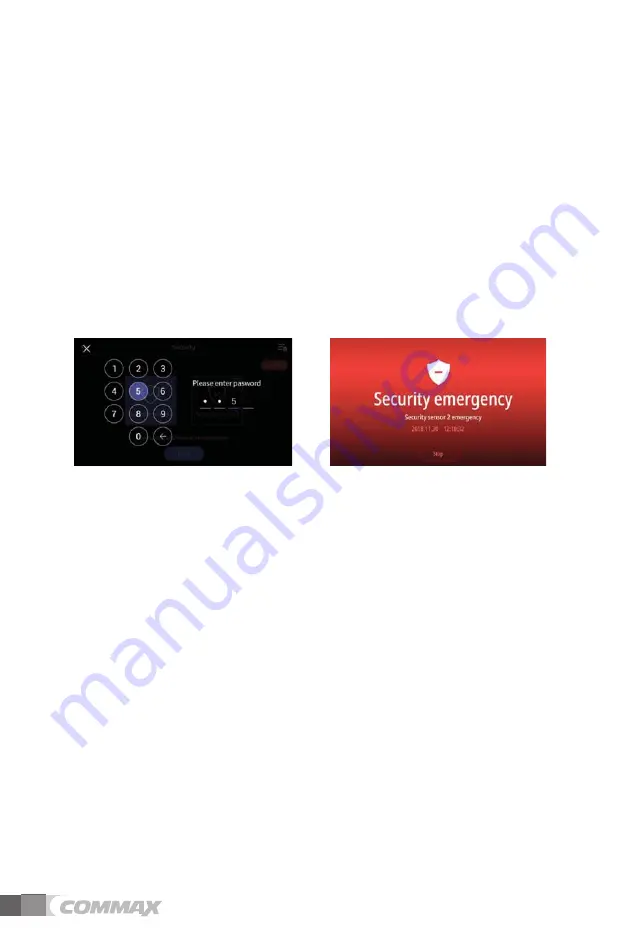
- Press the button and enter the four-digit password. (Factory default password: 1234) 

- If the password is correct, the mode is turned off and the screen returns to the main screen. 

(If the password is incorrect, you can not turn the mode and please progress initialization of 

the device.) 

<Password input screen to turn off the mode>      <Sensor detected screen during security mode> 

1)

 When security alarm occurs 

-  When a sensor is detected during security mode, an alarm is generated, and the sensor 
number(Sensor1 or Sensor2) and the time of occurrence are displayed. 

-  If the emergency situation is canceled, press 'Stop' button at the bottom. 

(You can turn off the alarm if the corresponding sensor is recovered to normal status.) 

- When the password input window appears, enter the four-digit password using the key 

buttons. 

- Alarm sound occurs for 3 minutes and then only alarm screen is displayed after then. 

(During the alarm occurs, the calling sound rings by the camera to indicate the 

emergency situation.) 

4-6 Option 

- When you touch option button, the below screen will be shown. 

- When you select each item, the corresponding sub item is displayed on the right.

- If you do not do any action for 30 seconds after you get in Option menu, the main screen will be 

shown. 

Summary of Contents for CDV-70QT

Page 1: ...sponsible for any safety accidents caused by abnormal operation of the product Thank you for purchasing COMMAX products Please carefully read this User s Guide in particular precautions for safety bef...

Page 2: ...ety before using a product and follow instructionsto use a product exactly Greetings 1 Table of contents 1 Greetings 1 2 Warnings and caution 2 4 3 Parts names 4 How to use the product 5 5 Using Smart...

Page 3: ...tric shock fire when using a damaged power cable Please don t handle the power cable with a wet hand It may cause an electric shock Please plug out the power cable from the socket when not using it fo...

Page 4: ...e power cable Please don t use any chemical products such as wax benzene alcohol or cleanser Please don t drop the product on the ground and don t apply a shock It may cause a failure Please use the d...

Page 5: ...4 3 Parts names No Parts No Parts No Parts 1 Touch LCD 2 Micro SD card slot 3 Speaker 4 Microphone 5 Power switch 6 Connection terminal...

Page 6: ...Interphone Move to Interphone menu 4 Playback Move to the list of recorded images and videos 5 Security Move to Security menu 6 Option Move to the menu Options 7 Mute Icon Indication of mute status 8...

Page 7: ...Videos In Motion detection mode Storage mode MANUAL AUTO SD card status Insertion Full memory Split screen view Split monitoring of door cameras is available It s not available to use if there is onl...

Page 8: ...cut image When you touch a button you can store images And the below icon will be shown during storage Calling of visitor When a visitor calls from entrance you can hear calling tone sound and the vis...

Page 9: ...be shown Monitoring time is max 60 seconds The video clip storage can be proceeded within 60 seconds You cannot use CCTV functions if cameras are not installed G CCTV sign To show the current working...

Page 10: ...ed in the monitor s embedded memory 1 Turn off the monitor and then insert SD card Turn on the monitor And then the images are automatically stored in SD card After a backup files will be automaticall...

Page 11: ...file Emergency Recording File saved when emergency occurs by sensors When Auto Rec is set in Security menu CCTV video is recorded for 10 secs when emergency occurs CCTV1 is automatically saved when s...

Page 12: ...ait a moment 3 6 Security Can be used with security sensor Touch the Security button to display the following screen Using this function the door is detected when the sensor is connected Before operat...

Page 13: ...to turn off the mode Sensor detected screen during security mode 1 When security alarm occurs When a sensor is detected during security mode an alarm is generated and the sensor number Sensor1 or Sen...

Page 14: ...method Select between Photo Video Sensing sensitivity To set sensitivity Select among High Middle Low Motion timer To set up the timer function activation Motion detection activation time Once activat...

Page 15: ...e password to connect Add Wi Fi derectly When the Wi Fi you want is not discovered you can add it entering the Wi Fi information directly to the list Select Add Wi Fi network icon at the top of Wi Fi...

Page 16: ...es about 1 minutes for initialization It can be different by types of SD card 2 Selection of deletion file To delete the saved images and videos The time required varies depending on the file size Cau...

Page 17: ...splay 1 Screen adjustment Brightness Luminosity Chroma adjustment is available as below picture In this case you can adjust the display of door camera The range for adjustment is 0 20 level There is a...

Page 18: ...detection function is activated this function does not work Open Frame Time You can set the usage time of the wallpaper frame function Night mode The brightness of the screen is minimized during the...

Page 19: ...e touch screen is deactivated for 30 seconds You cannot stop this function until it is finished 4 Display Set the brightness of the menu screen Etc 1 Language To select the languages 8 languages 2 Ope...

Page 20: ...s 10 or higher 2 FORMAT File system method FAT32 Boot the product after inserting a formatted Micro SD card at first use 3 Maximum storage capacity Maximum resolution of saved images videos 640x360 Wh...

Page 21: ...tton Select your country Enter Email Address ID and select Get Verification Code button Enter the Verification Code sent to you by email Set your password 2 Add Device Registration If Auto scan is not...

Page 22: ...of how to share the invitation code appears Select Messages In this case the invitation code will be sent via text message Invitees can share their device by entering the invitation code in Home Manag...

Page 23: ...installation use metal tube coaxial cable for wiring 2 Beware of wrinkling of line coating and cable stick outs as it may cause circuit shortage and operation inconvenience 3 When connecting a monito...

Page 24: ...screw 4EA Monitor fixing screw 1EA Connector 2P 6EA Connector 4P 3EA 8 Package contents When wiring Camera CCTV Interphone sensor please use the core provided in the package to wrap around as shown i...

Page 25: ...Calling 60 5sec Wiring Distance UTP CAT 5e Standard 0 5 Camera CCTV Interphone Household unit monitor 28 meters MAX Resistance under 10 per 100 meters on UTP Cat 5e Operating Temp 0 40 32 F 104 F 9 S...

Page 26: ...Printed In Korea 2021 08 104 513 11 Sangdaewon dong Jungwon gu Seongnam si Gyeonggi do Korea Int l Business Dept Tel 82 31 7393 540 550 Fax 82 31 745 2133 Web site www commax com Edited 2021 08 18...

Reviews: