background image

4

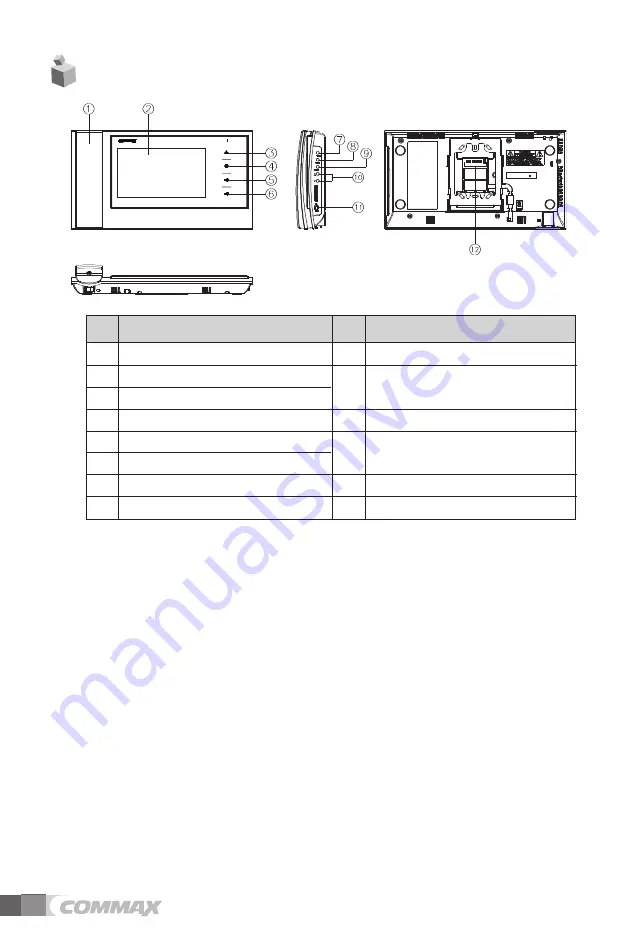
HANDSET 

MONITOR: The image of visitor is shown. 

MONITOR BUTTON(ENTRANCE) : Check the situation of entrance. 

INTERPHONE BUTTON : Call the interphone. 

DOOR RELEASE BUTTON : Release the door for visitor. 

2ND DOOR RELEASE BUTTON

RINGTONES VOLUME : Adjust the ringtones volume. 

MENU BUTTON 

To enter the menu for screen control, mute setting and product information.  

SELECT(SELECT BUTTON): Press to select an item from the menu. 

UP BUTTON : Move from the menu items to up and right.  

DOWN BUTTON : Move from the menu items to down and left. 

POWER SWITCH : Turn your device on and off. 

EXTERNAL CONNECTION TERMINAL : For product update and connection

between lobby and interphone. 

Description

1

HANDSET 

9

SELECT BUTTON

2

MONITOR

UP BUTTON(

) /

3 MONITOR BUTTON

DOWN BUTTON(

)

4 INTERPHONE BUTTON

11

POWER SWITCH

5 DOOR RELEASE BUTTON 

EXTERNAL CONNECTION 

6 2ND DOOR RELEASE BUTTON

TERMINAL

7 RINGTONES VOLUME
8 MENU BUTTON

No. Description

No.

2. Product Overview

10

12

www.safemag.ru

www.safemag.ru

Summary of Contents for CDV-70KR3

Page 1: ...ny safety accidents caused by abnormal operation of the product Thank you for purchasing COMMAX products Please carefully read this User s Guide in particular precautions for safety before using a product and follow instructions to use a product exactly The company is not responsible for any safety accidents caused by abnormal operation of the product Color video door phone CDV 70KR3 User Manual w...

Page 2: ...he product Greetings 1 Table of Contents 1 1 Warnings and caution 2 2 Product Overview 4 3 How to use 5 4 Settings 7 5 Installation 9 6 Wiring 10 7 Package Contents 12 8 Caution in use 13 9 Miscellaneous 13 10 Specification 13 Greetings Table of contents www safemag ru www safemag ru ...

Page 3: ...e when using a damaged power cable Please don t handle the power cable with a wet hand It may cause an electric shock Please plug out the power cable from the socket when not using it for a long period of time It may shorten the product lifespan or cause a fire Please don t install the product in the place where there is much oil smoke or humidity It may cause an electric shock or fire Please don ...

Page 4: ...Please don t use any chemical products such as wax benzene alcohol or cleanser Please don t drop the product on the ground and don t apply a shock It may cause a failure Please use the designated connection cable within the maximum calling distance designated for the product It may reduce the product performance Please check the use voltage and current for the DC only products and use the appropri...

Page 5: ...to select an item from the menu UP BUTTON Move from the menu items to up and right DOWN BUTTON Move from the menu items to down and left POWER SWITCH Turn your device on and off EXTERNAL CONNECTION TERMINAL For product update and connection between lobby and interphone Description 1 HANDSET 9 SELECT BUTTON 2 MONITOR UP BUTTON 3 MONITOR BUTTON DOWN BUTTON 4 INTERPHONE BUTTON 11 POWER SWITCH 5 DOOR ...

Page 6: ... picking up the handset you can talk with the person using interphone Image of visitor is shown on the screen and 3 way communication is possible between household interphone and door camera when visitor calls from door camera while household is talking with interphone 2 Call from video door phone to interphone After picking up handset of video door phone and then press INTERPHONE BUTTON in order ...

Page 7: ...ollows Stand by mode In position CHIME VOL0 CHIME VOL1 CHIME VOL2 CHIME VOL3 CHIME VOL0 Door Release Function If you press the door release button Key shaped button the monitoring door camera will make a sound and release the door the door release function is only enabled while in a monitoring mode The same rule applies to COMMAX interphone series If you press the 2 nd Door Release button while in...

Page 8: ...en 2 CONTRAST Adjusting Contrast of Screen 3 COLOR Adjusting Color of Screen How to adjust Move to Menu you want to adjust with button on the list of DOOR VIDEO SET Press SELECT button to choose an icon Adjust the set value with button To complete the set press SELECT button 4 RESET Initializing How to reset Move to RESET menu in DOOR VIDEO SET menu Press SELECT to enter the menu Select YES with b...

Page 9: ...o back to Setting menu 4 3 INFORMATION The function to check Model name Version In order to check the product information press menu button and move to INFORMATION menu with button 1 MODEL You can check the model name 2 VERSION You can check the model version 3 VIDEO You can check the video transmission formats NTSC PAL 4 SOURCE You can check the position of camera DOOR1 DOOR2 which is shown on th...

Page 10: ...d to Direct sunlight Keep cleaning up its lens to capture good views 1 Installation Method of camera monitor Note Avoid the range of direct sunlight Recommended height is pertinent from 1450 1500mm Avoid the installation near magnetic activity humid temperatures and gas www safemag ru www safemag ru ...

Page 11: ... POWER 12V 4 WHITE VIDEO The wiring of this equipment is as follows Each device should be connected by separated cables If you use UTP CABLE CAT 5 for CAMERA1and CAMERA2 2 lines of UTP cable are required Wiring precautions 6 Wiring www safemag ru www safemag ru ...

Page 12: ...es to GND after connecting 4 lines between monitor and camera CAM1 CAM2 DOOR Camera Wiring If you use UTP CABLE CAT 5 connect the rest 4 lines to GND after connecting 4 lines between monitor and interphone INTERPHONE Wiring www safemag ru www safemag ru ...

Page 13: ...acket for wall mount Manual T4 X 18 4EA Screw for wall mount Monitor CDV 70KR3 Wall bracket for monitor User Manual Mounting Screw SCREW GH1T 4X18 ZnY 4EA Monitor fixing screw SCREW PHM 3X6 ZnY 1EA Connector CONN 4PX300 2EA 4P Connector 2EA www safemag ru www safemag ru ...

Page 14: ...7 78Cm 7 TFT DIGITAL LCD Entrance electronic chime Interphone electronic buzzer Screen Display Monitoring 30 5sec Talk 60 5sec Cable thickness Pie 0 5mm 0 65mm 0 8mm Distance 28m 50m 70m Working temperature 0 40 32 104 Dimension 311 W X 168 H X 32 50 3 D MODEL 1 Turn on the power switch 2 Please contact your local agent for product maintenance when you have a problem in use of CDV 70KR3 3 For your...

Page 15: ...gdaewon dong Jungwon gu Seongnam si Gyeonggi do Korea Int l Business Dept Tel 82 31 7393 540 550 Fax 82 31 745 2133 Web site www commax com Printed In Korea 2014 03 104 PM0770KR2010 www safemag ru www safemag ru ...

Reviews: