


Model: PMD8141
Owner’s Manual
4
5
6
7
8
9
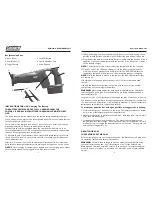
Reciprocating Saw:
4. Base (Shoe)
7. Lock-Off Button
5. Saw Blades (2)
8. Comfort Rubber Grip
6. Trigger Switch
9. Allen Wrench
INSTRUCTIONS FOR USE: Charging The Battery
THE BATTERY(IES) MAY NOT BE FULLY CHARGED FROM THE
FACTORY. READ ALL INSTRUCTIONS THOROUGHLY PRIOR TO FIRST
USE.
The Saws covered by this manual use the same battery and battery charger.
Your Saw comes complete with a rechargeable battery, we recommend that you
fully charge before the first use.
Your Saw must be charged for 3-8 hours prior to first use. After initial charge,
allow approximately 3-8 hours to recharge your battery.
Your battery should be recharged when the saw does not operate up to its
normal performance level. Do not continue to operate the saw in this depleted
capacity. Recharge the battery immediately.
To increase the life of your battery, do not leave the battery charging for more
than 8 hours. While this is not a safety concern, overcharging may reduce the
life of the battery(ies).
Overtime, if the saw is not used, the battery will lose capacity. For maximum
performance, recharge the battery after prolonged storage or non-use periods.
NOTE:
Before inserting or removing the battery from the charging base, always
ensure that the base is not plugged into a 120V power source.
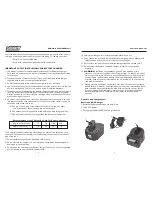
1) To begin charging, remove the battery pack from the tool by pressing on the
battery release buttons on either side of the battery pack and pulling down.
2) Plug the battery pack into the battery charger making sure the positive (+) and
negative (-) poles of the battery match the positive (+) and negative (-) poles
of the battery charger.
NOTE:
The battery will only fit into the battery charger and the tool one way.
3) Plug one end of the 120 Volt AC Adaptor into the battery charger and the
other end into any standard 120 Volt wall outlet. The RED LED indicator on
the battery charger will illuminate to indicate that the battery is charging.
NOTE:
While the battery is placed in the charger, the RED LED indicator light
will remain on.
If charging more than one battery, wait at least 15 minutes between each
charge.
Use only the battery charger that is supplied with this tool. Using another
charger may cause damage to the battery.
WARNING:
Never charge a battery pack again immediately after it has been
fully charged. This can give rise to the battery pack being overcharged and a
reduced battery life.
Length of service of your battery will depend on the type of work you are doing.
The batteries in this tool have been designed to provide maximum, trouble-free
life. However, like all batteries, it will eventually wear out. Do not disassemble
battery pack and attempt to replace the batteries.
To make your batteries last as long as possible, we suggest the following:
1. Store and charge your batteries in a cool area. Temperatures above or below
normal room temperatures will shorten battery life.
2. Never store batteries in a discharged condition. Recharge them immediately
after they are discharged.
3. All batteries gradually lose their charge. The higher the temperature the
quicker they lose their charge. If you store your tool for long periods of time
without using it, recharge the batteries every month or two. Getting into this
habit will prolong battery life.
ABOUT YOUR SAW
THE FEATURES OF THIS SAW:
Before attempting to use your reciprocating saw, familiarize yourself with all of
its operating features and safety requirements.
WARNING:
Carefully read through this entire owner’s manual before using
your new reciprocating saw. Pay close attention to all of the Safety Rules,
Warnings and Cautions as laid out above. If you use you’re reciprocating saw
properly and only for what it is intended, you will enjoy years of safe, reliable
service.
5
6


