background image

Pr

eparing f

or 

Your Ne

w P
or

tab
le Spa

11

Coleman logo (white)

<----------

Coleman

®

 Spas

LTR50001090, Rev. D

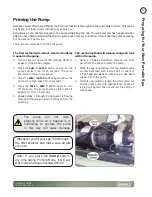
Priming the Pump

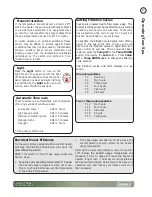
New spa owners often have difficulty the first time they start their spa and the pump fails to prime. This can be 

frustrating, but these simple instructions can help you.

Sometimes air can become trapped in the pump while filling the spa. You will know this has happened when 

after you have filled and started the spa, the pump does not seem to function. You will hear the pump operating, 

but no water will be moving.
There are two methods of priming the pump.

The pump will not work 

properly while air is trapped in it. 

Continuing to operate the pump 

in this way will cause damage.

Whenever you fill your spa, fill it through 

the  filter  canister  and  make  sure  all  jets 

are open.

Note: If you press the 

Temp

 button 

any time during Priming Mode, it will exit 

that mode and begin Standard Mode.

The second method will remove a large air lock 

within the pump .

Using a Phillips screwdriver, remove the front 

1. 

panel from the spa and locate the pump.
While the spa is operating, turn the bleeder valve 

2. 

counter clockwise with a small pair of pliers or 

a  flat  head  screwdriver  until  the  air  has  been 

released from the pump.
If this is unsuccessful, loosen the white union nut 

3. 

on side of the pump with channel locks.  When air 

is bled out, tighten the nut and set the pump on 

high speed.

The first method will remove small air bubbles 

trapped in the pump .

Turn the spa on and wait for PR (Priming Mode) to 

1. 

appear on the topside display.
Press the 

2. 

Jets  or  Jets 1 button to turn on the 

pump and let it run for 10 seconds. The pump 

should be running in low speed.
Press the 

3. 

Jets or Jets 1 buttons again and let the 

pump run in high speed for 10 seconds.
Press the 

4. 

Jets  or  Jets 1 button again to turn 

off the pump. The pump should be left in the off 

position for 10 to 15 seconds.

Repeat  steps  1  through  4  until  water  is  flowing 

5. 

through all the jets and all air is removed from the 

plumbing.

Summary of Contents for 37 jets legend

Page 1: ......

Page 2: ...LTR50001090 Rev D 9 17 12...

Page 3: ...on 4 240 Volt Electrical Installation 4 240V GFCI and Wiring Requirements 5 VS 500 System High Power Configuration 5 GFCI Wiring Diagram 6 230V 50Hz Electrical Installation 7 RCD Wiring Diagram 8 50 H...

Page 4: ...water can induce hyperthermia Hyperthermia occurs when the internal temperature of the body reaches a level 3 F to 6 F above the normal body temperature of 98 6 F or 2 C to 4 C above 37 C While hyper...

Page 5: ...s should not use a spa or hot tub WARNING To avoid injury exercise care when entering or exiting the spa or hot tub WARNING Do not use drugs or alcohol before or during the use of a spa or hot tub to...

Page 6: ...will you use your spa for recreational or therapeutic purposes If your spa is mainly used for family recreation be sure to leave plenty of room around it for activity If you will use it for relaxation...

Page 7: ...ng diagram on page 6 These instructions describe the only acceptable electrical wiring procedure Spas wired in any other way will void your warranty and may result in serious injury When installed in...

Page 8: ...ng See configuration instructions below One 50 amp GFCI Four 6 AWG copper wires CO866B CO866L CO866DL VS 500 three pump system Standard power mode One 50 amp GFCI Four 6 AWG copper wires VS 500 three...

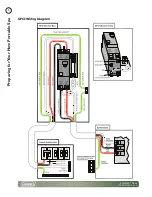
Page 9: ...Preparing for Your New Portable Spa 6 Coleman Spas LTR50001090 Rev D Coleman logo white GFCI Wiring Diagram...

Page 10: ...Use copper wire with THHN insulation Do not use aluminum wire Use the table below to determine your GFCI and wiring requirements When wires larger than 6 AWG are required install a junction box near...

Page 11: ...UE BLUE BROWN Hot BROWN Hot BROWN GREEN YELLOW Ground To control box BROWN Hot BROWN Hot Two service configuration BLUE Neutral BLUE Neutral BROWN Hot BROWN Hot GREEN YELLOW Ground BROWN Hot BLUE Neut...

Page 12: ...Preparing for Your New Portable Spa 9 Coleman logo white Coleman Spas LTR50001090 Rev D 50 Hz Circuit Board Connection...

Page 13: ...e pump is running 8 there could be an air pocket at the suction side of the pump Shut off power to the spa and loosen the pump union on the suction side of the pump to bleed the air When air is bled t...

Page 14: ...The second method will remove a large air lock within the pump Using a Phillips screwdriver remove the front 1 panel from the spa and locate the pump While the spa is operating turn the bleeder valve...

Page 15: ...n the pump and let it run for 10 seconds The pump should be running in low speed Press the 2 Jets or Jets 1 buttons again and let the pump run in high speed for 10 seconds Press the 3 Jets or Jets 1 b...

Page 16: ...e has been determined the heater light will stop flashing You will frequently see the heater light flashing rapidly while it is also steady or slowly blinking JETS 1 JETS MODE JETS 2 JETS 3 Low and Hi...

Page 17: ...sh While the display is flashing each time you press the Temp UP or Temp DOWN button the set temperature will change up or down one degree Temp UP Temp DOWN The spa can be set to operate in three diff...

Page 18: ...hours F3 Three hours F4 Four hours F5 Five hours F6 Six hours Two or three pump systems Fil 2 Two hours Fil 4 Four hours Fil 6 Six hours Fil 8 8 hours Fil C Continuous Electrical Power Efficiency You...

Page 19: ...third occurrence of dr message Follow directions for dr message and press any button to reset spa Spa will not automatically reset when dry or dY is displayed Ec Indicates heater is in Economy Mode N...

Page 20: ...ature in the Standard mode SF Safety Suction Spa is shut down The display will show SF when a vacuum switch closes All functions will turn off and the system will be disabled until a panel button is p...

Page 21: ...floor jets to wall jets This is accomplished by rotating the diverter knob to the left counterclockwise decreasing the amount of water flow through a section of jets To increase the amount of water fl...

Page 22: ...oreril in ut pratie dionull umsandio consed dolumsandit at Rat consequi tinim ilisi bla feuis euguerc ilisi Em verit iliqui endiam nulluptat lamcore minibh elestio num sandip eraesectem diatio ercing...

Page 23: ...ecommended total alkalinity is 80 120 ppm If the TA is too low the pH level will fluctuate widely from high to low Low TA can be corrected by adding pH Alkalinity Up If the TA is too high the pH level...

Page 24: ...acidic and the hot temperature of the spa causes it to dissolve too quickly It will cause damage to your spa and will void your warranty Sanitizers kill bacteria and other organic waste by breaking th...

Page 25: ...for 30 minutes with the cover open If necessary repeat oxidizer shock in 30 minute intervals Chemical Safety Do not exceed chemical dosages as recommended in the Clear Water Plan or on chemical bottle...

Page 26: ...a Liquid Filter 2 Cleaner to the bucket of water Note It is a good idea to keep a spare filter to use in the spa while the dirty filter is being deep cleaned This way you can rotate the filters and b...

Page 27: ...3 tap water Do not use soft water Use test strip and balance the spa water 4 Adjust total alkalinity acceptable range is 80 120ppm Adjust pH if necessary between 7 2 to 7 8 Pour in 16 oz of Metal Prot...

Page 28: ...of Clear Water Plan Every two to four months Drain and clean your spa with Multi Purpose Cleaner Polish the acrylic surface with Fast Sheen Clean and treat spa cover pillows and Cal Select cabinet if...

Page 29: ...fill the spa Organic buildup scum ring around spa Buildup of oils and dirt Wipe off scum with clean rag if severe drain the spa use a spa surface and tile cleaner to remove the scum and refill the spa...

Page 30: ...e objects of any kind on top of it Draining Your Portable Spa Turn off the power at the breaker 1 Remove all filters 2 Using a Phillips screwdriver remove the screws 3 to the access panel and open it...

Page 31: ...of the pumps 5 Disconnect the unions from both sides of the pump 6 Blow any remaining water out of the jets and equipment 7 area with the wet dry vacuum Cover your spa with a good spa cover and an all...

Page 32: ...clean the spa without damaging its acrylic finish Spa safe Fast Sheen is a non oil based wax that is specifically formulated to protect the spa s finish from the chemicals and minerals associated with...

Page 33: ...el some resistance Continue to rotate the jet for another quarter turn You will feel the jet snap out of position Continue to rotate the jet as you pull it out of the jet well To replace jets insert t...

Page 34: ...fle Stainless steel PLU21703703 Red PLU21703704 RED Jets COPSTB 5 Power Storm Twister Stainless steel PLU21703705 Red PLU21703706 RED COPDB 5 Power Storm Directional Stainless steel PLU21703699 Red PL...

Page 35: ...Gray Cap and Wall fitting PLU21300820 1 Diverter Valve Silver Handle with Dark Gray Cap and Wall Fitting PLU21300810 Drains Main Drain Super Hi Flo Suction 2 1 2 Silver PLU21400400 Pillow Pillow ACC01...

Page 36: ...e center to two and a half inches on the sides to drive off rain and prevent water from pooling Filled with 1 lb foam Spa Covers All Coleman spa covers are hunter green Size Slope Fits spa model Part...

Page 37: ...CO 756B CO 756L Side Panel 7 ft 28 1 2 X 67 1 2 Choice Mahogany CCM WOO27519430 CCM Side Panel 7 ft 28 1 2 X 67 1 2 Choice Mist CCMI WOO27519430 CCMI Door Panel 28 1 2 X 40 1 4 Choice Mahogany CCM WO...

Page 38: ...t on the spa Contact your dealer Heat Problems Spa does not heat Heating mode not selected See control panel instructions on page 12 Water level is too low Add water to correct level No electrical pow...

Page 39: ...and empty the hoses Close or turn off empty cycle if necessary Water Pressure Problems Jets surge on and off Water level is too low Add water to normal level Jets are weaker than normal or do not work...

Page 40: ...ntact your dealer Pump turns off during operation Automatic timer has completed its cycle Start the cycle again Pump has overheated due to the vents on the equipment door being blocked Clear items awa...

Page 41: ...ion due to defects in materials or materials in the manufacturer installed heater and ozonator Specifically excludes re placement ozone cartridge and the LED light source which have a one year warrant...

Page 42: ...ut voltage spikes or operation of spa out of voltage range by more than 10 Spas improperly installed or placed on non approved surfaces Although shell cracks which are breaks in the shell that go all...

Page 43: ...Appendix 41 Coleman logo white Coleman Spas LTR50001090 Rev D...

Page 44: ...ou register your Coleman Spa as soon as possible By taking just a few quick minutes to register you can enjoy Product alerts More efficient support Quicker service Register now it s fast and it s easy...

Reviews: