background image

POWER
Switch the main power button on whichis located on the end of the heater.
After the power is turned on, the computer board emits a

‘click’

and the screen displays the

current room temperature and the set temperature.
Press the On\Off key once to enter the standby state.

HEAT SETTING
Press the

‘Heat Setting’

button to adjust the heat setting from 1000W to 1300W to 2300W & ANTI-

FROST.
In anti-frost: If the heater is in standby and the room temperature is lower than 5

°

C, the heater will

automatically turn on to HIGH heating mode. When the room temperature reaches 9

°

C, the

heating is turned back to standby. This cycle will repeat as required.

TEMPERATURE
The set temperature is displayed every time the appliance is power up. The temperature can be set
when the appliance is in stand-byor heating.
Press the

‘+’

or

-

buttons to set the desired room temperature.

The temperature range is 5

°

C-37

°

C.

The appliance can hold the last temperature setting in its memory. This temperature will be shown
at each start-up.

TIMER
Press the timer button, each time the time is increased by 1 hour up to 24 hours. Once the timer is
set, the timer countdown starts after 5 seconds. When the set time has elapsed, the heater will go
back into standby mode.
To cancel the timer, press the timer button until the display read0h 00m.

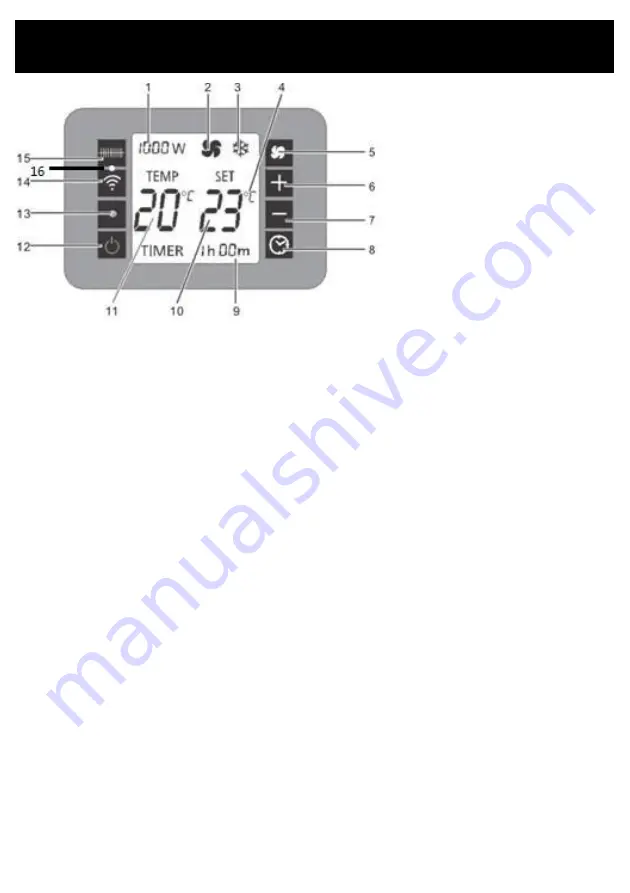
Operating your Heater

1.   Selected heating level display

2.   ‘Fan’ symbol
3.   ‘Frost protection’ symbol

4.   Selected unit of measurement display 
5.   Fan button
6.   Increase temperature
7.   Reduce temperature
8.   Timer button
9.   Running time display
10. Set temperature display
11. Measured temperature display
12. On/Off button
13. Infrared receiver for remote control
14. Wi-Fi button
15. Heat Setting Button
16. Wi-Fi indicator lamp

Summary of Contents for GCV440

Page 1: ...OperatingInstructions Model GCV440 2300WConvector Heater with WiFi...

Page 2: ......

Page 3: ...it WARNING Do not use this appliance in small rooms when they are occupied by persons not capable of leaving the room on their own unless constantsupervisionisprovided WARNING To reduce the risk of fi...

Page 4: ...e area and is unrolled before use It is recommended that this appliance is plugged directly into the wall socket Power boards arenot ratedto supply power to high wattageappliances A correctly specifie...

Page 5: ...chase or the Customer Services Team General Care and Safety Guide WARNING DANGER IF SWALLOWED Keep batteries out of reach of children Swallowing may lead to serious injury or death in as little as 2 h...

Page 6: ...ed onas follows 1 Unpackthe appliance from the packaging 2 Remove the transport packaging 3 Check that the appliance shows nosigns ofdamage 4 Slide the feet fromthe outside into the corresponding supp...

Page 7: ...re risk exists if the heater is covered or positioned incorrectly WARNING Neverleave thisheaterunattended when inuse Ensure heaterison a flat stable heat resistantsurface Once the heater is in a safe...

Page 8: ...hen the applianceisin stand byor heating Press the or buttons to setthe desired roomtemperature The temperaturerangeis 5 C 37 C The appliance can hold thelast temperature setting in its memory This te...

Page 9: ...2 4GHz WiFi channels Please ensure your phone is 2 4GHz capable WARNING You shouldneverleave yourheaterunattendedwheninuse Tap REGISTER in the centre ofthe screen If you alreadyhave an existingaccoun...

Page 10: ...register anemail address or a phone number The APPdefaults to email but you just need to tap the Register byPhone at topright of the screen to change XXXXXXXXXXXXXX XXXXXXXX Enter you email addressor...

Page 11: ...ificationcode that you will receive byemail ortext message Next you will be promptedto Set a Password The password must contain6 20 characters andmust be a mixof letters and numbers We recommend allow...

Page 12: ...o ON withthe remote control On your phone tap the to connect to the heater If the WiFi symbol is not alreadyflashing onthe heater pressthe small black buttonon the back of the heater for 5 seconds unt...

Page 13: ...nnect againas per the above process Choose confirm whichWiFi to connect to Note yourphone maypick upotherWiFi signals e g neighbours soyou will needto choose Enter your WiFi passwordandpress Confirm T...

Page 14: ...g Tap the Switch icon and the heater will turn on The display will change to show the set temperature and ambient temperature You can now control the heater To turn the heateroffagaintap the Switch ic...

Page 15: ...omaticallyturn onto HIGH heating mode When the roomtemperature reaches 9 C the heating is turned back to standby This cycle will repeat as required Operating your Heater from the APP You can adjust th...

Page 16: ...ater off after a periodof time has elapsed 1 24 hours When the heater is turnedon press the DELAY TIMER icon thenselect the number of hours before the heater will turnOFF 1 24 hours The mainscreenwill...

Page 17: ...g your Heater from the APP Tap the Pen symbol onthe topright ofthe control screenof the APPto take you to the next page From here you can Change the heater name Add a location Set up sharing Remove th...

Page 18: ...heat Thermal Fuse this disconnects the appliance permanently in case of overheating It is non resettable CAUTION The appliance generates heat during use Precautions must be takento preventthe riskof b...

Page 19: ...nder the Australian Consumer Law You are entitled to a replacement or refund for a major failure and compensation for any other reasonably foreseeable loss or damage You are also entitled to have the...

Page 20: ...New Zealand PO Box 100707 North Shore Mail Centre Auckland 0745 www goldair co nz Australia PO Box 574 South Morang Victoria 3752 www goldair com au...

Reviews: