English
14
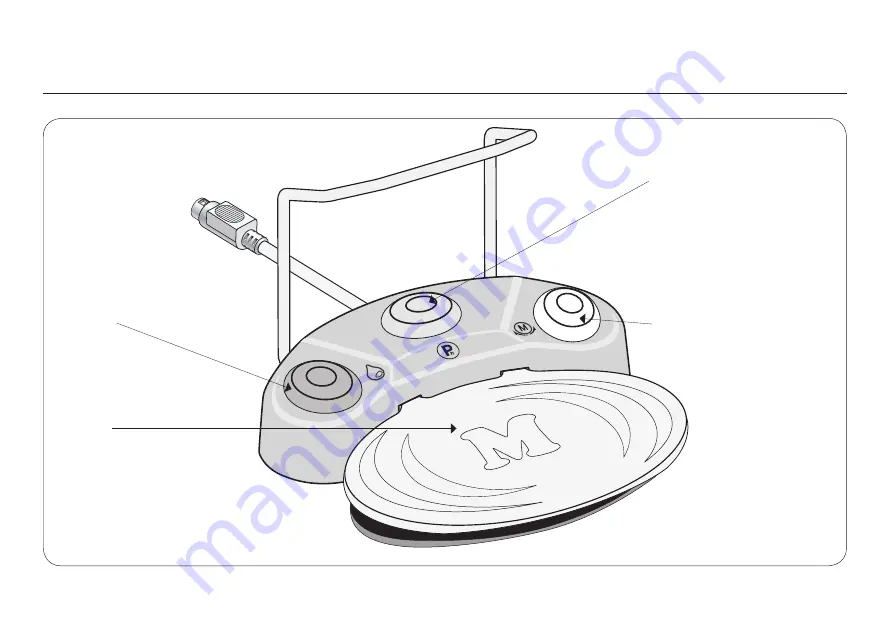
9. Starting operation–Foot control
GREEN
Pump
ON/OFF
GREY
Start motor
VARIABLE or ON/OFF
(Factory setting = variable)
ORANGE
Change program
Program 1 to 3
YELLOW
Change motor direction
forward/reverse drive
Page 1: ...Osscora Surgical Set Instructions for Use Model no 91051 91052 91053...
Page 2: ...revent damage occurring General explanations Without risk to persons or objects Sterilisable Up to the stated temperature Thermo washer Disinfectable Only for USA Caution Federal law USA restricts thi...
Page 3: ...ra contra angle handpiece 28 15 Osscora accessories 44 16 Servicing 45 17 Technical data 47 Chapter Page 1 Introduction 4 2 Safety notes 5 3 Unpacking 8 4 Equipment supplied 9 5 Description of front p...
Page 4: ...lidates all claims under warranty and any other claims For your safety and the safety of your patients These Instructions for Use explain how to use your Cochlear product However we must also warn aga...
Page 5: ...ease ensure that you carry out the following instructions Only fit the contra angle handpiece when the motor is at a complete standstill Never touch rotary instruments which are still rotating Never t...
Page 6: ...IEC 60601 1 UL 60601 1 the control unit is not suitable for use in potentially explosive atmospheres or with potentially explosive mixtures of anaesthetic substances containing oxygen or nitrous oxid...
Page 7: ...the relevant regulations for disposal of irrigation tubing Rotational energy Fast deceleration of the bur can at times cause the selected torque to be overloaded as a result of the rotational energy s...
Page 8: ...ustrial recycling companies However we recommend that you keep the original packaging u Lift out insert with stand v Remove foot control and insert w Lift out insert with control unit x Remove irrigat...
Page 9: ...ocking pins 2 pcs and clips 10 pcs Motor with 3 5 m cable incl motor protective cover locking pins 2 pcs and clips 10 pcs Motor with 3 5 m cable incl motor protective cover locking pins 2 pcs and clip...
Page 10: ...English 10 5 Description of front panel Motor connection socket Display OPEN Pump arm Program buttons Pump arm Stand holder P1 P2 P3...
Page 11: ...English 11 6 Description of rear panel Connecting socket for foot control Fuse holder with 2 fuses 250 V 1 25A slow blow Power socket Power switch ON OFF Stand holder...
Page 12: ...prevent the instrument on the motor attachment from turning during the transmission the locking pin supplied can be pushed into one of the two holes see illustration Test run Start the motor If you o...
Page 13: ...Starting operation General u Connect the mains cable and foot control v Connect the motor cable Note the positioning w Insert the stand Note the positioning x Fit the irrigation tubing set y Close pum...
Page 14: ...h 14 9 Starting operation Foot control GREEN Pump ON OFF GREY Start motor VARIABLE or ON OFF Factory setting variable ORANGE Change program Program 1 to 3 YELLOW Change motor direction forward reverse...
Page 15: ...ble warning signals are given Changing program The programs 1 3 can be selected in ascending sequence by operating the ORANGE button When changing from program 3 to program 1 a longer confirmation sig...
Page 16: ...sed throughout this procedure u Press P3 for approx 4 seconds v Keep P3 depressed and simultaneously press PLUS and MINUS w Keep P3 depressed and carry out adjustment 01 VARIABLE factory setting Press...
Page 17: ...2 P3 Forward P3 Reverse Factory setting rpm 2000 2000 15 30 Adjustable range rpm 15 2000 15 2000 Motor direction Forward Forward Forward Reverse Pump Off On Off Off Factory setting Ncm Max Max 20 20 A...
Page 18: ...y setting always starts with program 1 P1 u Switch off the control unit v Keep P1 depressed and simultaneously switch on the control unit w Keep P1 depressed as long as on the display the adjustment D...
Page 19: ...ble signal can be heard and the program button is illuminated On the display the selected program appears with the adjusted range in rpm Display adjustments P1 P2 speed P3 torque Pump operation ON OFF...
Page 20: ...ontrol unit operation Keeping PLUS MINUS depressed activates the repeat function and the values are continuously increased decreased Press program button P1 P2 Increase speed Decrease speed Changing t...
Page 21: ...function and the values are continuously increased decreased When changing from 5 to 50 Ncm and 50 to 5 Ncm a longer confirmation signal is heard When the adjustable torque in the forward reverse dri...
Page 22: ...program button P2 depressed throughout this procedure Keep P2 depressed for approximately 4 seconds the adjusted coolant flow rate appears Keep P2 depressed and press PLUS button to increase flow rat...
Page 23: ...ff the equipment restart do not actuate foot control when switching on 09 Foot control error Switch off the equipment check connection of the foot control then restart 19 Run limiting control Switch o...
Page 24: ...ing off the Osscora surgical set and then switching it on again the equipment must be checked by a service agent For contact details please contact your local Cochlear office If a total failure of the...
Page 25: ...ly soiled Clean first with disinfectant cloths Only use disinfectants that have no protein fixing effects Manual cleaning and disinfection The front panel of the control unit and the foot control are...
Page 26: ...oths Only use disinfectants that have no protein fixing effects Manual cleaning Rinse under demineralised water 38 C with the aid of a brush brush is not recommended in U K Then remove any liquid resi...
Page 27: ...ust free and dry Approved sterilisation procedures Follow your country specific directives standards and guidelines Steam sterilisation with sterilisers in accordance with EN 13060 or EN 285 class B S...
Page 28: ...a angle handpiece Product description Osscora contra angle handpiece u press button v head w hexagon chucking system x spray clip y middle gear U knee V lower shaft W locking pin X sheath at nozzle cl...
Page 29: ...stafix surgery Prior to initial use Please read the section on hygienic maintenance page 34 43 Lubricate the contra angle handpiece Sterilise the contra angle handpiece nozzle cleaner and spray clip C...
Page 30: ...e handpiece during the operation u Push the contra angle handpiece onto the motor Use a rotational lock between motor and instrument see page 12 v Check that the motor and handpiece are securely attac...
Page 31: ...ra angle handpiece during operation This leads to detachment of the rotary instrument and makes the head of the contra angle handpiece hot To change rotary instrument in the Osscora contra angle handp...
Page 32: ...e rotary instrument into the contra angle handpiece until back stop a and turn until it engages b v Check secure location by applying slight axial tension w Remove the rotary instrument by pushing the...
Page 33: ...nsert rotary instrument Start the contra angle handpiece If you observe problems e g vibrations unusual noise overheating coolant supply failure or leakage contact your service agent For contact detai...
Page 34: ...instrument Remove the contra angle handpiece from the motor Clean and disinfect the disassembled contra angle handpiece immediately after every treatment to flush out any liquid residues such as blood...
Page 35: ...ora contra angle handpiece u Remove the spray clip v Hold the head firmly with one hand w Press sheath gently against knee At the same time turn off the sheath from the knee x Remove the shaft y Remov...
Page 36: ...g u Rinse under demineralised water 38 C with the aid of a brush not recommended in U K v Then remove any liquid residues absorbent cloth blow dry with compressed air Do not place the contra angle han...
Page 37: ...with the air syringe In the case of a clogged up spray nozzle or coolant tube contact your service agent For details please contact your local Cochlear office The removable spray clip can be cleaned...
Page 38: ...ot contain chlorine and which are certified by officially recognised institutes For USA Use EPA registered surface disinfectants Note the manufacturer s specifications for the use of the surface disin...
Page 39: ...contra angle handpiece immediately after thermo washer disinfection A contra angle handpiece with this symbol can be cleaned and disinfected in a thermo washer disinfector Cochlear recommends processi...
Page 40: ...ible onto the contra angle head until it engages w Put the shaft in the knee and mind the position of the rotational lock b Check free running rotation c x Press the sheath firmly against the knee and...
Page 41: ...F1 MD 400 For oil service W H Service Oil F1 MD 400 is recommended For details on how to purchase this contact your local Cochlear office Follow the Instructions for Use of the oil spray can Recommen...
Page 42: ...d downwards v Start the contra angle handpiece for 30 seconds to remove excess oil Start at the minimum speed and increase to the maximum speed within 5 to 10 seconds Repeat the complete hygiene and m...
Page 43: ...nly remove dry sterile goods Store sterile goods dust free and dry Approved sterilisation procedures Follow your country specific directives standards and guidelines Steam sterilisation with sterilise...
Page 44: ...English 44 15 Osscora accessories 91102 Sterilisation cassette 91054 Osscora motor with 3 5 m cable 91061 Irrigation tubing set 3 8 m 6 pcs 91050 Osscora contra angle handpiece Disposable article...
Page 45: ...by a qualified organisation and needs to include the following procedures Visual inspection for outside damage Measurement of enclosure leakage current Measurement of patient leakage current Visual i...
Page 46: ...ervicing after 500 sterilisation cycles or one year Repairs If a defect occurs always return all the equipment due to the fact that with motor malfunctions an inspection of the electronic controls is...
Page 47: ...otective Class II type of protection against electric shock Type BF appliance not suitable for intracardiac application 91051 91052 91053 Supply voltage 220 240 V 100 130 V Rated current 0 1 0 8 A 0 2...
Page 48: ...order to ensure that the warranty is maintained When having a torque higher that 30 Ncm on the rotary instrument you have to use hardened shafts 50 HRC 520 HV risk of deformation When using a longer...
Page 49: ...set in accordance with current Instructions for Use Particular attention was shown to Safety notes Disinfection cleaning sterilisation and Servicing Osscora surgical set Type Serial Number Name of the...
Page 50: ......
Page 51: ...accordance with current Instructions for Use Particular attention was shown to Safety notes Disinfection cleaning sterilisation and Servicing Copy for the Medical Device Consultant Osscora surgical s...
Page 52: ......
Page 53: ......
Page 54: ......
Page 55: ......
Page 56: ...33 M lnlycke Sweden Tel 46 31 792 44 00 Fax 46 31 792 46 95 Regional offices Cochlear Americas 400 Inverness Parkway Suite 400 Englewood CO 80112 USA Tel 1 303 790 9010 Fax 1 303 792 9025 Cochlear AG...