background image

11

Preparations

Connect cables.(Refer to the “Cable Connections” section for details).

1. 

Press the POWER button to turn on the player.

2. 

Select the TV signal mode, using the SOURCE button.

3. 

Press CH+/- to skip channels. Or you can use number buttons to access a channel directly.

4. 

.  For an initial use, you need to scan channels under the Channesl Menu, please follow steps below. 

Press the MENU button to display system menu window, use direction buttons to access the CHANNELS 
menu. In the Channels menu, select "Auto Channel Search", press OK to enter - - > Set the TV source 
as Antenna/Cable (ATV/DTV) - - > Select "Start", press OK to scan. To quit, press MENU.

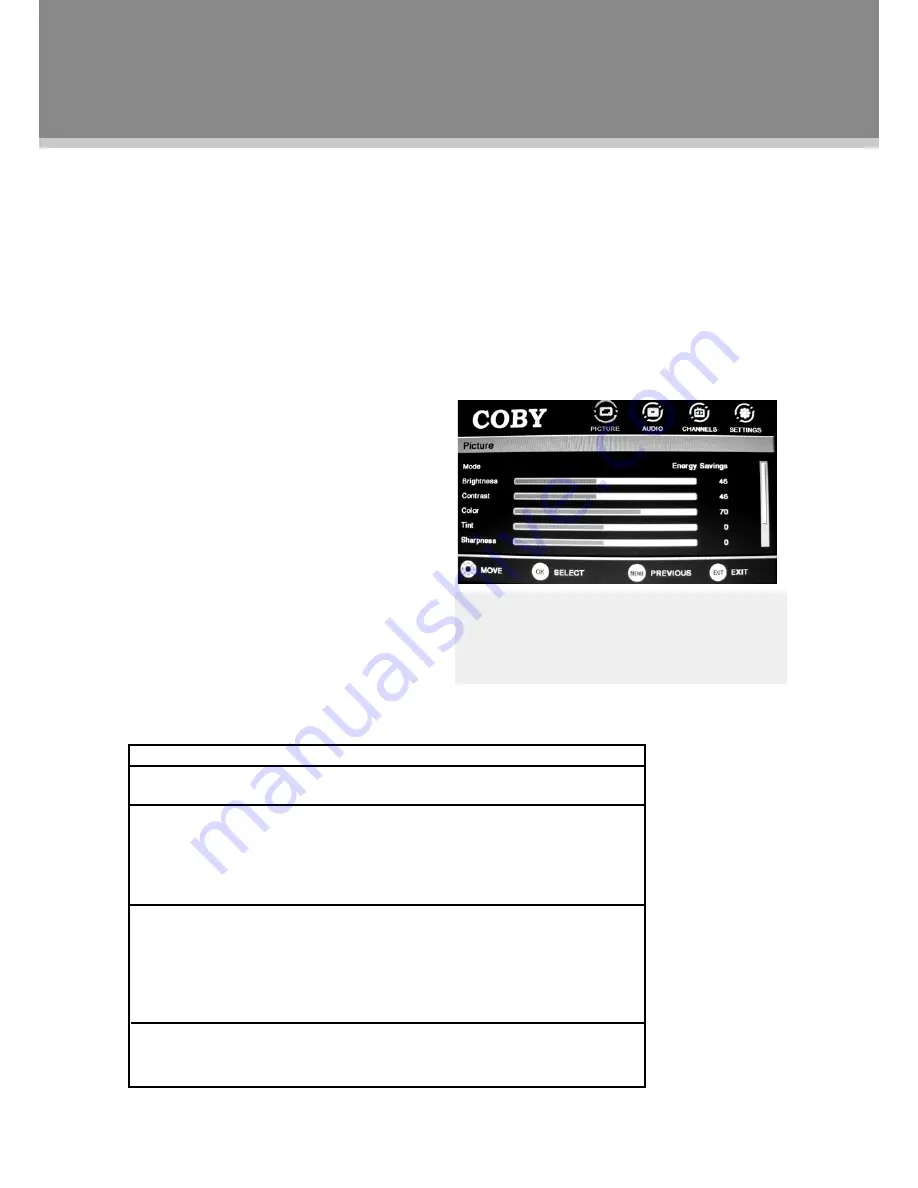
Picture Menu


TV Function

Note:

 Menu option availability is dependent on 

the TV’s current input source mode. Options that 
are grayed out are not selectable from the current 
mode.

ITEM   

DESCRIPTION

Mode

  - Setup the picture mode as Custom/Sports/Theater/Energy Savings/

Standard/Vivid.

Brightness/Contrast/Color/Tint/Sharpness

 - Press the left/right direction 

button to adjust settings. When you select a picture Mode other than "Custom",  

these items are automatically given parameters to correspond with the chosen 

preset mode, so any change to these parameters would return the Mode setting 

to “Custom”.

Advanced Video

  - Press the right button to enter this option.


Aspect Ratio

 - Set the screen aspect ratio as Normal/Zoom/Wide/Cinema.


Color Temperature

 - Set color preference as Cool/Normal/Warm.


Noise Reduction

 - Set the noise reduction function as Off/Low/Middle/Right. 


Adaptive Contrast

 - Set the adaptive contrast function on/off.

     Over Scan

 - Set the over scan function on/off.

Reset Picture Settings

  - Select this item and press OK or the right direction 

button to set all items under this menu to the factory default.

System Setup Menu

Various features can be preset through the setup 

menu, please read this section carefully.

Press  MENU  to  display  the  system  menu 


window.
Press the left/right direction button to select the 


desired menu, press the down direction button or 

the OK button to enter.

While working with the menu,

Always use direction buttons to select an option, 
press OK to confirm. Press MENU to back up/exit 
the setup menu, or press EXIT to quit.

Summary of Contents for TF TV 3229

Page 1: ...an equilateral triangle is intended to alert the user to the presence of important operation and servicing instructions in the literature accompanying the appliance Precautions For Customer Use Enter...

Page 2: ...ntial installation This equipment generates uses and can radiate radio frequency energy and if not installed and used in accordance with the instructions may cause harmful interference to radio commun...

Page 3: ...f the provided plug does not fit you re your outlet consult an electrician for replacement of the obsolete outlet Protect the power cord from being walked on or pinched particularly at plugs convenien...

Page 4: ...ted device the 2222 disconnected device shall remain readily operable WARNING To reduce the risk of fire or electric shock do not expose this apparatus to rain or moisture 2222 The apparatus shall not...

Page 5: ...and headphones can cause hearing loss To avoid damaging your ears adjust the Volume to the lowest level before playback and turn up to the desired level when playback has started Legal and Trademark N...

Page 6: ...Important Safety Instructions Main Feature 1 Package Contents 2 Unit View 3 Wall Mounting 3 Remote Control 4 Cable Connections 6 TV Function 11 AV Function 15 PC Function 16 Troubleshooting 17 Specif...

Page 7: ...ogy process to deliver a crisp clear and detailed picture Occasionally a few of these transistors may become stuck or non active please note that this does not affect the performance of the television...

Page 8: ...2 Please make sure the following items are included with your product If any item is missing contact your dealer a Main Unit b RCA Cable c Remote Control Unit Package Contents a b c...

Page 9: ...installation Screws used for mounting purposes shall not exceed 10mm in length Unit View Remote Control Senser Sense the remote control signal TFT Screen Power Indicator Lights bright blue when TV is...

Page 10: ...ress this button to set the front panel light on off 12 MUTE Press this button to turn on off sound output 13 RETURN Press this button to reveal the previously viewed channel 14 SOURCE Press this butt...

Page 11: ...long period of time Warnings The battery used in this device may present a fire or chemical burn if mistreated Do not recharge disassemble incinerate or heat the battery 212 F Keep batteries away from...

Page 12: ...11 connections properly done before connect the power supply If the product will not be used for a 222 long period of time disconnect the power NOTE In poor signal areas to achieve better picture qual...

Page 13: ...definition signals from computers with a VGA output jack When used as a computer moniter connect the VGA jack and the PC Audio In jack with a 15 Pin D Sub cable and a 3 5mm stereo audio cable The ment...

Page 14: ...ces Three input modes are available for you to chose from we have them ranked as below in regard to image definition HDMI COMPONENT RCA After cable connection set the unit into the relevant input mode...

Page 15: ...d video sources e g cable satellite boxes DVD players VCRs etc Connect the VIDEO port with the yellow plug of the the supplied AV cable 111 Connect the L R port with the white red plug of the supplied...

Page 16: ...ls from standard video sources e g cable satellite boxes DVD players VCRs etc Connect the Y Pb Pr port by the component cable to input the video signal Component cabel is not 111 included with this pr...

Page 17: ...n button to adjust settings When you select a picture Mode other than Custom these items are automatically given parameters to correspond with the chosen preset mode so any change to these parameters...

Page 18: ...IPTION Auto Channel Scan and save all available channels automatically overwriting previously stored channels Select this item press OK to enter Set the TV source as Antenna Cable ATV DTV Select Start...

Page 19: ...ng and French Rating Use direction buttons to select the rating level press OK to confirm press MENU to back up menu English Rating E C C8 G PG 14 18 French Rating E G 8ans 13ans 16ans 18ans Change Pa...

Page 20: ...s to write in data Sleep Timer Unit will shut down automatically on Sleep Time The available option is 5 10 15 30 45 60 90 120 180 240 min Off The count down would start immediately after setting You...

Page 21: ...rough the setup menu please read this section carefully Press MENU to display the system menu window Press the left right direction button to select the desired menu press the down direction button or...

Page 22: ...tup menu or press EXIT to quit PC Function Adjust the PC Screen via System Menu Upon switching to the PC mode the moniter will be automatically regulated for a proper functioning If the result is not...

Page 23: ...is connected properly Check if the system has been properly connected If using antenna adjust the antenna Make sure the POWER button on the unit has been turned on manually Remove the obstacles betwee...

Page 24: ...mpedance Standby Power Consumption Power Consumption Operating Temperature Range Wall Mounting TFT Panel Characteristic TV Charactoristic Standard 32 1366XRGBX768 16 7M colors 0 17025 V X0 51075 H ATS...

Page 25: ...Instruction Manual Please read this manual carefully before connection and use TF TV 3229 TFT LCD Widescreen Television...

Reviews: