background image

12

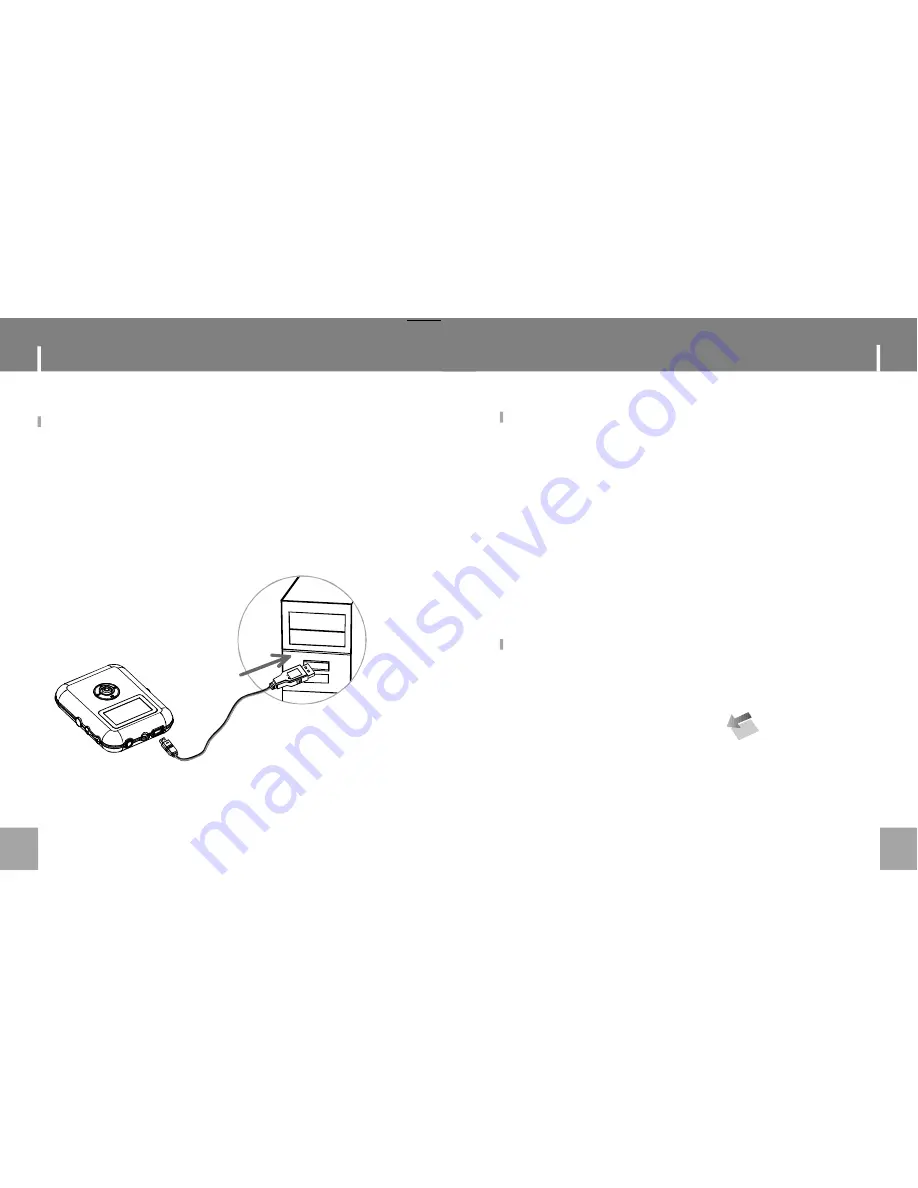
Connecting to PC

Connecting the player to PC:

1. Make sure the player is turned off.
2. Connect the player with your computer by supplied

USB cable.

3. PC will automatically detect the player as removable

disk under MY COMPUTER.

4. Go to MY COMPUTER and confirm the connection.

Downloading/ Uploading files:

1. Connect the player to PC.
2. Open Window Explorer on PC.
3. Select the file to save and drag-and-drop it into the

removable disc icon. You can also transfer file from the
player to your PC.

Note:

Do not remove the player while it's transfering files.

It might currupt or damage the firmware and or files
on the player. If the player is accidentley removed
while transfering and does not work properly, remove
battery for 3 seconds and replace it.

Disconnecting the Player:

After completing the file transfer, you must disconnect the
player as following direction:
1. Double-click on the green arrow in the taskbar on the

bottom right of the window.

2. When the [Stop a Hardware device] message appears,

press the [OK] button and disconnect the USB port.

3. Now you can remove the player safely.

Down / uploading Files

13

Summary of Contents for MPC651 - 512 MB Digital Player

Page 1: ...n DIGITAL AUDIO PLAYER W VOICE RECORDER MPC651 USER S MANUAL Customer Service Hours Monday Friday 8 00 AM 11 00 PM EST 1 800 681 2629 or 718 416 3197 Monday Friday 6 30 PM 11 00 PM EST 1 800 727 3592...

Page 2: ...g Uploading files Disconnection the USB Basic Operations Power On Off Entering the Menu Playing Music Adjusting the Volume Recording Voice Searching for Music Voice Files 2 4 5 6 7 8 9 10 11 12 13 13...

Page 3: ...ion software require for Window 2000 Window ME Window XP Voice Recording Displays Song Title Album and Artist Upgradable Firmware You can upgrade the programs when available Please check the home page...

Page 4: ...ct your ears Hearing experts advise against the constant use of personal stereo played at high volume Constant high volume use can lead to hearing loss If you experience ringing in the ears or hearing...

Page 5: ...Hold Battery Compartment SD MMC Card Compartment Mic REC A B Button POWER ON OFF ENTER LCD Display 9 Total Track File F ormat Bit Rate Sample Frequency EQ Indicator Current T rack Elapsed Time Battery...

Page 6: ...XP or Mac X version10 2 6 or above there is no installation require just connect the player to the computer OS will setup for one moment and then removable disk icon will show in My Computer For Mac O...

Page 7: ...nsfer file from the player to your PC Note Do not remove the player while it s transfering files It might currupt or damage the firmware and or files on the player If the player is accidentley removed...

Page 8: ...HOLD To enter the main menu press MENU button In the main menu it will display NAV MSC REC and SYS Refer to the MENU Table for detail pg9 NAV Navigation 1 MUSIC Navigation for the Music files ex MP3 W...

Page 9: ...custom settings the player automatically powers off 2 Press the joystick up again to resume playback Playing Music 16 Start Recording 1 Select REC menu from the main menu 2 Press joystick to enter 3 T...

Page 10: ...qualizer settings Normal Classic Live Pop Rock 2 REPEAT Mode Change repeating options refer to pg 20 3 Display Adjust screen display settings ID3TAG Displays track information such as album name artis...

Page 11: ...racks in normal order ONE The player will repeat current track only ALL The player will repeat all tracks INTRO The player will play each track for a few seconds RANDOM The player will play tracks in...

Page 12: ...steps to get to the Format submenu Main menu SYS menu Format 2 In Format menu it displays INTERNAL M SD MMC Card Press joystick to confim an option The Format window appears 3 Press the joystick left...

Page 13: ...atically update it when the player is turn on F W Upgrade 24 Trouble Shooting 25 The player does not work 1 Check the battery capacity 2 Check to see if the battery is inserted properly Download failu...

Page 14: ...LCD Processor 65MIPS DSP Audio Playback MP3 decode Voice Recording IMA ADPCM encoding 32 hours recording Signal to Noise Ratio 90dB Frequency Response 20Hz 20KHz Output 5mW each output Distortion Outp...

Reviews: