background image

22

AM/FM TUNER

Your player comes with a built-in AM/FM tuner. To use the AM/FM tuner:

Make sure that the AM loop antenna and the FM antenna have been connected properly on 

the rear panel of the player. 
Press MODE to enter AM/FM mode.
Press the AM or FM button to listen to the AM of FM band, respectively.

Press STOP to toggle between the two tuning modes: CH (preset) and Tune (manual).

CH Mode: Listen to Preset Channels. 

This is the default tuning mode. Press the / - buttons to tune to higher or 

lower preset channels, or press the C / - keys on the remote.

Tune Mode: Listen to Manually-Tuned Channels. 

The front-panel display will read “Set Tune” when the radio is in Tune Mode. Press 

the / - buttons to tune to higher or lower station frequencies, or press the 

C / - keys on the remote. Press and hold / - to auto-seek to the 

next station in reception range.

Note: 

If a button or key has not been pressed for longer than approximately 3 seconds in Tune 

Mode, the player will automatically switch back to the default CH Mode.

To store preset channels automatically:

Press AUTO. The player will automatically scan the entire band and memorize any 

stations in reception range. This will overwrite any previously store channels. To stop 

Auto-Search, press STOP again.

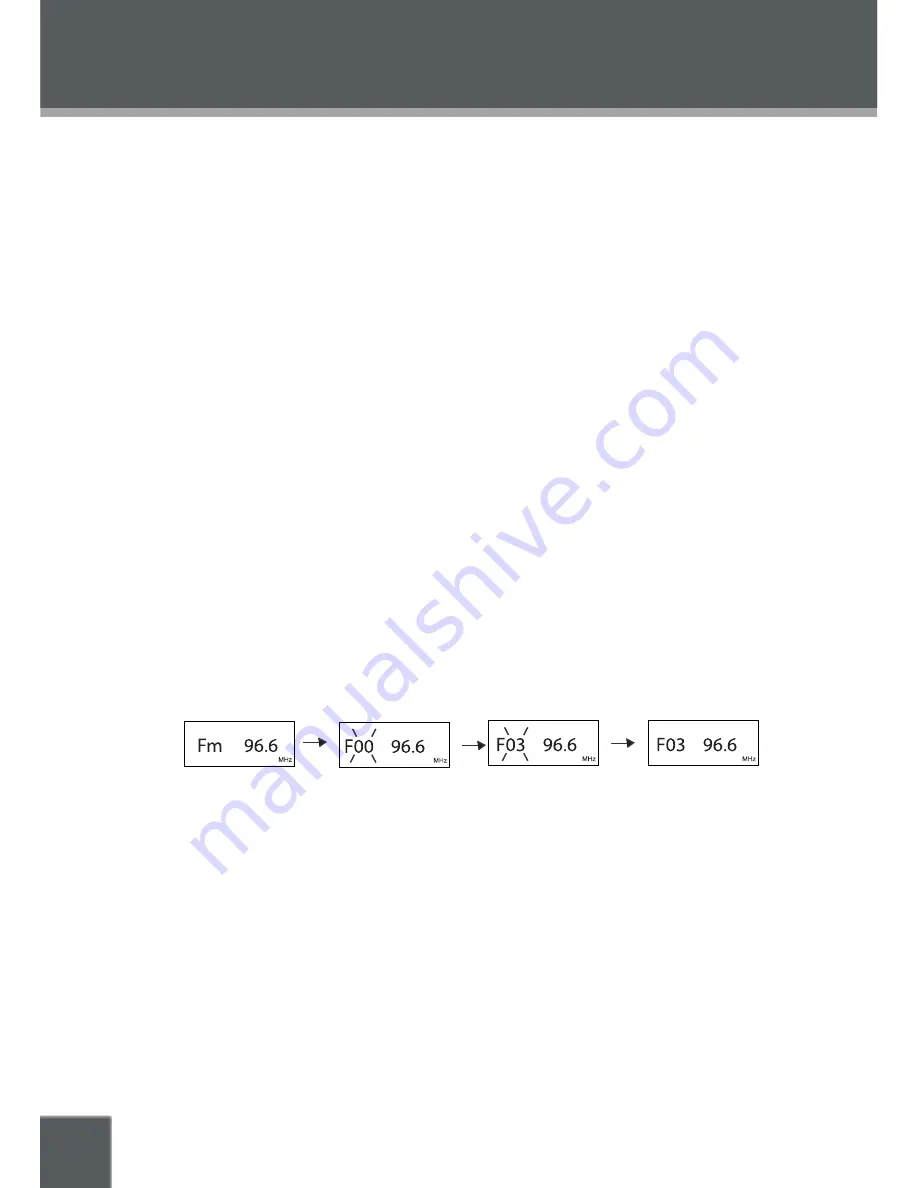
To store preset channels manually:

Press MEMO to manually store the current station as a preset channel. The front-

panel display will flash “F 00”
Use the numeric keypad to enter the desired preset channel number.

Press MEMO again to store the preset channel.

To delete a preset channel:

Tune to the preset channel you want to delete, and then press CLEAR to delete it.

1.

2.
3.
4.

1.

2.
3.

Summary of Contents for DVD-937

Page 1: ...DVD 937 5 1 Channel Home Theater System Progressive Scan DVD Player with Digital AM FM Tuner Instruction Manual Please read this manual carefully before operation ...

Page 2: ...afety interlocks When open and the interlocks are defeated visible laser radiation is present Use of controls adjustments or performance of procedures other than those specified herein may result in hazardous radia tion exposure DO NOT STARE INTO THE BEAM FCC Notice This equipment has been tested and found to comply with the limits for a Class B digital device pursuant with the FCC Rules Part 15 T...

Page 3: ...the obsolete outlet A polarized plug has two blades where one is wider than the other the wide blade is provided for your safety Do not place heavy objects on the power cord Protect the cord from being walked on pinched by objects or torn and exposed to liquids especially at plugs convenience receptacles and the point at which they exit from the device Do not use this device near water Do not plac...

Page 4: ... and should be left to a professional antenna installer Note to CATV System Installer This reminder is provided to call the CATV system install er s attention to Section 820 40 of the National Electric Code which provides guidelines for proper grounding and in particular specifies that the cable ground shall be connected to the grounding system of the building as close to the point of cable entry ...

Page 5: ... PACKAGE CONTENTS DVD 937 Progressive Scan DVD Player Main Unit Satellite Speakers 5 Subwoofer 1 Full Function Remote Control AV Cable FM Antenna AM Antenna ...

Page 6: ...N OF CONTROLS 11 Main Unit 11 Remote Control 11 CONNECTIONS 12 System Connection Diagram 12 Progressive Scan Connection 13 GETTING STARTED 14 Remote Control 14 Power Supply 14 Turning the Player On Off 14 BASIC OPERATIONS 15 Basic Playback 15 Play Pause Stop 15 Previous Next Skip 15 Fast Forward Fast Backward Search 15 Slow 15 Menu Navigation 16 Numeric Keypad 16 Adjusting the Volume 16 Adjusting ...

Page 7: ... within a specified title 17 CD Time Search 17 Repeat Mode 18 Repeat A B Mode 18 Multi Angle Subtitle Audio 18 Zoom 18 Program 19 DVD Program Mode 19 CD Program Mode 19 SETUP 20 Language Setup 20 Screen Setup 20 Audio Setup 21 Custom Setup 21 AM FM TUNER 22 TROUBLESHOOTING 23 SPECIFICATIONS 25 TABLE OF CONTENTS ...

Page 8: ...Extra CD G CD I etc DVD Feature Symbols DVD discs may contain various features that depend on the production of the disc These features are represented by the symbols below DVD Region Codes DVD discs and DVD players are manufactured under an worldwide agreement the DVD Regional Code System so that players will operate only with discs with the same Regional Code that cor responds with the player s ...

Page 9: ...era tures Do not bend or press discs To reduce the risk of scratches always put discs back in their case after use Store discs vertically in a cabinet Do not place stickers or labels on either side of a disc Cleaning a Disc Use a dry soft cloth to wipe off any fingerprints and dusts from the playing surface of the disc Wipe in a straight line radially from the center to the outside edge of the dis...

Page 10: ...recorder is connected to the player the video output image will be dis torted during recording Manufactured under license from Dolby Laboratories Dolby and the Dolby D symbol are trademarks of Dolby Laboratories Confidential Unpublished Works 1992 1997 Dolby Laboratories All rights reserved This product incorporates copyright protection technology that is protected by method claims of certain U S ...

Page 11: ... 11 12 13 14 15 16 17 18 19 FM CHANNEL AM Open Close Numeric Keypad GOTO Channel Channel Volume EQ Equalizer Setup Enter Mute FBW Fast Backward FFW Fast Forward Stop Play Language Subtitle Repeat A B Repeat A B Display Audio Mode AM FM Memo Auto 1 2 3 4 5 6 7 8 9 10 11 12 13 14 15 16 17 18 19 20 21 22 23 24 25 Clear Tuner Volume ST MONO Stereo Mono Navigation Keypad Reset Next Prev Previous Prog P...

Page 12: ... Input Coaxial Input External Audio Source TV System NOTE Connect the color coded speaker wires to their corresponding colored speaker clip on the rear panel Connect to the Coaxial or Optical digital output only To avoid sound interference use only ONE of the audio output connections System Connection Diagram ...

Page 13: ...nnect the player s AV outputs to your TV s AV inputs Make sure your TV is set to the correct video mode AV Video Input 1 2 etc Typically there is a button on the front panel of the TV labeled TV AV press it to change video modes Consult your TV s instruction manual if you need help setting the TV s video line mode The player is equipped for stereo playback To fully realize 2 channel sound a Stereo...

Page 14: ...eration If the sensor has been covered or if there is a large object between the remote and the sensor the sensor will not respond The sensor may not be able to receive the remote s signal when it is exposed to direct sunlight or a strong artificial light eg fluorescent or strobe lighting Change the direction of the light or reposition the player to avoid direct lighting Power Supply This player s...

Page 15: ...when the disc is Pre Stopped to stop playback completely When is pressed the disc will start playing from the beginning Previous Next Skip Press to skip forward one track DVD CD etc Press to skip back one track DVD CD etc Fast Forward Fast Backward Search Press to fast forward through the disc Each successive press of will change the rate of fast forward playback Press to fast backward through the...

Page 16: ...ill toggle another option on the front panel display press VOLUME to adjust the option up or down Disc Error Messages The following messages will be displayed on screen if there is a problem with the format of the loaded disc WRONG REGIONAL DISC The region code of the disc does not match the player s region code Region 1 WRONG PASSWORD The parental rating level of the disc is higher than the paren...

Page 17: ...itle Search Press GOTO once to display the Chapter Title Search Bar shown to the right Press the left right NAVIGATION buttons to select highlight an entry field Use the Numeric keypad to input the desired chapter title number or press the up down NAVIGATION buttons to increase decrease the chapter title number Press ENTER to confirm and execute the search or press GOTO to exit search mode DVD Tim...

Page 18: ... with subtitles press SUBTITLE to view the available subtitle tracks A DVD may have up to 32 selectable subtitles During playback of a DVD that has been mastered with alternate language tracks press LANGUAGE to hear the alternate tracks A DVD may have up to 8 selectable language tracks During playback of a DVD that has been mastered with alternate audio tracks press AUDIO to hear the alternate tra...

Page 19: ...n NAVI GATION buttons to select a chapter Press PLAY or ENTER to confirm the selec tion Repeat steps 2 4 until you have finished programming your selections or when you have programmed the maximum 20 tracks Press PLAY to start playback Press PROGRAM to cancel CD Program Mode Load a CD and press PROGRAM Press the right NAVIGATION button to select the Track column press the up down NAVI GATION butto...

Page 20: ...rench German Italian Spanish Portuguese Hindi Thai Russian Korean Others Subtitle Sets the default subtitle track of loaded DVDs English Chinese Japanese French German Italian Spanish Portuguese Hindi Thai Russian Korean Others Screen Setup Use the NAVIGATION buttons to highlight the desired screen selection and press ENTER to confirm Item Description Options Default is in Bold TV Type Sets the as...

Page 21: ... using the included home theater speakers set this to 5 1 Channel If you are only using an RCA Stereo Audio connection set this to 2 Channel Custom Setup Use the NAVIGATION buttons to highlight the desired Custom Setup selection and press ENTER to confirm Item Description Options Default is in Bold Parental Ctrl Sets the maturity rating level of the player The player will not play any discs rated ...

Page 22: ...or lower station frequencies or press the CHANNEL keys on the remote Press and hold TUNING to auto seek to the next station in reception range Note If a button or key has not been pressed for longer than approximately 3 seconds in Tune Mode the player will automatically switch back to the default CH Mode To store preset channels automatically Press AUTO The player will automatically scan the entir...

Page 23: ...s region code matches the player s region code Ensure that the disc s rating level does not exceed the player s Ensure that the disc is not damaged or too dirty Clean the disc or try another disc Moisture may have condensed inside the player Remove the disc and leave the player on for 1 2 hours and then try again There is no picture Ensure that the AV switch is set to the correct mode AV IN or AV ...

Page 24: ...of this is the WARNING screen of most DVDs Ensure that the disc has multiple chapters tracks The remote control doesn t work Ensure that the Power Switch has been physically set to the ON position Ensure that there are no obstacles between the remote and the player Point the remote at the remote sensor on the main unit Ensure that the batteries in the remote retain a charge and have been installed...

Page 25: ...al System NTSC PAL Video Output Component Video Progressive Scan S Video RCA Composite Video Audio Output Optical Digital Audio Coaxial Digital Audio RCA Stereo Audio Speaker Output Surround Right Surround Left Front Right Front Left Center Subwoofer Audio Input RCA Stereo Audio 2 Unit Dimensions 17 0 x 12 6 x 2 0 WHD ...

Page 26: ...COBY Electronics Corp 56 65 Rust Street Maspeth NY 11378 www cobyusa com www ecoby com ...

Reviews: