background image


58

Clutch adjustment washers 

 
Your Cobra comes stock with flat washer(s) at the bottom of the spring washer 
stack. Cobra offers several thicknesses of thin adjustment washers that allow 
clutch engagement tuning. Increasing the flat washer(s) thickness increases the 
engine speed for clutch engagement thus increasing the abruptness of clutch 
engagement (harder hit). Conversely, decreasing the flat washer(s) thickness 
decreases the engine speed for clutch engagement thus decreasing the 
abruptness of clutch engagement (softer hit). 
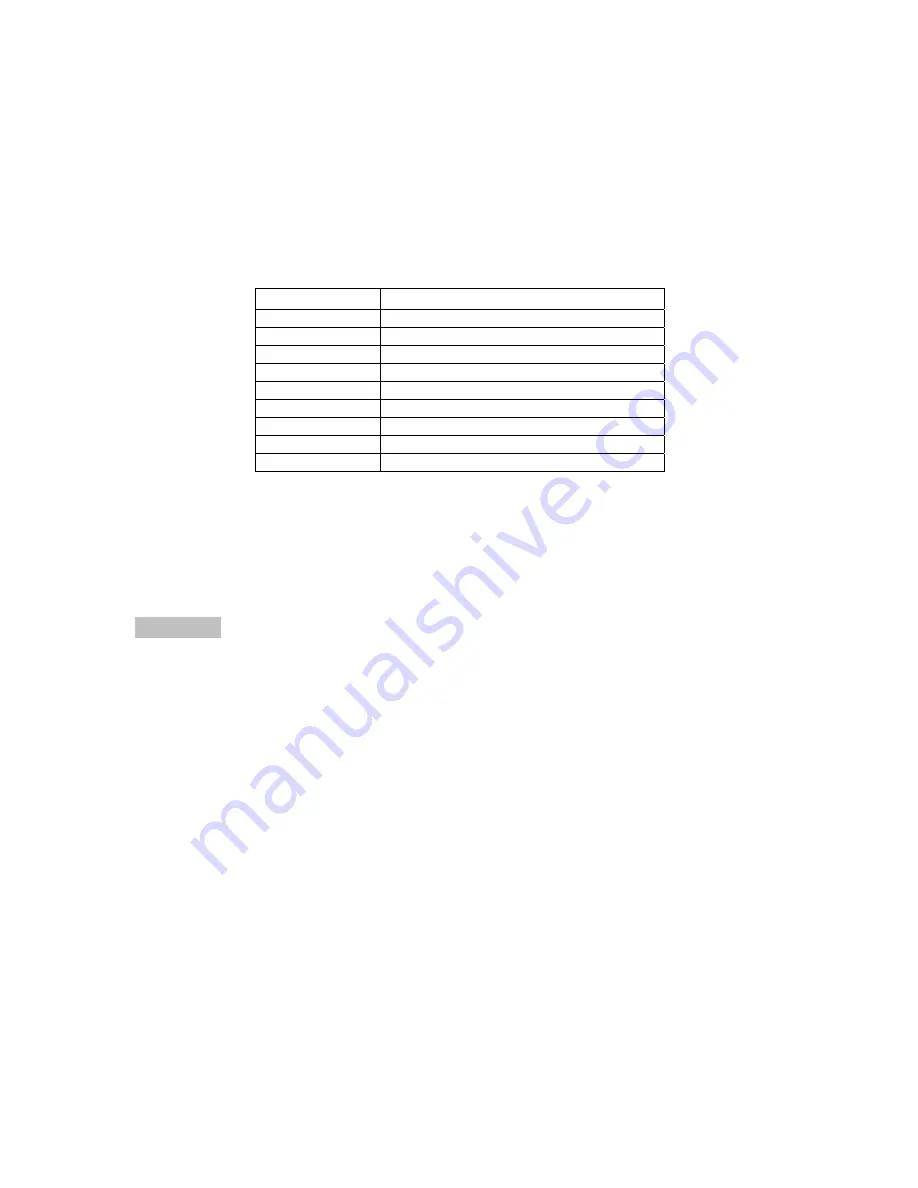
 

Part # 

Thickness mm (inch) 

HKCSM015 1.5 

(0.060) 

HKCSM012 1.2 

(0.047) 

HKCSM008 0.8 

(0.031) 

HKCSM006 0.6 

(0.025) 

HKCSM005 0.5 

(0.020) 

HKCSM004 0.4 

(0.015) 

HKCSM003 0.25 

(0.010) 

HKCSM001 0.12 

(0.005) 

HKAM0022 

CLUCTH SHIM KIT 


NOTE: 

HKAM022 Clutch shim kit includes -  3 each .005”, .010”, .015” and .020” 

shims along with 2 clutch to hub spacers and 2 thin clutch to hub spacers. 
 
Use the table above to order adjustment washers. Replace the stock washer with 
the proper combination of adjustment washers that delivers the desired clutch hit. 
 
CAUTION: 
It is easy to prematurely damage the clutch and other engine components with 
improper clutch adjustment. If you are unsure of how to adjust the clutch, contact 
the Cobra Technical Support Group before making adjustments. 
 

Clutch shoe wear: 

  This can be measured by the overall diameter of the shoes installed on the 

arbor. This measurement should be greater than 80.5mm  

  If the clutch has been slipping and shows signs of glazing, it is best to replace 

the shoes. We have found that once the shoes are glazed, even if deglazed 
with emery paper or a file, the performance is reduced. 

  The best way to prevent glazing is by not gearing too high, changing the oil as 

specified and by not blipping the throttle.


Every time you blip the throttle, you 

are working your clutch springs.   


Clutch basket wear: 

  The internal diameter of a new clutch basket should measure ˜84.10mm. 

Over time the clutch shoes will wear the internal surface down creating a 
bigger ID and causing a later engagement. The maximum ID we recommend 
to allow is 84.25mm. 


Summary of Contents for CX50 SR

Page 1: ...ED FOR EXPERIENCED RACERS ONLY AND NOT FOR BEGINNERS IT IS YOUR RESPONSIBILITY AS THE OWNER OF THIS COBRA MOTORCYCLE OR AS THE PARENT OR LEGAL GUARDIAN OF THE OPERATOR TO KEEP THIS COBRA MOTORCYCLE IN...

Page 2: ...eding 15 Fork Oil Replacement 16 FRICTIONAL DRIVE V3 CFD 17 PARTS AIRBOX INLET SYSTEM 19 PARTS BARS AND CONTROLS 20 PARTS CARBURETOR 21 PARTS COOLANT SYSTEM 22 PARTS ELECTRICAL SYSTEM 23 PARTS ENGINE...

Page 3: ...sassembly Procedure 52 Splitting the Cases 53 Engine assembly 54 CLUTCH 55 Clutch Assembly 59 IGNITION 60 COOLING SYSTEM 61 FUEL AIR SYSTEM 63 Carburetor 63 Reeds 65 EXHAUST 65 REAR WHEEL PULLERS 65 B...

Page 4: ...er break in 40 1 to 50 1 Carburetion 19 mm Dell Orto Slow Pilot Jet Main Jet 55 93 Needle W7 2 Needle Clip Position 2nd slot from top of needle Float Height 16mm 0 5mm 0 63 0 020 Transmission Speed Si...

Page 5: ...lts 5 8 70 7 9 M6 X 1 0 Clutch nut 40 480 54 263 M10 x 1 25 Clutch bolts 12 144 16 263 M6 x 1 0 Engine mount bolts 22 265 30 M8 X 1 25 Swingarm pivot 21 250 28 M14 X 2 0 Shock bolt 35 420 47 243 M10 x...

Page 6: ...um avoid prolonged high RPM operation and avoid abusing the clutch with throttle blipping Cool and inspect bike for loose fasteners Next hour of operation avoid prolonged operation at Wide Open Thrott...

Page 7: ...rear wheel off the ground 2 Pull up the choke knob and turn it to lock it 3 Kick start the engine 4 Rev the engine in short spurts turning the throttle no more than 1 4 open until the engine will run...

Page 8: ...Produces virtually no coking deposits leaving pistons rings and heads extremely clean with minimal pipe spooge 2 Filling your transmission with more than 8 0 oz 235 cc of lubricant may help to transf...

Page 9: ...ter each ride If the clutch is engaging properly DO NOT feel the need to take the clutch apart to measure the spring stack clean the stack replace the springs etc Cobra has worked very hard to make a...

Page 10: ...ny but not so hot that there is risk of being burned by the engine or the oil Hot oil and hot components on the motorcycle may cause burns 2 Remove the oil drain plug located on the right side of the...

Page 11: ...is aligned properly 2 For proper adjustment the chain should have 35 mm 1 3 8 free movement just behind the chain block with no load on the bike figure 2 CAUTION Sit on the bike and verify that the c...

Page 12: ...is required so that the brake pads do not drag on the rotor 1 MINIMUM Make sure that the free play locking clip is installed such that one must push forward toward the front of the bike to remove Othe...

Page 13: ...engage the brake lever pedal and hold it there as if engaging the brakes While doing this pull on the plunger of the syringe Doing this will cause a vacuum in the system The vacuum will swell the air...

Page 14: ...tile petroleum product Diesel fuel or kerosene would be preferred but caution should still be taken Hot soapy water works well 1 Clean the filter in hot soapy water to remove all dirt particles 2 Allo...

Page 15: ...recommends that a professional service technician conduct all internal maintenance other than changing springs and oil This will help to ensure safe and consistent operation For routine maintenance th...

Page 16: ...ench c Holding in one hand the 9 16 wrench use the fork cap wrench to unscrew the fork cap from the damper rod d Remove the fork spring pad and fork spring e Inside the damper rod the rebound adjustme...

Page 17: ...ration after break in The slip torque value should be above 80 ft lb 108 Nm measured at the sprocket with the following process To properly measure the minimum torque at which the CFD Cobra Frictional...

Page 18: ...ersal puller MCMUTL70 If it slips below the value the CFD must be readjusted as per described in the service section of this manual NOTE If the bike makes a whir whir whir sound coming from the clutch...

Page 19: ...LAP 6 MCKGHO03 HOSE CLAMP AIRBOX TO BOOT 7 RCKG0505 AIR BOOT 8 MCKGHO01 HOSE CLAMP BOOT TO CARB 9 MCKGHO04 HOSE CLAMP CARB TO MANIFOLD 10 RCMU0036 INLET MANIFOLD 2016 5 11 ECMU0246 REED CAGE ASSEMBLY...

Page 20: ...ICRO BAR THROTTLE 4 FCPW0004 CABLE COVER 5 FCMU0021 THROTTLE COVER 6 FCMU0019 THROTTLE CABLE 6A HCNJ0801 NUT 8MM JAM 7 BAKG0003 BRAKE ASSEMBLY FRONT 8 FCMU0033 KILL SWITCH ASSEMBLY 9 HCBC0806 M8X30mm...

Page 21: ...0009 FUEL MIXTURE SCREW 16 14 RCMU0011 IDLE ADJUSTMENT SCREW 18 15 RCMU0201 SCREW FLOAT BOWL 20 RCMU00xx PILOT JET xx denotes size 22 RCMU0262 ATOMIZER 2 62 AU STANDARD 23 RCMU0107 FLOAT NEEDLE 24 RCM...

Page 22: ...5A MCMUGR03 GROMMET RADIATOR MOUNTING TOP THICK ONE 5B MCC6GR01 GROMMET RADIATOR MOUNTING BOTTOM ONE 6 HCBF0616 M6X16mm FLANGE HEAD BOLT 2 REQ D 7 HCWF1478 FLAT WASHER 2 REQ D 8 MCMUCL07 HOSE CLAMP 4...

Page 23: ...R WITH GROMMET 8 HCBC0535 M5X35mm SOCKET HEAD CAP SCREW 2 REQ D 9 HCBC0525 M5X25mm SOCKET HEAD CAP SCREW 10 HCWF0601 6MM FLAT WASHER FOR STATOR 3 REQ D 11 ICMU0042 ROTOR FEW 2016 5 12 EKMU0035 KIT PUL...

Page 24: ...24 Parts Engine Bottom End and Transmission...

Page 25: ...1 BEARING TRANSMISSION SHAFT 1 EACH CASE HALF 13 HCBB0612 M6X12mm BUTTON HEAD SCREW BEARING RETAINER 2 REQ D 14 ECKGBR01 BEARING TRANSMISSION OUTPUT SHAFT 15 ECMU0236 SEAL OUTPUT SHAFT 2016 5 16 ECMU0...

Page 26: ...26 Parts Engine Clutch and Kick Lever...

Page 27: ...CFD 7mm 21 ECMU0272 OIL FILL PLUG VENOM 22 ZCMUB014 O RING OIL FILL PLUG 23 HCFH0616 M6X16mm FLAT HEAD BOLT 24 ECMU0250 WASHER KICK LEVER MOUNTING 25 EAMU0011 KICK LEVER 26 ECDC0078 SEAL KICKSHAFT 28...

Page 28: ...5 ECKG0073 IMPELLER WATER PUMP ALUMINUM 6 HCBB0512 M5X12mm BUTTON HEAD 7 ECMU0167 BEARING WATER PUMP BIG 8 EKMU0035 KIT PULLEYS SPACER BELT RETAINER FWE 2016 5 9 HCBS0009 SHOULDER BOLT 10 ECKG0170 WAT...

Page 29: ...ECMUSR00 SNAP RING FOR PISTON 2 REQ D 7 ECKG0012 WRIST PIN 8 ZCMUOR07 O RING EXHAUST FLANGE 9 ECMU0262 EXHAUST FLANGE 10 ZCMOTE11 O RINGS PIPE TO FLANGE 2 REQ D 11 HCBC0612 M6X12 EXHAUST FLANGE SCREW...

Page 30: ...REQ D 4 XCMU0033 ISOLATION MOUNT 5 HCBF0616 M6X16mm FLANGE HEAD BOLT 2 REQ D 6 HCHA0003 6mm CLIP NUT FOR FRONT PIPE MOUNT 7 HCWF1478 PIPE GROMMET WASHER 2 REQ D 8 XCMU0032 SILENCER 9 XCC60017 PIPE SIL...

Page 31: ...31 This Page Intentionally Left Blank...

Page 32: ...32 Parts Forks Triple Clamps...

Page 33: ...03 BAR MOUNT KIT TALL 14 HCBC1001 M10X45mm SOCKET HEAD CAP SCREW 2 REQ D 15 HCNL1001 M10 LOCK NUT 16 FCMU1103 DUST COVER 1 REQ D 17 ZCMUOR35 O RING CLUTCH SLAVE STEERING STEM 2 REQ D 18A FCMU0038 SPAC...

Page 34: ...34 Parts Forks Leg Assembly Brake Side...

Page 35: ...NUT JAM 3 8 24 CLASS 8 16 KCC60068 RING CLIP FORK SPRING GUIDE RETAINER 17 KAC60003 DAMPER ROD ASSEMBLY 18 KCC60058 O RING MID VALVE ADJ NEEDLE 19 KCC60050 FORK MID VALVE ADJUSTER NEEDLE 20 KCC60051 S...

Page 36: ...36 Parts Forks Leg Assembly Non brake Side...

Page 37: ...ORK 0 23 KG MM 32mm 14 KCCS3227 HEAVY SPRING FORK 0 257KG MM 32mm 15 HCNJ3824 NUT JAM 3 8 24 CLASS 8 16 KCC60068 RING CLIP FORK SPRING GUIDE RETAINER 17 KAC60003 DAMPER ROD ASSEMBLY 18 KCC60058 O RING...

Page 38: ...OUNTING 2REQ D 9 HCBF0616 M6X16mm FLANGE HEAD BOLT 2 REQ D 10 HCWF1478 FLAT WASHER 2 REQ D 11 HCBH1203 M12 SWINGARM PIVOT BOLT 12 HCNL1201 M12 SWINGARM LOCK NUT 13 HCBH0880 M8X80mm HEX HEAD BOLT 14 HC...

Page 39: ...4mm SOCKET HEAD CAP SCREW 2 REQ D 7 HCWP0002 WASHER BODY PANEL FLAT 2 REQ D 8 MCMUGR03 MOUNTING GROMMET 2 REQ D 9 TCKG0001 SPACER 2 REQ D 10 HCBF0630 M6X30mm FLANGE HEAD BOLT 2 REQ D 11 HCWF1478 PIPE...

Page 40: ...KE FLUID BEL RAY DOT 4 355 ml ACCESSORY BKMU0003 TOOL BLEED KIT FORMULA CARD AJP ACCESSORY BCKG0028 LEVER ADJUSTMENT KIT ACCESSORY BCKG0027 RESERVOIR SEAL KIT ACCESSORY BCKG0025 REPLACEMENT BAR CLAMP...

Page 41: ...1201 12 FRONT TUBE 4 WCMU0016 FRONT AXLE 5 ECMU0040 T SHIM OPTIONAL FOR BRAKE CALIPER ALIGNMENT 6 WCMU0101 FRONT WHEEL SPACER LARGE 7 WCMU0120 WHEEL BEARING 2 REQD 8 WCMU0036 WHEEL BEARING SPACER 9 HC...

Page 42: ...SHROUD LEFT x DENOTES COLOR BLK WHT YEL FLL 7A TCC60017 BODY PANEL WASHER 5MM 1 REQ D MT SHROUD TO RADIATOR 7B HCBC0514 M5X14 SHCS 1 REQ D MOUNT SHROUD TO RADIATOR 7C HCCN0000 5MM EXTRUDED U NUT 7D HC...

Page 43: ...E HOSE CLAMP 2 REQ D 15 HCPP0832 BRAKE HOSE CLAMP FASTENER 2 REQ D 16 BCMU0502 BRAKE ROTOR 140mm 17 HCBC0601 M6X16mm SOCKET HEAD CAP SCREWS 5 REQ D 18 HCBF0620 M6X20mm FLANGE HEAD BOLT 2 REQ D 19 BCKG...

Page 44: ...th 35 45 PCMU0y38 SPROCKET y denotes width 1 420 2 415 7 HCBH0702 M7X30mm HEX HEAD BOLT 7A HCWF0701 7mm FLAT WASHER 4 REQ D 7B HCNL0701 M7 LOCKNUT 4REQ D 8 WCMU0016 REAR AXLE 10 WCMU0101 WHEEL SPACER...

Page 45: ...4 REQ D 5 SCMU0058 SHOCK WHITE NYLON TIP SETSCREW M6 1 0 CARD 6 SCMU0056 SHOCK SLEEVE BLACK CARD 7 SCMU0100 BUMPER TAPPERED SHOCK 8 SCMU0040 SHOCK SPRING PAD CARD 9 SCMU0054 SHOCK SPRING PERCH CARD 10...

Page 46: ...U0051 O RING IFP 6 SCMU0052 IFP SEAL BAND 7 SCMU0033 O RING SHOCK BASE 8 SCMU0050 RESERVOIR CAP RETAINER RING 9 SCMU0035 O RING CHARGE CAP 10 HCBB0506 M5X6mm LONG BUTTON HEAD STAINLESS STEEL 11 SCMU00...

Page 47: ...ER HOSE CLAMP 2 REQ D 11 HCBF1040 M10X40mm LOWER SHOCK MOUNT BOLT 12 FCMU0203 WHEEL PULL 13 FCMU0202 WHEEL PULL ENDCAP 14 HCBH0810 M8X65mm WHEEL PULL BOLT 14A HCWL0801 8mm LOCK WASHER 15 HCWF0801 8mm...

Page 48: ...before you establish the most accurate reading possible Because of the geometry of the spark plug used in this Cobra Motorcycle the adapter used with your compression tester must have a similar volume...

Page 49: ...at TDC and there are negative effects of either having too much or too little clearance Since parts like the crank connecting rod cylinder head piston and crankcases all have varying tolerances Cobra...

Page 50: ...over piston rings can be left off to ease of assembly Carefully insert the solder wire though the spark plug hole into the cylinder far enough such that the tip of the wire touches the left or right s...

Page 51: ...se for you Europeans to tighten it 4 Tighten the castle nut to the next cotter pin assembly location 5 With the internal CFD gear stop tool in position check the slip torque again it is NOT necessary...

Page 52: ...10 Remove the engine from the right side of the frame NOTE If you are merely performing a top end service skip ahead to Top End Disassembly Procedure Complete Engine Disassembly Procedure 1 Remove the...

Page 53: ...pes scratches pitting etc are found replace the cylinder 2 If deposits are all are found a Clean with muriatic acid b Once the deposits are removed inspect for abrasions and missing surface coating i...

Page 54: ...faces the crank weights 3 Press in the counter shaft seal concave side faces inside of transmission 4 Press in the water pump assembly 5 Tap both ways axially then verify easy rotation 6 Inspect the...

Page 55: ...cycles 19 Leak check the engine to 20 psi to ensure proper seal 20 Install stator reinstalling the grommet and wires snug the bolts 21 Install the rotor per Rotor Installation section under the S3 Ig...

Page 56: ...CLUTCH REMOVAL 1 Drain the engine transmission oil and remove the clutch cover 2 Remove the clutch nut NOT left hand thread on the end of the crankshaft with the clutch nut removal tool CAUTION It is...

Page 57: ...ions CAUTION Generally reassemble the springs as you removed them from the engine or as you received them from Cobra If you are unsure call the Cobra Technical Support Group 517 437 9100 and consult t...

Page 58: ...e stock washer with the proper combination of adjustment washers that delivers the desired clutch hit CAUTION It is easy to prematurely damage the clutch and other engine components with improper clut...

Page 59: ...er removing all old thread locking material 3 Assemble the stacks and shoes on the arbor using high strength thread lock material to the stack bolt and tighten to 16 Nm 12 ft lb 144 in lb CAUTION Avoi...

Page 60: ...large enough There should be even clearance as the rotor rotates relative to the stator Ignition timing is not adjustable Changing the ignition timing can degrade performance Make sure connections ar...

Page 61: ...ng System Radiator fluid removal Remove the coolant drain plug 10mm hex key on the bottom of the engine cases NOTE Inspect the old coolant for evidence of oil combustion byproducts black oil slick stu...

Page 62: ...ssembly into the assembly tool and align the tool with engine case making sure alignment pin is in proper hole CAUTION Damage may occur if one attempts to install the water pump assembly and it s not...

Page 63: ...d head is the idle adjustment screw To raise the idle turn the screw in clockwise in 1 4 turn increments and rev the engine after each adjustment To lower the idle turn the screw counter clockwise TOP...

Page 64: ...he carburetor very clean and make sure you don t have water or dirt in the carburetor bowl Use automotive carburetor cleaner or WD 40 to clean the carburetor inside and out Cleaning the carburetor Cle...

Page 65: ...amage done to the pipe will result in a major performance loss NOTE Be sure to take the pipe off and any carbon that may be built up Carbon build up is created from exhaust Exhaust has oils in it and...

Page 66: ...cohol Contaminated pads must be replaced Ensure that the brake caliper is centered over the brake rotor It a correction is needed Cobra has thin brake shims to help make minor adjustments in alignment...

Page 67: ...can only be approximated by the size of the step where it sticks out of the basket h Basket has worn and is too large There is a relationship between observed characteristics and the things that can...

Page 68: ...utch life Change oil each ride Gear to the low side Avoid mud if possible Cut mud practice to 1 lap or none Stay on the gas no throttle blipping Run more air pressure to allow wheels to spin helps thr...

Page 69: ...ime to balance the three stacks shims springs bolts etc to as close to the same length as you are willing to put effort into will result in a better performing motorcycle Q One of my two riders weighs...

Page 70: ...16 33 2 06 15 31 2 07 16 34 2 13 15 32 2 13 16 35 2 19 15 33 2 20 14 31 2 21 16 36 2 25 15 34 2 27 14 32 2 29 16 37 2 31 15 35 2 33 14 33 2 36 16 38 2 38 15 36 2 40 14 34 2 43 16 39 2 44 15 37 2 47 14...

Page 71: ...esistance to the suspension motion when the suspension is compressing 1 6 Rebound damping 1 6 1 Harder more damping slower adds resistance to the suspension motion when the suspension is returning to...

Page 72: ...eed sensitive compression component is adjustable at the top of the fork The combination of the Smart Leg and the conventional leg allows the fork to be very supple throughout all low amplitude operat...

Page 73: ...ssion Damping Bike tends to jump rear end high Harder High Speed Compression Bike tends to jump rear end low Softer High Speed Compression Frequent rear end bottoming Harder Compression Damping Bottom...

Page 74: ...mping or slows it down whereas out speeds up the shock or removes damping Carburetion Although your Cobra is sent from the factory with the carburetor jetted for optimal performance you may find it ne...

Page 75: ...Leaner Richer Very humid air Richer Leaner Low altitude Standard None High altitude Richer Leaner Low barometric pressure Richer Leaner High barometric pressure Leaner Richer NOTE Before making any ca...

Page 76: ...urn the screw in clockwise in 1 4 turn increments and rev the engine after each adjustment To lower the idle turn the screw counter clockwise TOP END JETTING Adjust for clean full throttle acceleratio...

Page 77: ...case gasket 2 Engine is down on power a Clutch engagement is not set properly b Jetting is incorrect c Silencer needs repacked d Exhaust pipe i Has excess carbon buildup ii Has large dent in it e Com...

Page 78: ...h is shorted iv Bad electrical ground v Stator winding damaged d Exhaust is plugged with object of flooded fuel e Engine is flooded f Cracked broken or jammed reed pedal g Excessive piston or cylinder...

Page 79: ...Electrical Parts 23 Engine Specifications 4 Exhaust 65 Parts 30 Fork Adjustments 72 Operation 72 Fork oil replacement 16 Forks Service 66 Frame Parts 38 Frictional Drive 17 Front Brake Parts 40 Front...

Page 80: ...rs 65 Rear Brake Adjustment 11 Parts 43 Rear Wheel Parts 44 Pullers 65 Reeds 65 Shock Adjustments 73 Parts 45 46 Slip Clutch 17 Spark Plug Recommended 4 Specifications 4 Starting 7 Stator torque 5 Sus...

Reviews: