


2.
The GMX550 Lockpick is a simple Plug-N-Play interface however additional wiring is labeled and available on your
Lockpick harness. These connections may be used for your aftermarket accessory power needs.
RED – 12V ACC power output (Limit 1 amp) This is an output, do not connect to vehicle wiring. If your accessory
requires more than 1 amp, use this power output to control a relay connected directly to battery power.
YELLOW – 12V constant battery power output
BLACK – GROUND connection
ORANGE W/BLACK stripe – 12V rear camera power output (use this power source for your aftermarket rear
camera or for full control of your factory camera see step 3 below)
RED W/BLACK stripe – 12V ADDITIONAL camera power output (use this as the power source for front/left/right
view camera(s))
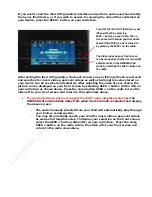
3.
If you have a FACTORY REAR VIEW CAMERA
and would like to be able to view and control it
when in DRIVE,
extend the ORANGE W/BLACK stripe 12V REVERSE wire labeled in your GMX550 harness. A crimp connector is
already attached for your convenience. Route the wire along the edge of the console and down to the small silver
module under the passenger seat. Slide the seat all the way back to view the connector on the front or side edge.
Unplug the connector and cut the Blue wire pictured in the photo below (end wire, left side, from the back of the
plug). Attach the ORANGE W/BLACK stripe GMX550 wire to the blue wire on the vehicle connector. The other cut
end of the wire in the factory harness should be insulated and left disconnected. Do not connect the Lockpick Orange
w/black stripe wire without cutting the BLUE factory wire or improper operation will occur. Also, early year Enclave
and Acadias may place the camera module in the rear instead of under the passenger seat. Refer to website at:
http://coastaletech/Acadia.htm
for installation help.
For 2008 and later H2 and all 2009-11 vehicle installations, extend
and run the GMX550 BLUE wire to the back of the vehicle and connect directly to the rear view camera connector
blue wire. Refer to website at:
http://coastaletech.com/Hummer.htm
for example install pictures.
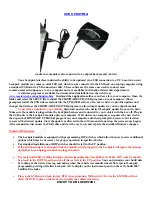
3.
OPTIONAL FACTORY CAMERA
LOCKPICK CONNECTION DETAIL
•
Unplug connector from module under
passenger seat.
•
Cut blue wire
•
Attach Lockpick Orange w/Black stripe
wire to blue wire of factory connector and
plug connector back into module
•
Crimp completed connection Cover
remaining loose end of blue wire left in
factory harness and leave disconnected
•
Anytime factory camera use is now enabled
by the GMX550
Unplug connector from camera module under passenger seat
and pull into view as shown. Cut and strip pictured blue wire as
demonstrated and attach to wire included with your Lockpick.
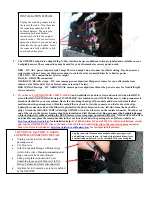
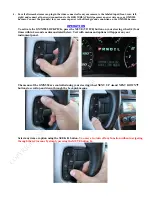
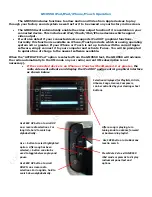
INSTALLATION DETAIL
Unplug the matching connectors on
the rear of the radio. Plug them into
the matching connectors of the
Lockpick harness. Then plug the
remaining Lockpick harness
connectors back into the original
radio locations. The connectors are
unique and keyed so you cannot plug
them into the wrong location. Insert
the connectors fully until they click
or are locked into place.


