14
Single Point Watering System (SPWS)
BATTERIES
• Do not use a longer garden hose than provided with the System (20 feet or 6 meters), as a decrease in
water pressure can overfill the batteries and damage the refill system.
2.
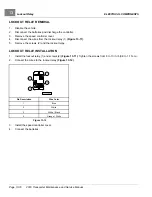
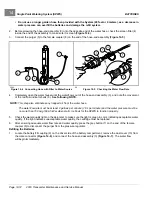
Before screwing the hose-end assembly (3) onto the opposite end of the water hose, check the screen filter (4)
inside the end of the assembly to make sure it is clean
3.
Connect the purger (5) to the female coupler (8) on the end of the hose-end assembly
1
3
5
4
2
3083
Figure 14-4
Connecting Hose with Filter to Water Source
69
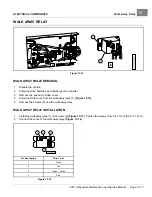
Figure 14-5
Checking the Water Flow Rate
4.
Completely open the water faucet until the water flows out of the hose-end assembly (3), and note the movement
of the red flow indicator balls (6).
See following NOTE.
NOTE:
This step also eliminates any trapped air from the water hose.
The water flow rate must be at least 2 gallons per minute (7.6 L per minute) and the water pressure must be
no more than 100 psig (689.5 kPa) when static (no flow) for the SPWS to function properly.
5.
Check the water quality light on the deionizer to make sure the light is green in color, indicating acceptable water
quality. If the light indicates unacceptable water quality, the cartridge must be replaced.
6.
After ensuring adequate water flow rate and water quality, press the grey button (7) on the end of the female
coupler (8) to disconnect the purger from the pressure regulator.
Refilling the Batteries
1.
Locate the battery fill coupling (9) on the driver side of the battery compartment, remove the dust cover (10) from
the male connector
, and connect the hose-end assembly (3)
. The water flow
will begin immediately.
Page 14-12
2019 Transporter Maintenance and Service Manual
Summary of Contents for TransPorter 4
Page 2: ......
Page 271: ...ELECTRIC MAIN HARNESS Wiring Diagrams Electric Main Harness 18 ...
Page 272: ... Page intentionally left blank ...
Page 273: ...ELECTRIC INSTRUMENT PANEL HARNESS Wiring Diagrams Electric Instrument Panel Harness 18 ...
Page 274: ... Page intentionally left blank ...
Page 275: ...ELECTRIC ACCESSORIES HARNESS Wiring Diagrams Electric Accessories Harness 18 ...
Page 276: ... Page intentionally left blank ...
Page 282: ...NOTES ...
Page 283: ...NOTES ...
Page 284: ...NOTES ...
Page 285: ......
Page 286: ......

